Building a Unified Zero Trust Perimeter with Microsoft Entra Global Secure Access and Purview DLP
This is the written companion to a live showcase we ran under Microtechx on LinkedIn not a step-by-step walkthrough but a live demonstration of the end result in action. The recording is on YouTube if you want to see it running:
Special thanks to Khalid Hussain and Sophie Gräfin von Brühl for joining the session.
1. The Problem Worth Solving
There’s a version of “Zero Trust” that exists mostly in architecture diagrams. It looks great in a slide deck and it involves a lot of arrows pointing toward an identity provider. Then there’s the version you actually have to build, and those two things are not always the same.
The traditional perimeter security model assumed that everything inside the network was trusted and everything outside wasn’t. That mental model started breaking down the moment organizations moved workloads to SaaS and gave users laptops they take home. It’s now completely obsolete. Your users are accessing Salesforce, SharePoint, ChatGPT, and Claude from coffee shops, airport lounges, and home offices. The “perimeter” isn’t a firewall in a data center rack anymore it’s a policy engine that needs to follow the user, their device, and their data everywhere those three things go.
Microsoft’s answer to this is built on two complementary pieces. Global Secure Access (the network plane) handles routing, TLS inspection, and threat intelligence at the traffic level. Purview DLP (the data plane) inspects the content of that traffic and decides what gets blocked, what gets logged, and what gets through. When they work together through a Security Profile, you get something that’s genuinely different from traditional web filtering you’re inspecting payloads in transit, not just blocking domains.
The specific problem this lab was designed to address: how do you enforce data loss prevention against modern generative AI tools without breaking those tools for legitimate use? If you FQDN-block claude.ai, you’ve solved the problem the wrong way you’ve blocked the domain entirely. If you do nothing, users can paste your entire customer database into a chat window and walk away. The real answer is somewhere in between, and getting there requires understanding exactly how these applications are structured at the HTTP level.
2. Lab Architecture Overview
Before touching any configuration, it helps to have a clear picture of what we’re building and how the data flows through it.
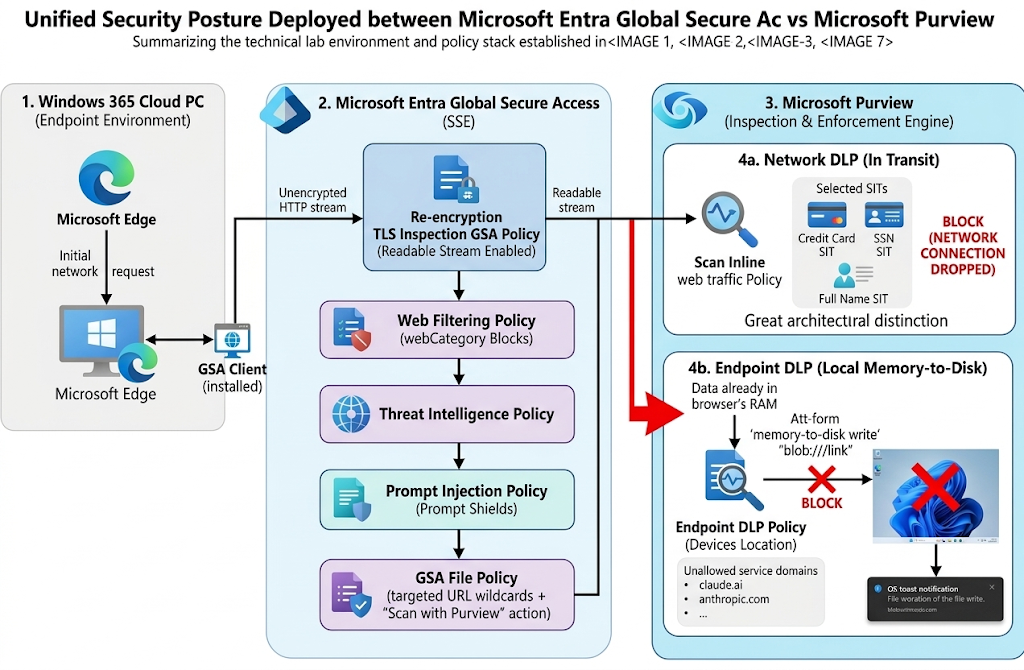
The Cloud PC is the endpoint. Every network packet from that machine goes through the GSA client, which forwards traffic to the Entra GSA service. The Security Profile named “ProfileMax” runs that traffic through its five policy layers in sequence. When a policy triggers DLP action, the payload gets handed to Purview for content inspection. The enforcement decision comes back and either the packet goes through or it doesn’t.
Two things that aren’t in this diagram but matter a lot: the TLS root CA certificate that makes HTTPS inspection possible, and the Endpoint DLP policy that catches the edge case where data never crosses the network at all (more on that later).
3. Identity and Endpoint Baseline
3.1 Accessing the Cloud PC via MyApps
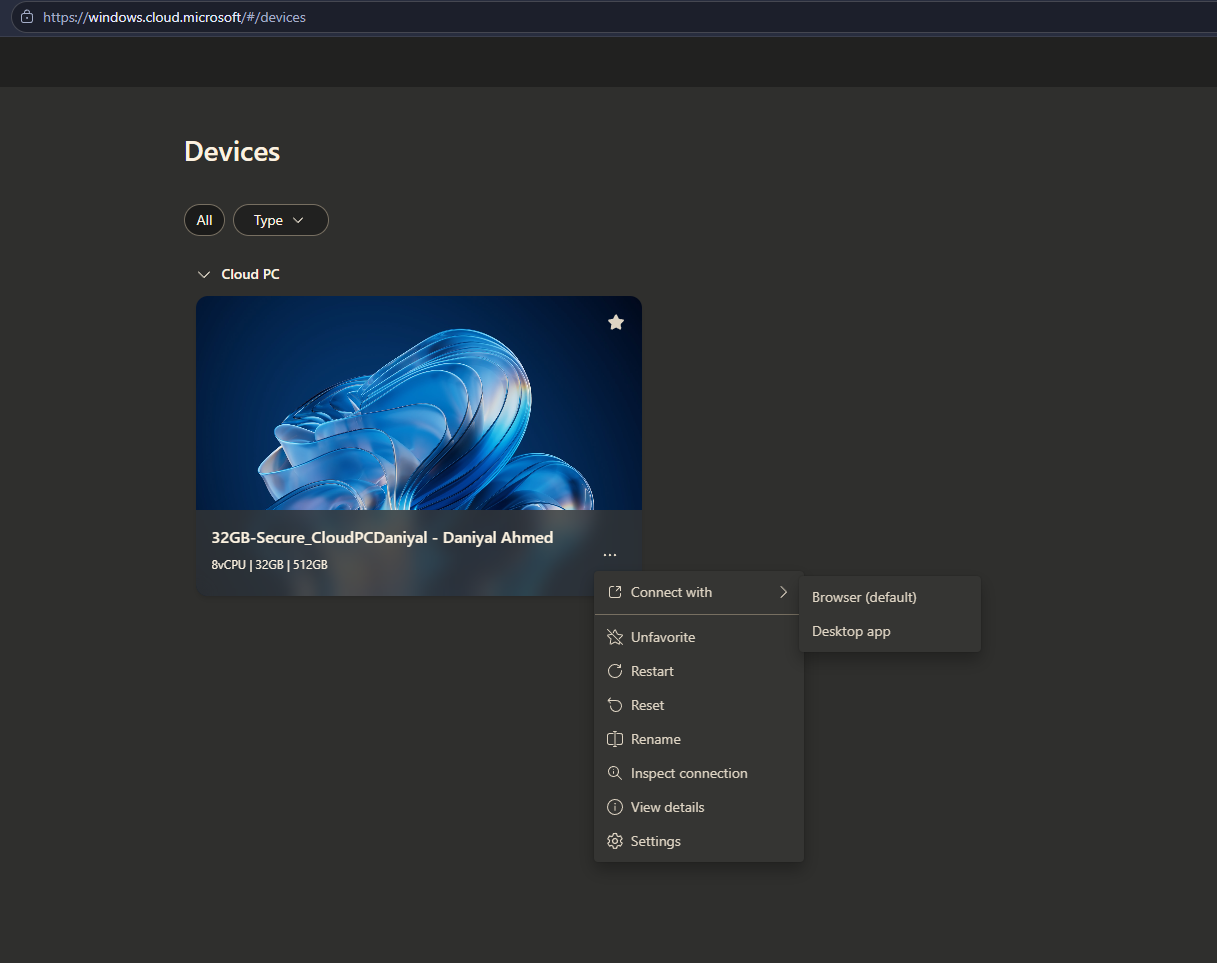
Before any security configuration makes sense, you need an endpoint to test from. The Cloud PC is accessed through the Microsoft MyApps portal at myapps.microsoft.com. Your tenant needs Windows 365 licenses provisioned and a Cloud PC assigned to your test user account.
Log in with your test identity, locate the Windows 365 tile, and launch the Cloud PC session. This gives you a managed, Entra-joined endpoint that you control completely for testing purposes.
3.2 Deploying the Global Secure Access Client
The GSA client is what establishes the tunnel between the Cloud PC and the Entra GSA service. Without it installed, none of the Security Profile policies apply traffic just goes directly to the internet as it normally would.
Download the GSA client from the Entra admin center. Navigate to Global Secure Access > Connect > Client Download and grab the Windows installer. Run it on the Cloud PC with admin rights.
After installation, the client appears in the system tray. Click it and verify it shows a connected state. You should see the user’s UPN reflected in the client status, which confirms the client authenticated against Entra ID and has an active forwarding session.
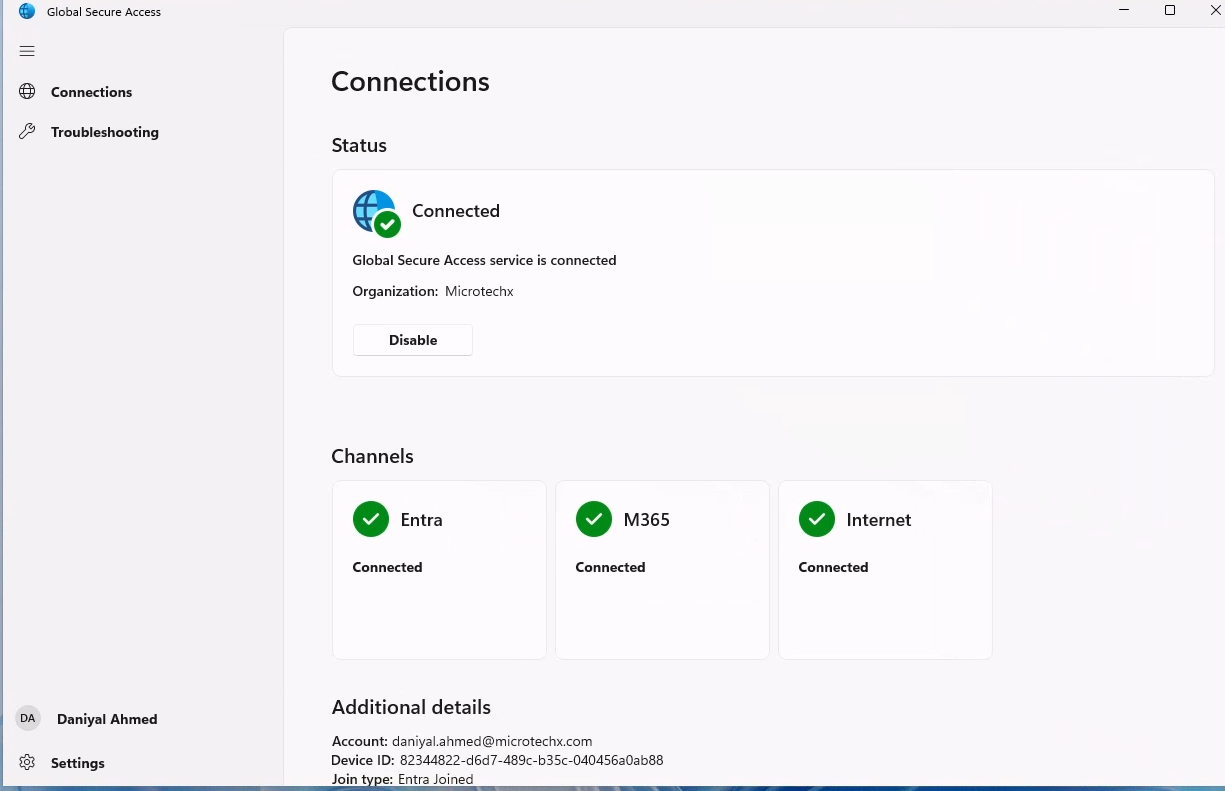
One thing worth noting: the GSA client uses a local loopback proxy mechanism to intercept outbound traffic. It’s not a traditional VPN. Traffic goes through the Entra network fabric, not a VPN tunnel you control. This is relevant later when you’re troubleshooting TLS issues because the certificate chain looks different from what you’d see with a typical corporate proxy.
4. The TLS Inspection Prerequisite
This section is where most deployments get stuck. TLS inspection is not optional if you want Purview to actually read the content of HTTPS requests and almost everything on the modern web is HTTPS. But making TLS inspection work without breaking applications takes a specific setup sequence that the documentation glosses over.
4.1 Why TLS Inspection Requires a Root CA
When a user visits https://claude.ai, their browser gets a TLS certificate signed by a trusted public CA (Let’s Encrypt, DigiCert, etc.). The browser validates that certificate against its trust store and establishes an encrypted connection. Nobody in the middle can read the payload.
For Purview DLP to inspect that payload, the GSA service needs to perform a man-in-the-middle. It terminates the TLS session from the browser, reads the content, makes an enforcement decision, then re-establishes an outbound TLS session to the real destination. The re-signed certificate the browser receives is signed by Microsoft’s inspection CA rather than the original issuer.
The browser will reject this unless you’ve imported Microsoft’s inspection root CA into the device’s certificate trust store. That part is documented. What’s not well-documented is which certificate store you import it into, and that choice breaks an entire class of applications if you get it wrong.
4.2 Generating and Downloading the Root CA Chain
In the Entra admin center, navigate to Global Secure Access > Connect > TLS Inspection and locate the CA certificate download option. Download the rootCAchain.cer file. This is the certificate chain you need to import on every managed endpoint.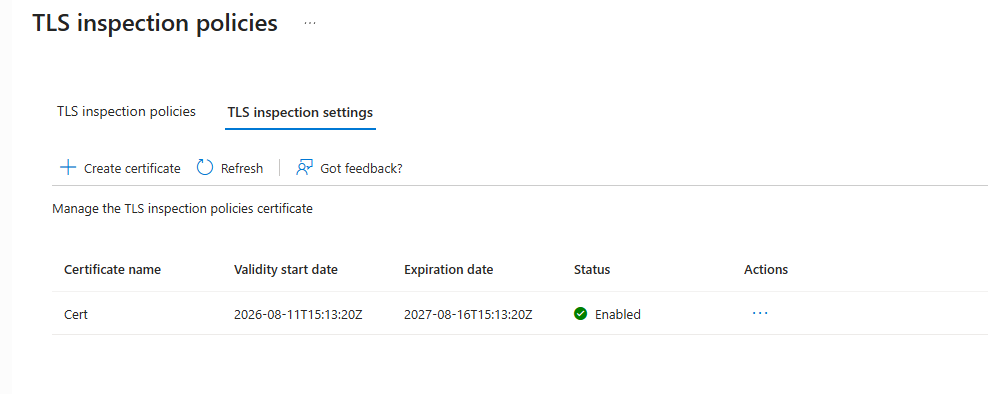
For managed device fleets, you’d push this certificate via Intune using a Trusted Certificate profile. For the lab, we’re doing it manually. Copy the .cer file to the Cloud PC.
Follow this guide for making the .CSR file usable as a certificate in the Entra Portal and the Endpoint GSA Device : Configure Transport Layer Security Inspection Settings - Global Secure Access | Microsoft Learn
4.3 The Current User vs. Local Machine Store Problem
Open the Certificate Manager on the Cloud PC and import the .cer into Trusted Root Certification Authorities. There are two ways to do this and only one of them works correctly.
The wrong way: Open certmgr.msc (Current User Certificate Manager) and import there.
Why it breaks things: Modern web applications make extensive use of background HTTP requests fetch() API calls, XHR requests, WebSocket upgrades that happen outside the context of the main browser tab. These requests are processed by background service workers, browser extension contexts, or the browser’s network stack before the UI even renders. Those background processes run under a system or service account context, not the signed-in user context. When you import the CA certificate into the Current User store, those background processes can’t see it. They hit the re-signed TLS certificate from GSA, fail to validate it, and throw net::ERR_CERT_AUTHORITY_INVALID.
The result looks like the website is broken. The main page might load (because the initial navigation request uses the user context), but chat rendering fails, file upload buttons don’t work, real-time streaming responses drop out mid-sentence. All of these failures are caused by background API calls that can’t trust the inspection CA.
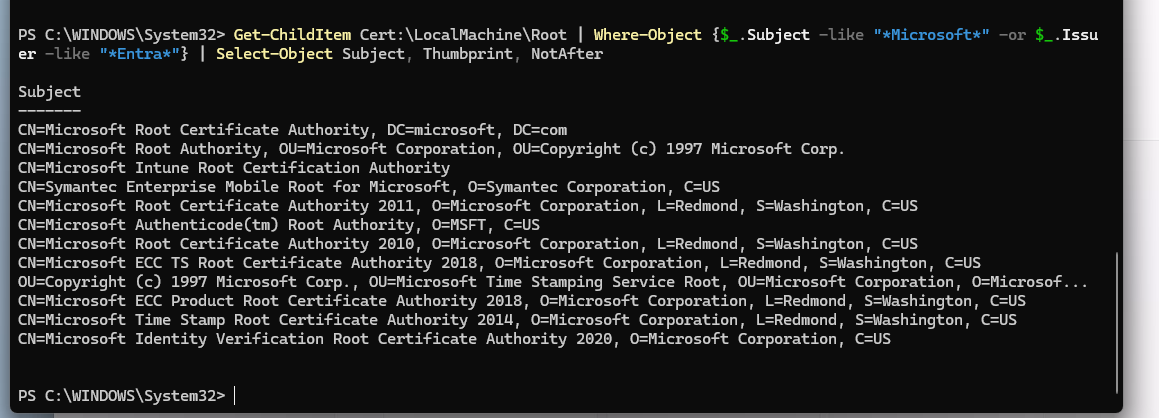
The correct way: Import into the Local Machine store using PowerShell with elevation:
# Run this in an elevated PowerShell session on the Cloud PC
Import-Certificate `
  -FilePath "C:\path\to\rootCAchain.cer" `
  -CertStoreLocation Cert:\LocalMachine\Root
The Local Machine store is visible to all processes on the system regardless of which account they run under. Every background service, every browser worker process, every system-level network operation will trust the inspection CA. The net::ERR_CERT_AUTHORITY_INVALID error goes away and all application functionality comes back.
Verify the import succeeded:
# Confirm the certificate landed in the right place
Get-ChildItem Cert:\LocalMachine\Root |
  Where-Object { $_.Subject -like "*Microsoft*" -or $_.Issuer -like "*Entra*" } |
  Select-Object Subject, Thumbprint, NotAfter
5. Building the Security Profile: ProfileMax
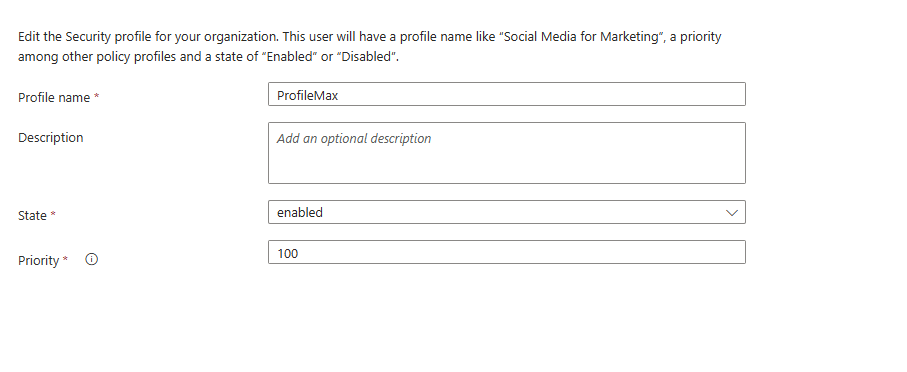
The Security Profile is the object that ties everything together. Think of it as a named policy bundle you create policies independently and then attach them to a profile. The profile then gets assigned to specific users, groups, or device contexts through a Conditional Access policy.
In the Entra admin center, navigate to Global Secure Access > Secure > Security Profiles and create a new profile. Name it ProfileMax. The name is just a label, but keeping it descriptive helps when you have multiple profiles for different user populations (e.g., a stricter profile for your SOC analysts, a lighter one for executives who complain about everything being blocked).
5.1 Web Filtering Policy: Category-Based URL Blocking
Create the first linked policy. Navigate to the Web Filtering section and create a policy named Web Filtering GSA. This policy handles broad category-based blocking the kind of filtering you’d do for acceptable use policy enforcement.
Category-based filtering works by matching the destination URL against Microsoft’s URL categorization database. The categories you enable here block entire topic areas rather than individual domains, which is both the strength and the limitation of this approach. It’s fast and low-maintenance, but it’s coarse. Fine-grained controls for specific applications need to be handled in the other policies.
Configure the following categories as Blocked:
- Gambling covers online casinos, sports betting platforms, lottery sites
- Sports covers sports news and streaming sites (adjust this based on your acceptable use policy; some organizations are fine with sports news but not streaming)
- Criminal Activity covers content related to illegal activities, hacking tutorials aimed at script kiddies, and similar categories
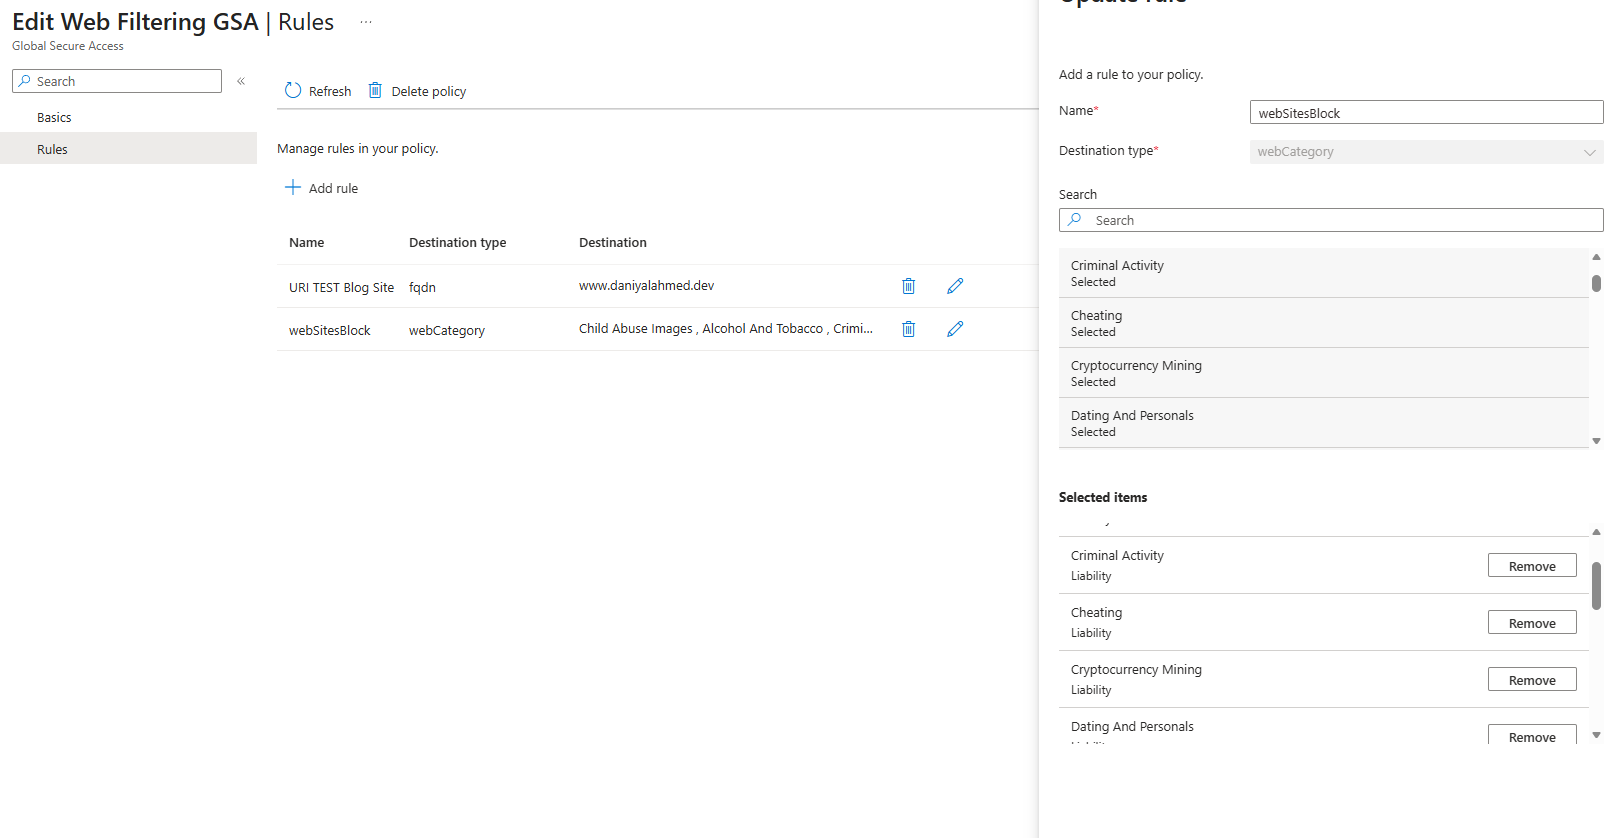
For each blocked category, the underlying policy engine uses the webCategory attribute in the policy rule. This maps to Microsoft’s URL intelligence feed, which is updated continuously. You’re not maintaining a domain blocklist you’re subscribing to a classification service.
5.2 TLS Inspection Policy
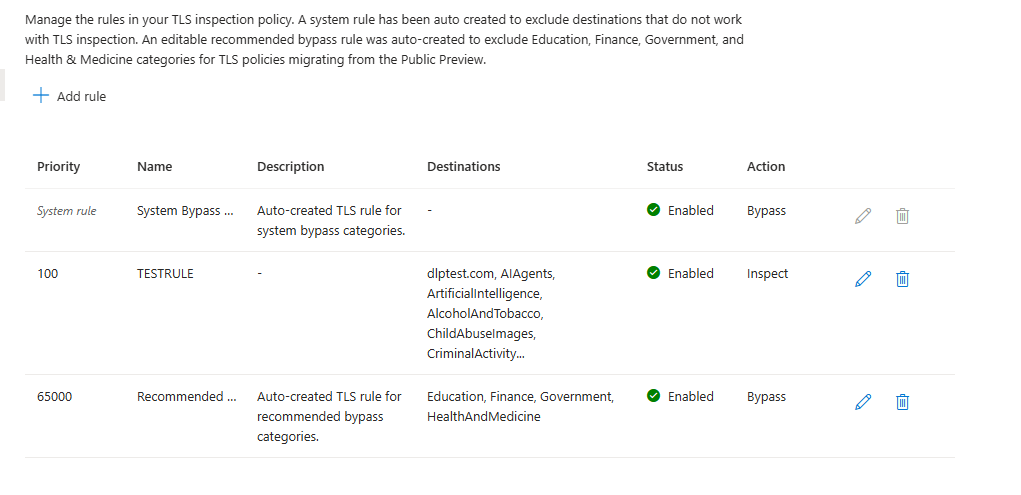
Create a policy named TLS GSA Policy. This is the policy that enables decryption of HTTPS traffic for deep inspection. Without this, every other content-aware policy (Purview DLP, Prompt Injection, File policy) is blind to anything in an HTTPS payload.
Enable TLS inspection globally within the policy and set the mode to active inspection (not just certificate validation). The scope should include all HTTPS traffic unless you have specific exclusions some organizations carve out financial services or healthcare sites for privacy reasons.
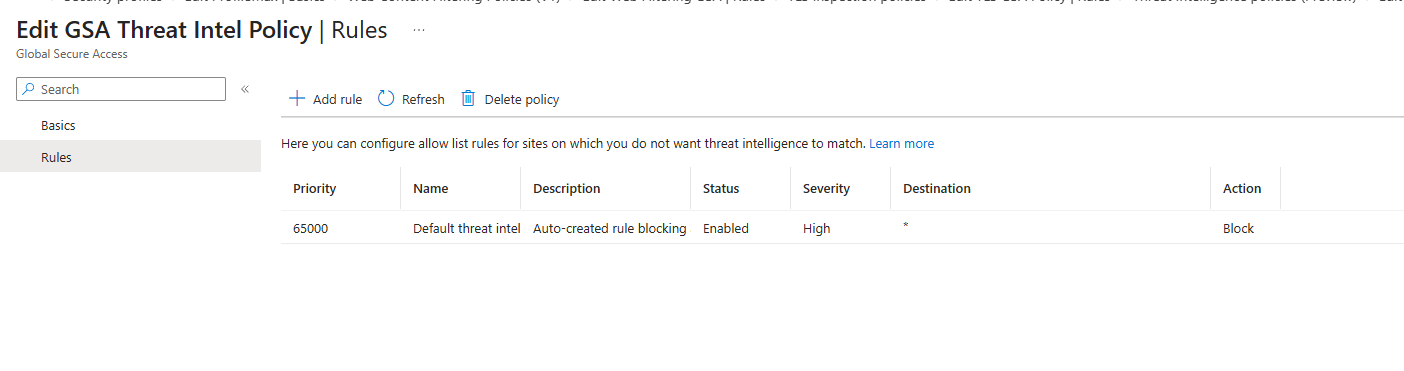
5.3 Threat Intelligence Policy
Create a policy named GSA Threat Intel Policy. This policy connects the GSA traffic flow to Microsoft’s threat intelligence feeds the same feeds that power Defender for Endpoint and Microsoft Sentinel. Any destination flagged as a known bad actor (C2 server, phishing domain, malware distribution point) gets blocked at the network level before TLS inspection even runs.
This is real-time prevention, not a signature-based blocklist that gets updated weekly. The feeds are continuously updated from Microsoft’s global threat telemetry, which means a newly registered phishing domain can be blocked within hours of being identified rather than days.
5.4 Prompt Injection Protection Policy
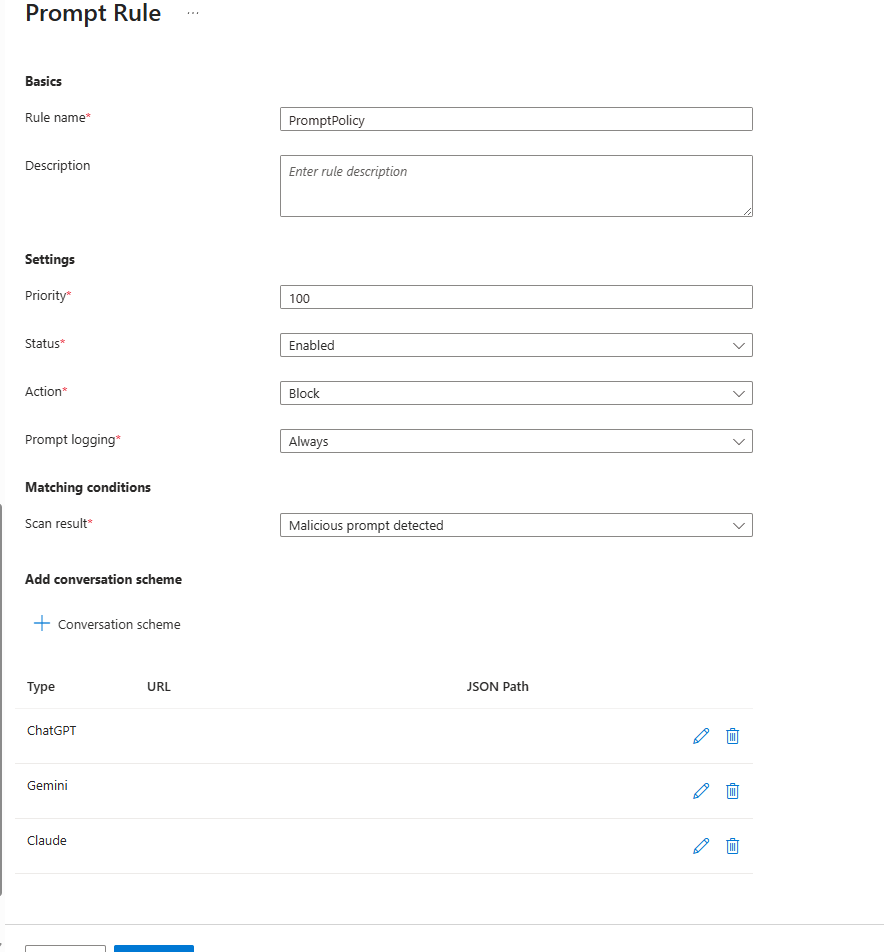
Create a policy named promptPolicy. This is one of the newer additions to the GSA policy set and it’s specifically designed for the AI threat landscape.
Prompt injection attacks against LLMs fall into a few categories: jailbreaks (trying to bypass the model’s safety guidelines), system prompt extraction (trying to get the model to reveal its instructions), indirect injection (embedding malicious instructions in data the model processes), and adversarial inputs designed to manipulate model behavior in ways the attacker controls. Microsoft’s Prompt Shields technology runs inline on traffic going to AI endpoints and identifies these patterns in the request payload.
This matters because your DLP policy protects your data from leaving the organization. Prompt Shields protects the AI system itself from being weaponized against you or the provider. They solve different problems and both need to be active.
5.5 File Policy: Scoping HTTP Activities and Precision Routing
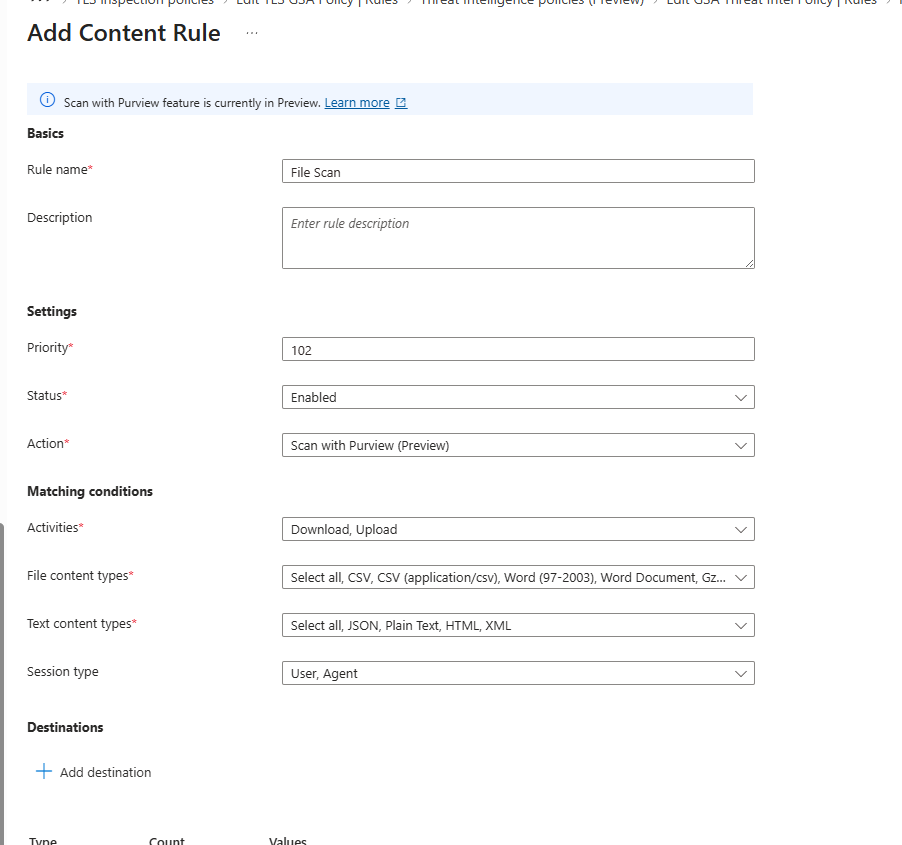
Create a policy named GSA File policy. This policy does two things: it scopes which HTTP activities the other policies apply to, and it defines the routing rules for specific file content types.
The scoping aspect is important. Without it, the DLP and content inspection policies could potentially apply to every byte of traffic, which creates latency and noise. You want to scope content inspection to HTTP POST and PUT requests with specific content type headers (multipart/form-data, application/octet-stream, application/json over a certain size threshold) rather than applying it to every GET request for a CSS file.
6. Precision API Routing: Why FQDN Blocks Break AI Applications
This section covers the most technically nuanced part of the entire deployment. Getting this wrong either breaks legitimate user workflows or leaves a gap that makes your DLP policy meaningless. Understanding what’s happening at the HTTP level is the only way to get it right.
6.1 The Problem with Blocking claude.ai
If you create a simple FQDN block on claude.ai in your Web Filtering policy, here’s what happens: the domain is blocked entirely. Users get a block page. Problem solved, right?
Not quite. The legitimate business requirement usually isn’t “ban Claude forever” — it’s “prevent users from uploading sensitive documents to Claude.” Blocking the domain entirely means employees who use Claude for legitimate purposes (drafting communications, summarizing public research, writing code) lose access completely. That’s a policy failure, not a security win.
The technically correct approach is to block only the specific HTTP endpoint used for file uploads while leaving all other functionality intact. To do this, you need to understand how the application actually works.
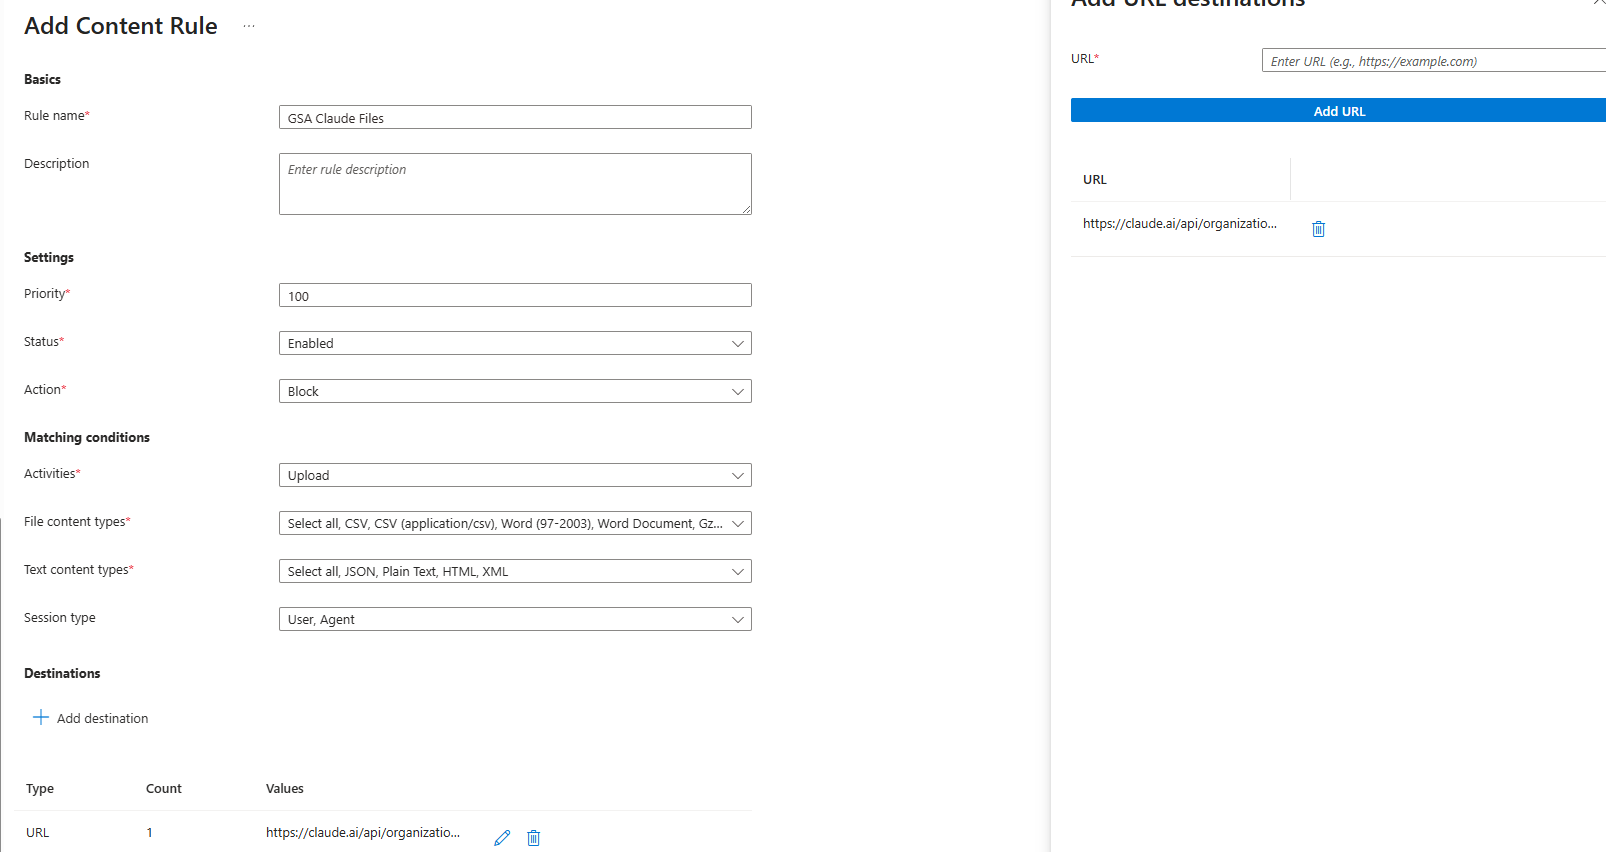
6.2 Claude.ai: Targeting the Upload Endpoint
Claude uses a specific API endpoint for file uploads that is separate from the main conversational API. The URL pattern follows this structure: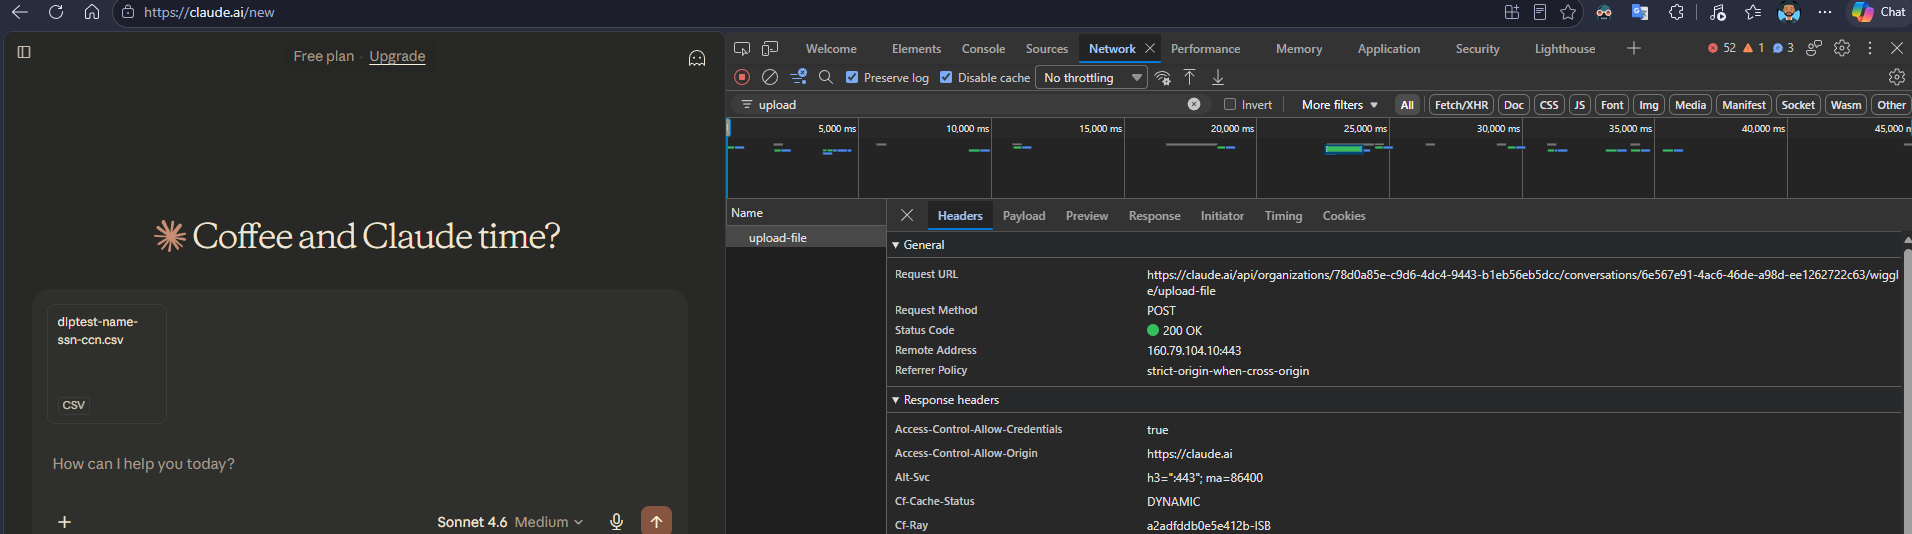
https://claude.ai/api/organizations/{org_id}/conversations/{conversation_id}/wiggle/upload-file
The {org_id} and {conversation_id} segments are dynamic UUIDs that change per user and per conversation. You can’t target a static URL. What you can do is use a wildcard pattern:
https://claude.ai/api/organizations/*/conversations/*/wiggle/upload-file
In the GSA File policy, create a rule targeting this pattern with:
- HTTP Method: POST (file uploads are always POST; GET requests to similar paths are for metadata retrieval, not content upload)
- Action: Scan with Purview (preview)
The wildcard * segments match any UUID value, so the rule applies regardless of which user or conversation is involved. The POST method constraint ensures you’re only catching actual uploads, not navigation requests to similar paths.
6.3 Gemini: Two Different Upload Mechanisms
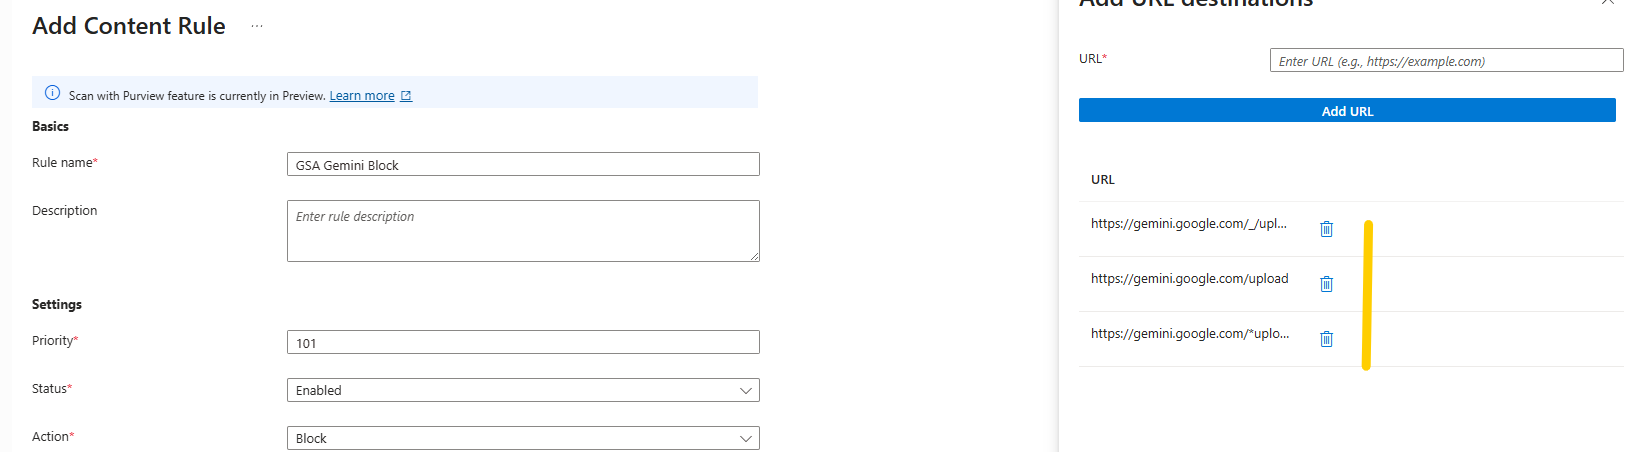
Google Gemini has a more complex upload architecture because Google built it on top of their existing Scotty upload protocol infrastructure. You’re dealing with two separate endpoint patterns that serve different purposes.
Standard text prompts go through the batchexecute endpoint:
https://gemini.google.com/_/BardChatUi/data/batchexecute
This is a generic Google RPC endpoint that Gemini uses for sending prompts and receiving responses. Blocking this would block text chat entirely, which may or may not be your intent.
File uploads go through Google’s Scotty protocol:
https://gemini.google.com/upload/*
And there’s a secondary pattern for resumable uploads that uses an *upload* wildcard:
https://gemini.google.com/api/*upload*
For a DLP policy focused on preventing data exfiltration via file uploads, target both patterns with HTTP Method POST:
| Destination Pattern | HTTP Method | Rationale |
|---|---|---|
https://gemini.google.com/upload/* | POST | Primary Scotty upload endpoint |
https://gemini.google.com/*upload* | POST | Catches resumable and chunked upload variants |
https://gemini.google.com/_/BardChatUi/data/batchexecute | POST | Text prompt channel (block if blocking all input) |
7. Network DLP vs. Endpoint DLP: The Blob URL Problem
This is the section that trips up most DLP deployments. You test your Network DLP policy, the obvious scenarios work, you declare victory, and then someone figures out the blob URL bypass three months later.
7.1 Testing Against DLP Test Sites
Before getting into the edge cases, let’s establish what Network DLP does handle correctly. The test sites dlptest.com, dlptest.io, and dlptest.ai provide publicly available test data sets containing fake credit card numbers, SSNs, and personal information in formats that trigger DLP rules.
Use these to validate baseline policy functionality. Upload a test file containing synthetic SSNs to one of these sites. With the Purview DLP policy active (scoped to Inline web traffic, with the U.S. Social Security Number SIT enabled and Action set to Block), the upload should fail with a policy violation notification.
7.2 The S3 Bucket Redirect Problem
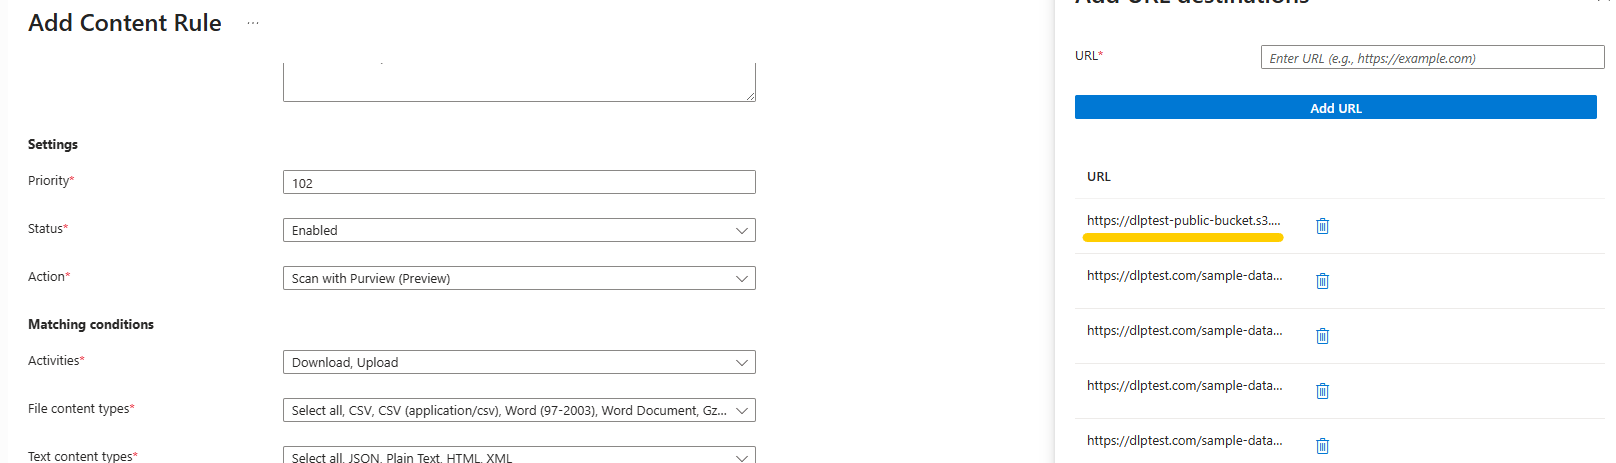
Here’s a scenario that catches people off guard. Some DLP test sites (and many real-world applications) use AWS S3 as the actual storage backend. The user’s browser POSTs the file to the application’s domain, but the application server returns a 302 redirect pointing to an S3 presigned URL like:
https://your-bucket.s3.amazonaws.com/uploads/file.pdf?X-Amz-Signature=...
The browser follows the redirect. The actual file transfer happens directly from the user’s browser to S3, bypassing whatever policy you’ve configured for the application’s domain.
If your GSA destinations don’t include *.amazonaws.com (or at minimum s3.amazonaws.com), the download or upload to S3 goes through as unmanaged traffic. The solution is to add the S3 domain to your GSA internet access destinations so that traffic to AWS is also routed through the inspection pipeline:
*.amazonaws.com
7.3 The Blob URL Architecture and Why Network DLP Cannot Catch It
Now for the hard one.
When you download a file through a modern web application, the actual download often doesn’t work the way you’d expect from a network perspective. Many applications use the following pattern:
- JavaScript makes a
fetch()request to retrieve the file content - The response body (binary data) is loaded entirely into browser memory
- JavaScript creates a
Blobobject from that binary data - JavaScript creates an object URL for that blob:
blob:https://app.example.com/abc123-def456 - JavaScript programmatically clicks a synthetic
<a>element withhrefset to the blob URL - The browser “downloads” the file by writing from its own memory to disk
From the network perspective, step 1 is the only event that generates a network packet. By the time the user sees a file save dialog and saves the document, no packets cross the wire. The file write from browser memory to disk is entirely a local I/O operation. Network DLP which inspects packets has nothing to inspect.
This is not a bug or an oversight. It’s the expected behavior of the browser’s Blob API. But it means that any DLP policy scoped to network traffic will not catch the final save operation.
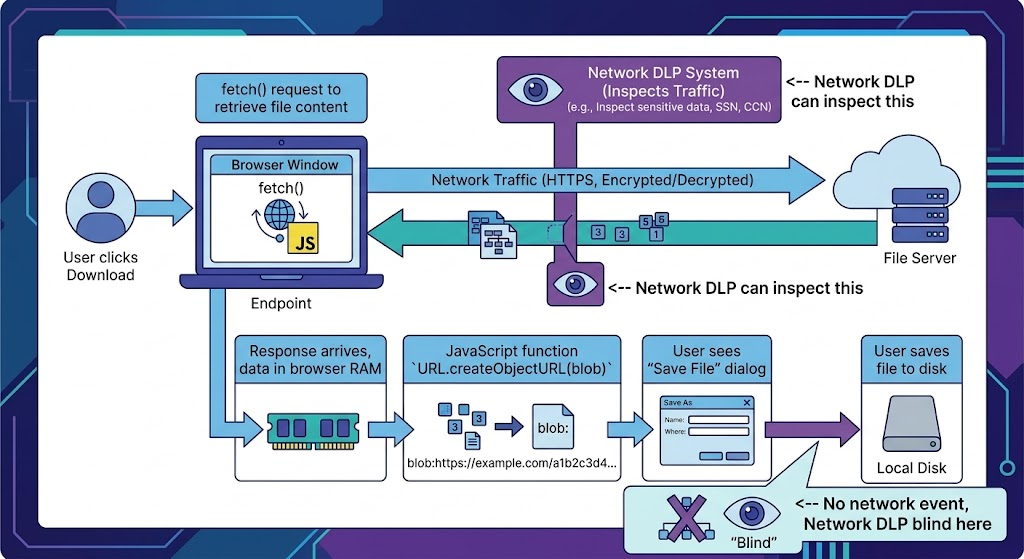
fetch() request that retrieves the content. If your Purview DLP policy catches that request (because the response contains sensitive data matching a SIT), it can block the operation before the data reaches the browser. This works when the file is being retrieved from a domain that’s in your GSA destinations list and the SIT matches on the response content.
The gap is when the fetch succeeds but the DLP policy misses it (wrong SIT configuration, response not fully buffered for inspection, etc.). At that point the data is in RAM and the disk write is invisible to Network DLP.
7.4 Closing the Gap with Endpoint DLP
The layer that catches blob URL saves to disk is Purview Endpoint DLP. Unlike Network DLP which operates on the network plane, Endpoint DLP has a sensor installed at the operating system level (part of the Microsoft Defender for Endpoint agent) that watches file system operations.
Configure an Endpoint DLP policy scoped to Devices with the following key settings:
- Monitored activity: File created from browser
- Sensitive information: Same SITs as your Network DLP policy (or a targeted subset)
- Unallowed service domains: List the AI platforms and other high-risk upload targets
- Action: Block (or Audit first if you’re running in pilot mode)
The combination of the two layers provides full coverage:
| Scenario | Network DLP | Endpoint DLP |
|---|---|---|
| User uploads file via standard POST form | ✅ Catches this | Not needed |
| User uploads file via presigned S3 URL | ✅ If *.amazonaws.com in destinations | Not needed |
| User downloads file, browser creates blob: URL, saves to disk | ❌ Misses the disk write | ✅ Catches the disk write |
| User copies text from a web app and pastes into a local file | ❌ No network event | ✅ If file write triggers a SIT match |
| User screenshots sensitive screen content | ❌ No network event | ⚠️ Depends on screenshot detection config |
8. Microsoft Purview DLP Configuration
Now let’s walk through the actual Purview DLP policy setup. Navigate to the Microsoft Purview compliance portal at compliance.microsoft.com and go to Data Loss Prevention > Policies.
8.1 Inline Web Traffic DLP Policy
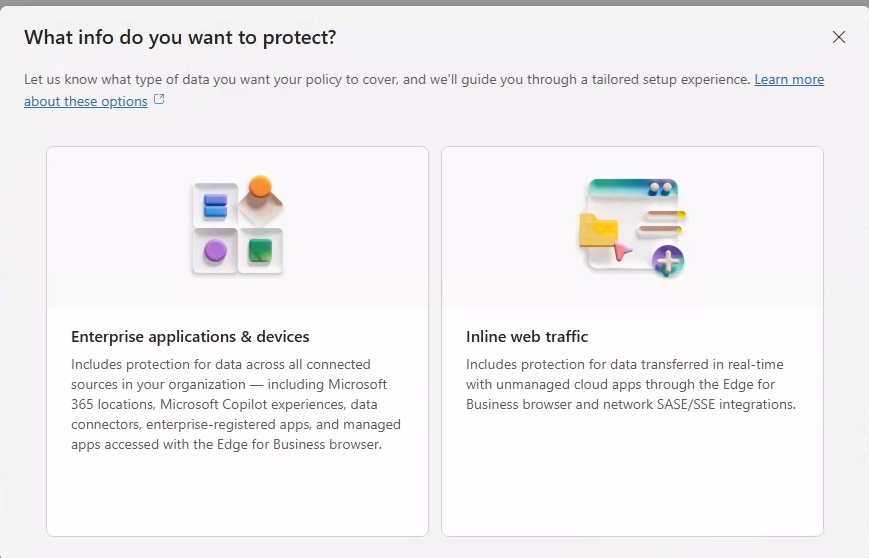
Create a new custom DLP policy. When prompted for locations, select only Inline web traffic. This is different from “Internet browsers” or “Endpoint” Inline web traffic specifically scopes the policy to traffic flowing through the GSA inspection pipeline. If you select multiple locations at once, the policy logic gets more complex and you can introduce conflicts.
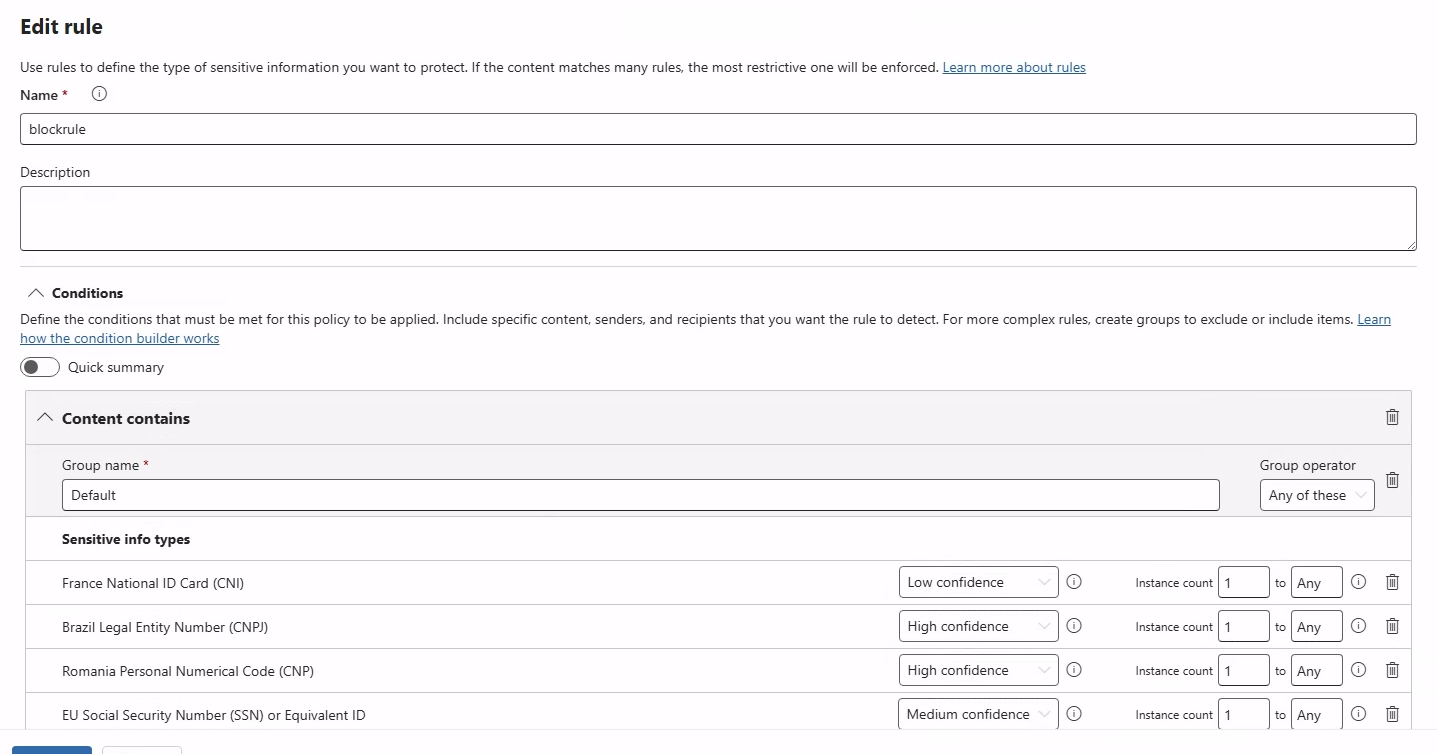
8.2 Sensitive Information Types
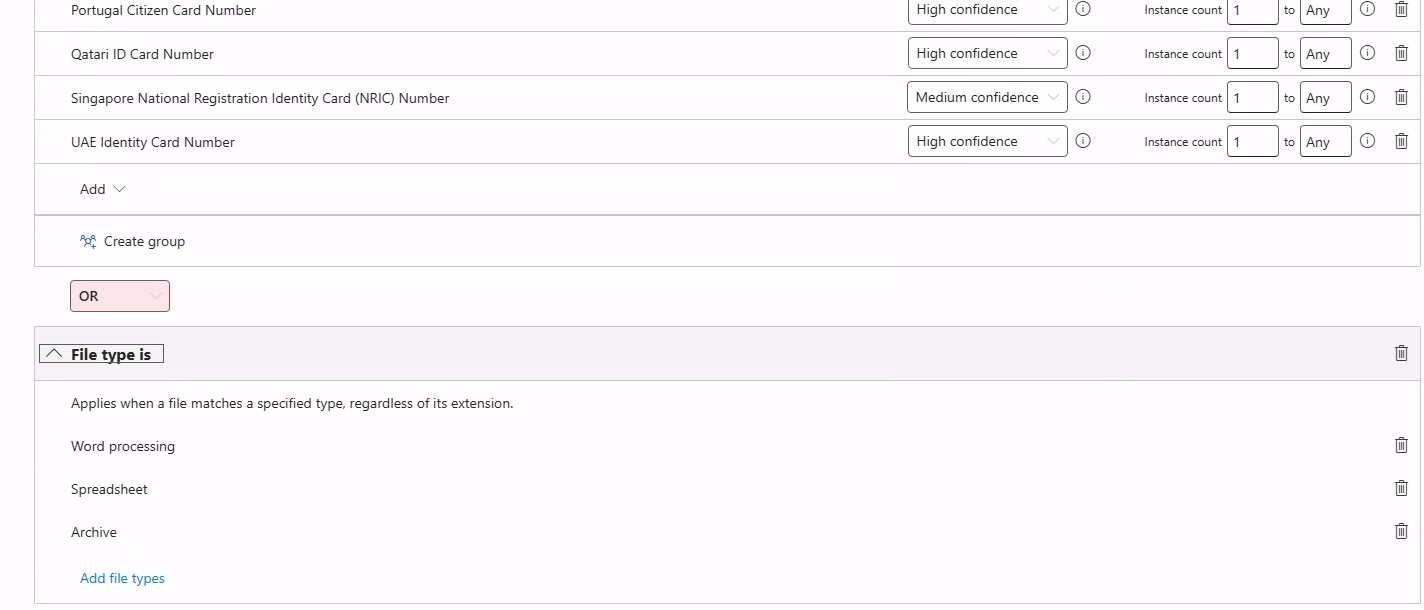
In the rule configuration, add the following Sensitive Information Types:
- Credit Card Number (high confidence, 1 or more instances)
- U.S. Social Security Number (SSN) (high confidence, 1 or more instances)
- Full Name (use with caution this SIT has a high false positive rate on its own; consider requiring it in combination with another SIT)
For each SIT, set the confidence level to High. Medium and Low confidence increase detection coverage but also increase false positives significantly. Start with High confidence and adjust based on what the Activity Explorer shows you after a week of Audit mode.
8.3 The 125 SIT Limit
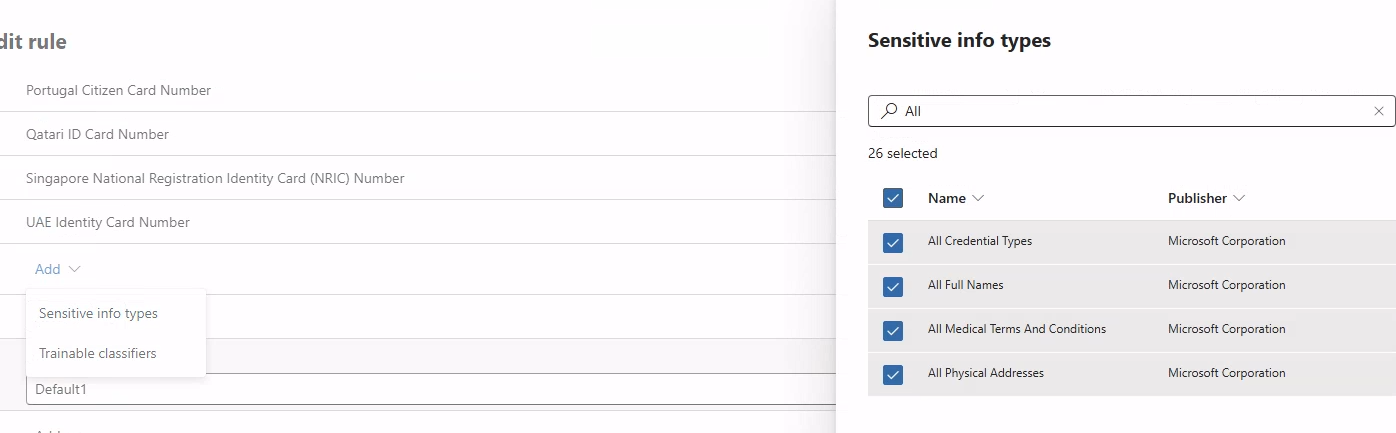
If you’ve explored the Purview SIT library, you’ve probably noticed there are over 300 built-in SITs available across different countries and categories. A natural instinct is to add as many as possible to maximize coverage. Purview stops you at 125 SITs per rule, and it’s worth understanding why rather than treating it as an arbitrary constraint.
Each SIT is evaluated by running one or more regular expressions, keyword proximity checks, and in many cases checksum validation algorithms against the content being inspected. Credit Card Number alone involves running Luhn algorithm validation against every 16-digit sequence in the document. SSN involves multiple regex patterns plus exclusion lists. When you stack these evaluations on live network traffic, latency compounds.
With 125 SITs active on a single rule, you’re potentially running hundreds of regex and validation operations against every inspected packet payload. Beyond 125, Microsoft’s testing showed that packet delivery latency crossed thresholds that would make the inspection pipeline noticeably impact user experience. There’s also a 100KB storage boundary on rule XML a policy with 300+ SIT configurations exceeds this limit.
The correct engineering response to this constraint is modular policy design:
| Policy Module | Target SIT Categories | Priority |
|---|---|---|
| Financial Data Policy | Credit Card, Bank Account, Routing Number | High |
| PII Policy | SSN, Passport, Driver License, Full Name + DOB | High |
| Health Data Policy | Medical Record Numbers, DEA Numbers, NPI | Medium |
| IP and Trade Secrets Policy | Custom SITs for internal naming conventions | Medium |
Each module is a separate DLP policy with focused SIT coverage. This also reduces alert fatigue a financial data violation and a health data violation are distinct events with different incident response paths, and having them as separate policies means they appear as separate alerts with appropriate metadata.
8.4 Action Configuration
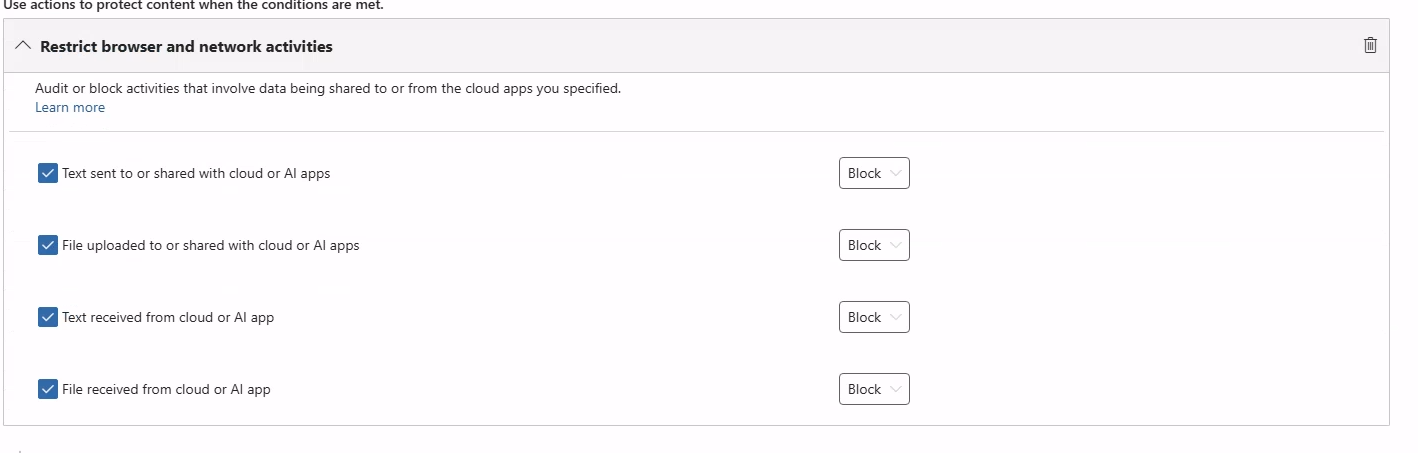
Set the action for the rule to Block. Do not start with Block if this is your first deployment start with Audit for at least one week. Audit mode logs all policy matches to the Activity Explorer without preventing the action. Review those logs carefully to identify false positives before enabling blocking.
Once you’re satisfied with the SIT match quality, flip to Block. When a user attempts to upload a file that matches the policy, they receive a block notification. Consider enabling the Policy Tip that explains why the action was blocked and optionally allows them to provide a business justification for override this reduces helpdesk tickets from frustrated users who don’t understand why their upload failed.
9. DSPM for AI: Capturing and Governing AI Interactions
Data Security Posture Management for AI (DSPM for AI) extends the DLP framework into AI-specific territory. Where standard DLP focuses on preventing data from leaving the organization, DSPM for AI also captures what’s being sent to and received from AI systems so you have visibility into the nature of AI usage across the organization.
9.1 Collection Policies
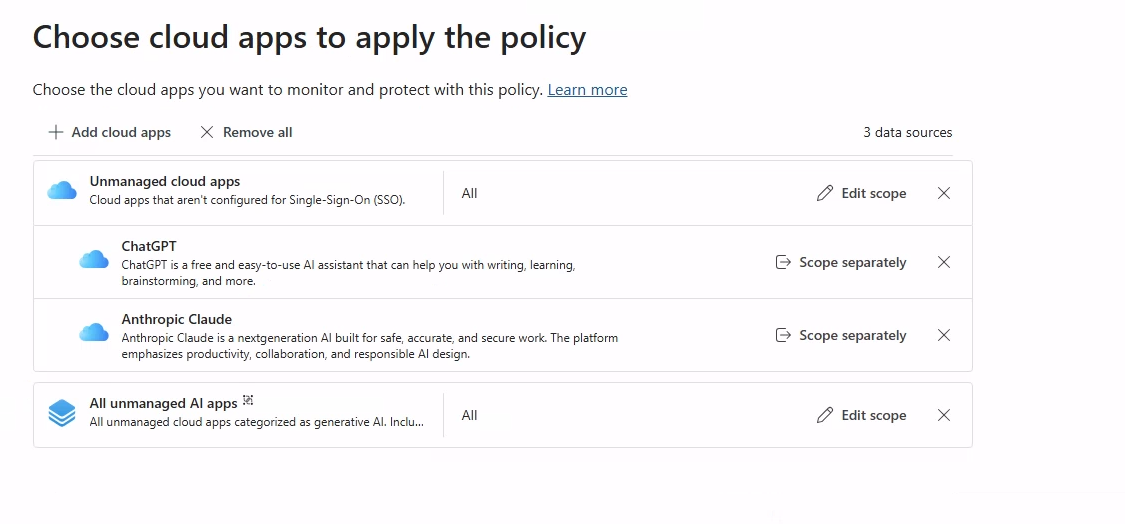
Navigate to Microsoft Purview > DSPM for AI and open the Collection Policies section. Microsoft auto-generates collection policies for common AI platforms (Microsoft Copilot, Teams Copilot, and Microsoft 365 Copilot) but the policy for third-party AI tools needs configuration.
For enterprise AI apps and general-purpose AI tools, look for the collection policy toggle labeled Content capture for AI interactions. Enable this. When active, this policy captures both the user’s input (the prompt) and the AI’s response and stores them as records subject to your Purview retention and data classification policies.
9.2 The Azure PAYG Billing Model
Content capture for AI interactions has a cost. The captured interactions are stored in Azure and billed on a pay-as-you-go basis per interaction captured. The per-unit cost is relatively low but scales with AI usage volume in organizations where AI adoption is high, the capture costs can add up quickly.
Before enabling this broadly, estimate your expected volume. You can set the collection policy to capture a representative sample rather than 100% of interactions, which reduces cost while still providing statistical visibility into AI usage patterns.
Make sure your Azure subscription is linked and billing is configured before enabling. Purview will prompt you to connect a PAYG-enabled subscription during setup.

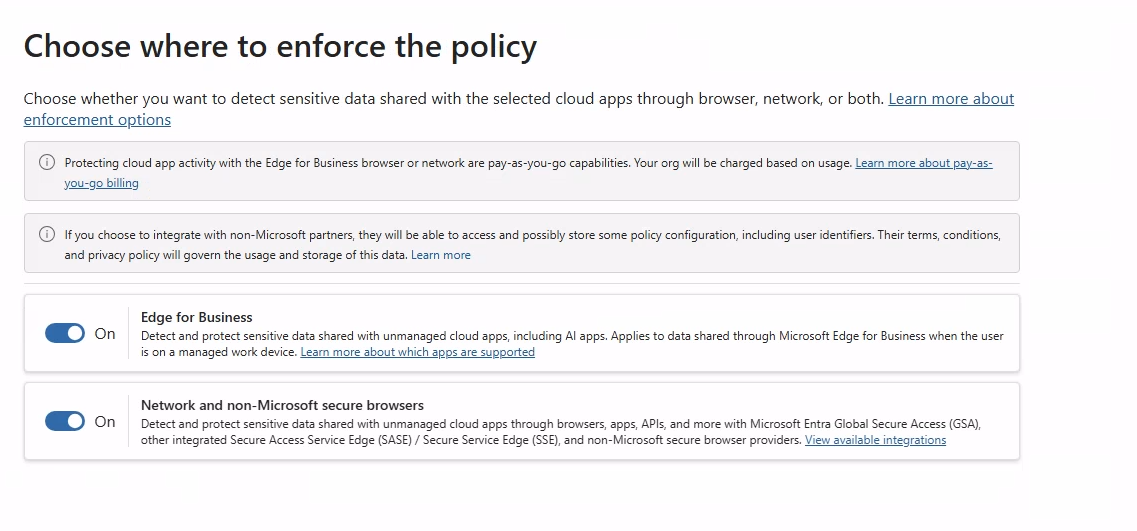
9.3 Enforcement Planes: Edge for Business vs. GSA Network Enforcement
Purview DLP can enforce through two different planes, and this distinction is important for understanding what gets covered and what doesn’t.
Edge for Business enforcement runs inside the Microsoft Edge browser through a built-in extension. The browser knows about DLP policies, can inspect content before it’s submitted, and can show native block dialogs with policy tip messages. This provides the best user experience but requires users to be using Edge Chrome, Firefox, and other browsers don’t participate in this enforcement layer.
Network and non-Microsoft secure browsers enforcement runs at the network level through the GSA proxy. This catches traffic from any browser because it operates on the packet stream rather than inside a specific browser. The coverage is broader but the inspection depth is slightly less granular than browser-level enforcement (the network layer sees the HTTP payload but not DOM-level content that’s assembled client-side).
Both should be enabled simultaneously:
| Enforcement Plane | Browser Coverage | Inspection Depth | User Experience |
|---|---|---|---|
| Edge for Business | Microsoft Edge only | Deep (DOM-aware, pre-submit) | Native block dialogs, policy tips |
| Network / non-Microsoft browsers | All browsers via GSA proxy | Network payload (HTTP body) | GSA block page, policy reference code |
| Both enabled | All browsers | Maximum coverage | Edge users get native UX, others get proxy block page |
10. Linking Policies to the Security Profile
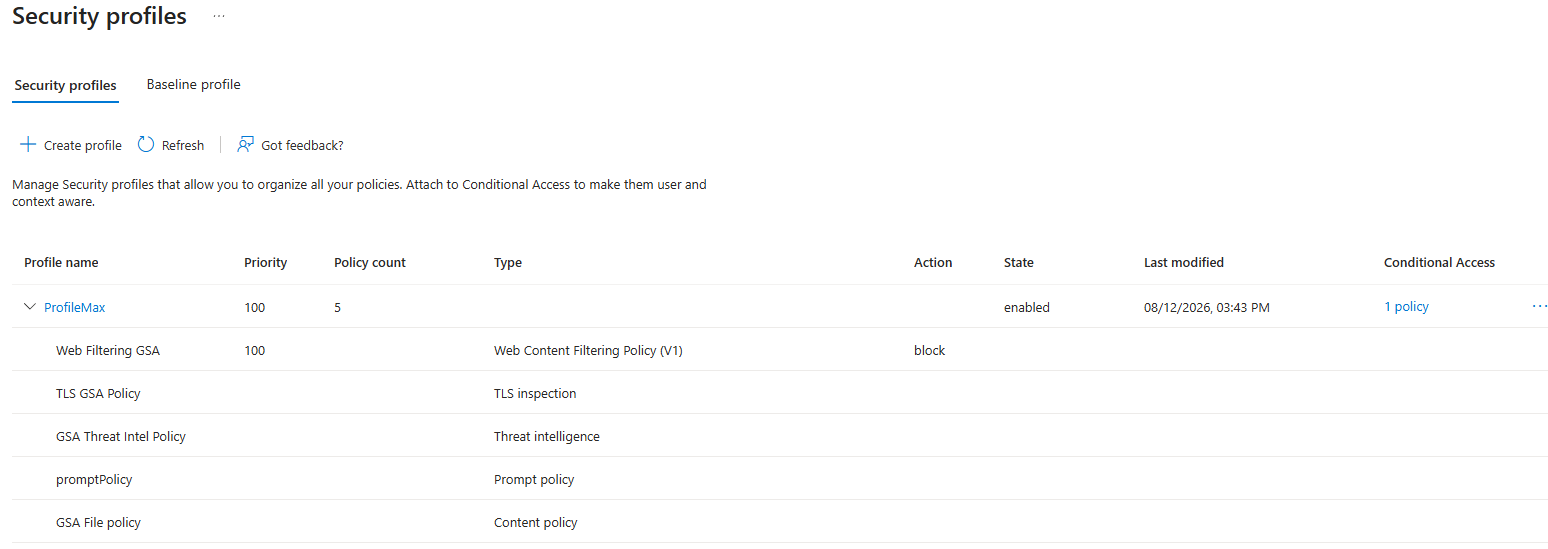
With all five policies created and the Purview DLP configuration in place, the final step is linking everything to the ProfileMax Security Profile and activating it through a Conditional Access policy.
Go back to Global Secure Access > Secure > Security Profiles and open ProfileMax. Add each of the five policies as linked policies:
Web Filtering GSAPriority 1TLS GSA PolicyPriority 2GSA Threat Intel PolicyPriority 3promptPolicyPriority 4GSA File policyPriority 5
Priority ordering matters when policies could conflict. The Web Filtering policy runs first so broad category blocks happen before TLS inspection resources are spent on blocked destinations. TLS inspection runs second so all subsequent content-aware policies have decrypted payloads to work with.
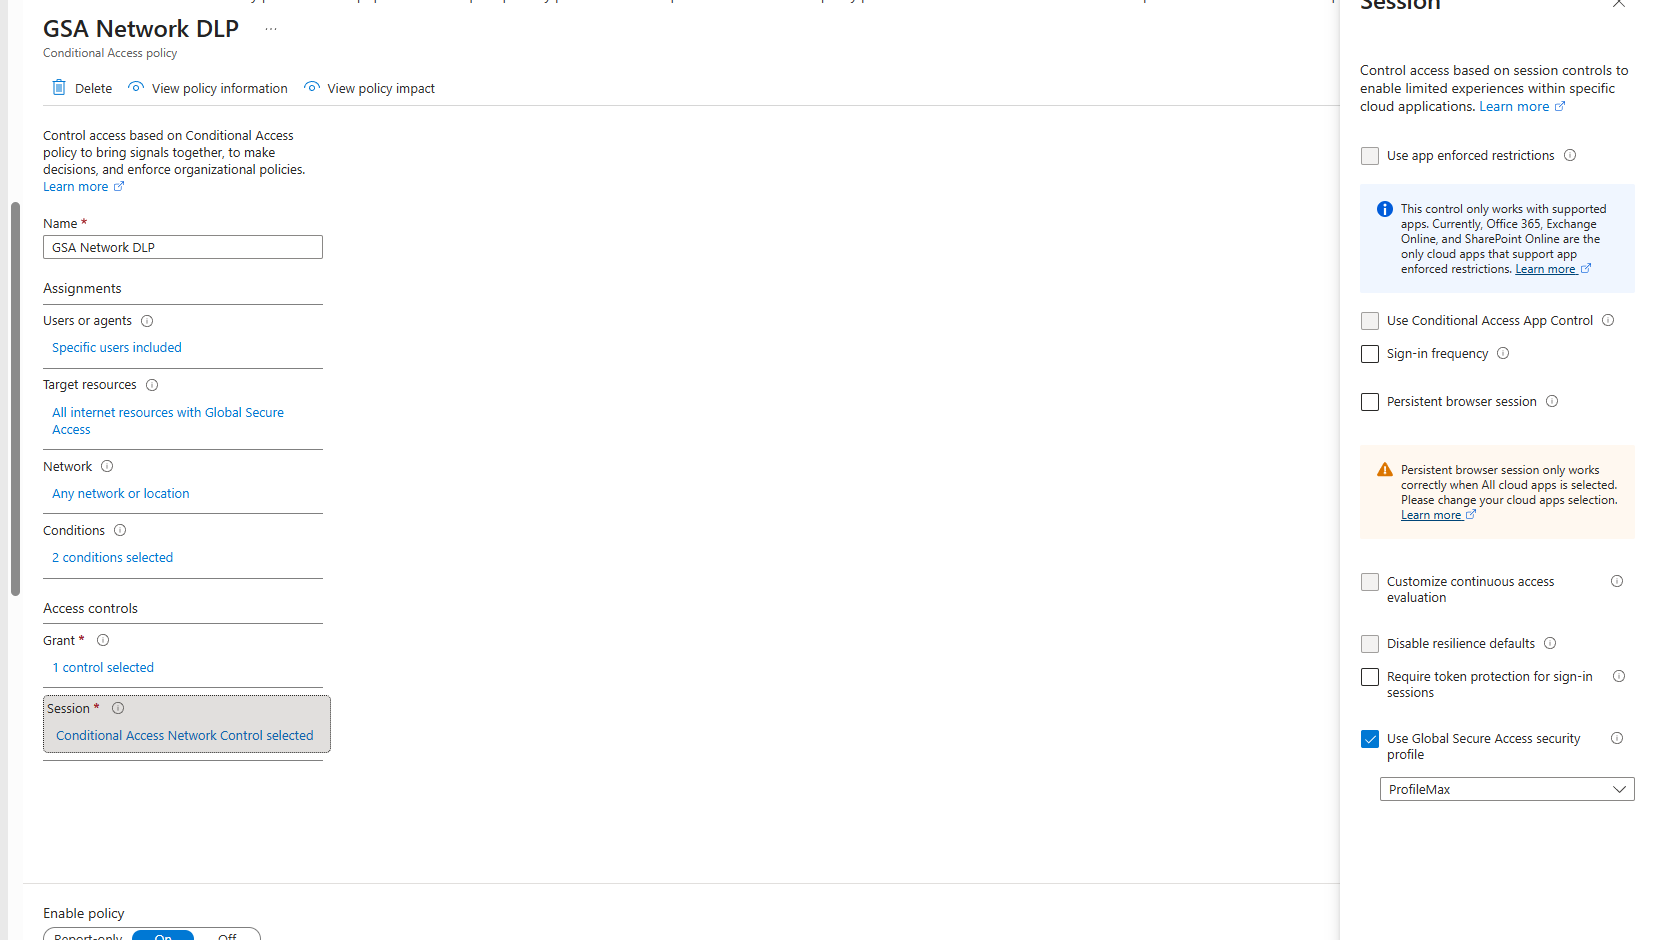
10.1 Conditional Access Assignment
The Security Profile becomes active for specific users through a Conditional Access policy. Navigate to Entra ID > Security > Conditional Access and create a new policy.
Set the assignment to your target user group (or your test user for validation). Under Session, select Use Global Secure Access security profile and choose ProfileMax.
Set the policy to Report-only mode first. This mode logs what would have happened if the policy were active without actually enforcing it. Review the Sign-in logs to confirm the policy matches your target users correctly and isn’t accidentally catching service accounts or guest users. Then switch to On to activate enforcement.
11. Validation and Testing
11.1 End-to-End DLP Test
With everything active, run the following test sequence from the Cloud PC:
- Open Edge on the Cloud PC and navigate to
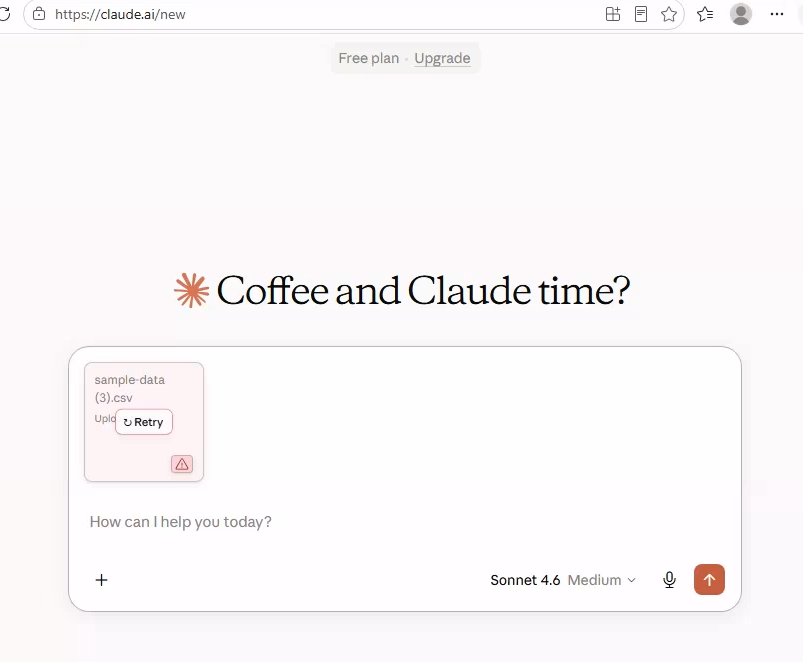
claude.ai. The site should load fully (chat interface, navigation, all UI elements) this confirms that the precision API routing is working and the FQDN is not blocked. - Attempt to upload a test file containing synthetic credit card numbers (use actual-format but fake numbers from a test data generator) to Claude via the file upload button. The upload should be intercepted and blocked by the Purview DLP policy.
- Navigate to
dlptest.comand attempt to upload the same test file. This tests the baseline Purview inspection on a neutral domain. - Navigate to a gambling site. You should receive a block page from the Web Filtering policy, not a connection error a block page means the policy is correctly intercepting the request before it reaches the destination.
- Attempt to trigger a TLS certificate error by navigating to a site that would normally show a certificate warning. With the inspection CA correctly in the LocalMachine store, this should resolve cleanly.
11.2 Reviewing Activity in Purview
Navigate to Purview > Data Loss Prevention > Activity Explorer. Filter by:
- Date range: Last hour (to catch your test events)
- Location: Inline web traffic
- Activity: DLP rule matched
Each matching event should show you the SIT type that triggered, the user, the destination, and the action taken. This is your audit trail and your tuning data — if you see false positives here, adjust the SIT confidence levels or add exclusions before widening the policy scope.
12. Common Issues and How to Fix Them
| Symptom | Root Cause | Fix |
|---|---|---|
net::ERR_CERT_AUTHORITY_INVALID errors | Root CA in CurrentUser store, not LocalMachine | Import-Certificate -CertStoreLocation Cert:\LocalMachine\Root |
| Site UI loads but chat/uploads fail | Same as above background API calls can’t validate the inspection CA | Same fix |
| Blob URL download not blocked | Network DLP has no network event to inspect | Add Endpoint DLP policy scoped to Devices |
| S3-hosted file downloads bypass DLP | AWS traffic not routed through GSA | Add *.amazonaws.com to GSA internet access destinations |
| GenAI site completely inaccessible | FQDN block instead of precision endpoint targeting | Switch to wildcard API endpoint rules in GSA File policy |
| DLP policy not triggering on test uploads | SIT confidence too high, or test data isn’t realistic enough | Lower confidence threshold in Audit mode and review Activity Explorer |
| Prompt Injection policy not appearing in profile | Licensing gap requires specific Microsoft E5 or Security add-on | Verify license assignment in the Entra admin center under License |
| Activity Explorer shows no events after testing | Latency in event ingestion (can take 15–30 minutes) | Wait and refresh; if still empty after 30 min, check policy Active status |
13. What This Deployment Gets You
After completing this deployment, you have the following security controls active and verifiable:
Network plane controls (GSA):
- Category-based URL filtering for broad acceptable use policy enforcement
- Real-time TLS inspection on all HTTPS traffic with user experience preserved
- Threat intelligence blocking against known malicious destinations
- Prompt injection protection on traffic to AI endpoints
- Precision file upload interception on Claude and Gemini without blocking general site functionality
Data plane controls (Purview DLP):
- Inline DLP blocking on sensitive data uploads through any browser via the GSA proxy
- Browser-level DLP through Edge for Business with native user experience
- AI interaction capture through DSPM for AI for governance and visibility
- Endpoint DLP coverage for blob URL disk-write operations that bypass the network layer
What this deployment does not get you:
- Coverage for traffic that doesn’t go through the GSA client (unmanaged devices, personal devices accessing corporate SaaS directly)
- Content inspection on encrypted messaging apps that use certificate pinning and bypass TLS inspection
- DLP coverage on data in motion within Microsoft 365 services themselves (that’s a separate set of Purview policies scoped to Exchange, SharePoint, and Teams)
Those gaps are solvable, but they’re separate problems requiring separate controls. The architecture built here is the network and identity perimeter layer. It pairs with device compliance policies, Microsoft 365 DLP, and information barriers to form a complete data governance posture.
finish